CommPortal: Administrator Guide
In depth guide for the CommPortal for Administrators.
- Business Group Administrator Login and Overview
- Accessing the CommPortal BG Admin Interface
- Logging into CommPortal BG Admin
- CommPortal BG Admin Overview
- Send Feedback
- Managing Subscribers
- Managing lines with BG Admin
- Working with your Business Group Lines
- Resetting a Business Group Line
- Moving lines between departments
- Logging into a user's account
- Managing Phones & Phone Profiles
- Managing Phones As Administrator
- Business Group Profiles
- Subscriber Phone Profiles
- Provisioning Phones
- Managing Short Codes
- Viewing Short Codes
- Moving Short Codes to Another Department
- Adding Short Codes
- Modifying Short Codes
- Managing Extensions
- Managing Hunt Groups (Multi Line Hunt Groups (MLHGs))
- Viewing Hunt Groups
- Moving MLHGs to another department
- Viewing and modifying Hunt Groups
- Hunt Group Pilots
- Hunt Group Members
- Settings
- Music On Hold
- Music On Hold (MoH)
- Logging In
- Viewing and Changing Your Security Settings
- Managing Recordings
- Assigning Recordings To Lines
- Managing Call Pickup Groups
- Viewing Call Pickup Groups
- Moving Call Pickup Groups to Another Department
- Adding Call Pickup Groups
- Deleting Call Pickup Groups
- Viewing and Modifying Call Pickup Groups
- Settings
- Viewing Business Group Call Reports
- Account Codes
- Viewing and Modifying Account Code Setting
- Setting Individual Line Properties
- Configuring Account Codes
- Viewing and Modifying Account Code Settings For a Line
- Unblocking Account Codes
- Cloud Contact Centre
- Departments
- Viewing Miscellaneous Settings
Business Group Administrator Login and Overview
This covers the how to access the Business Group Administrator Portal and overview of features
Accessing the CommPortal BG Admin Interface
To configure your Business Group line (subscribers) and to manage their services, a BG Administrator should log in to the CommPortal BG Admin interface using a separate login page to regular users.
BG Administrator: https://commportal.connectbetter.net//bg
BG Subscribers:https://commportal.connectbetter.net/
The BG Administrator login page sends the BG Administrator to the BG Administrator section of the default web UI.
CommPortal is supported on the latest versions of all major browsers and operating systems.
Logging into CommPortal BG Admin
The following shows the CommPortal login page.
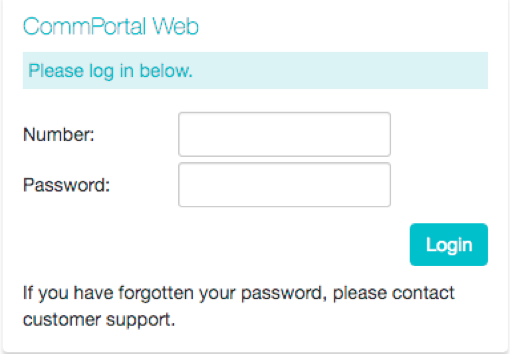
To log into CommPortal, follow these steps:
-
- To access the CommPortal for Administrators point a browser at https://commportal.connectbetter.net/bg
- Enter a phone number with administrative access.
- Enter the password.
- Click on Login.
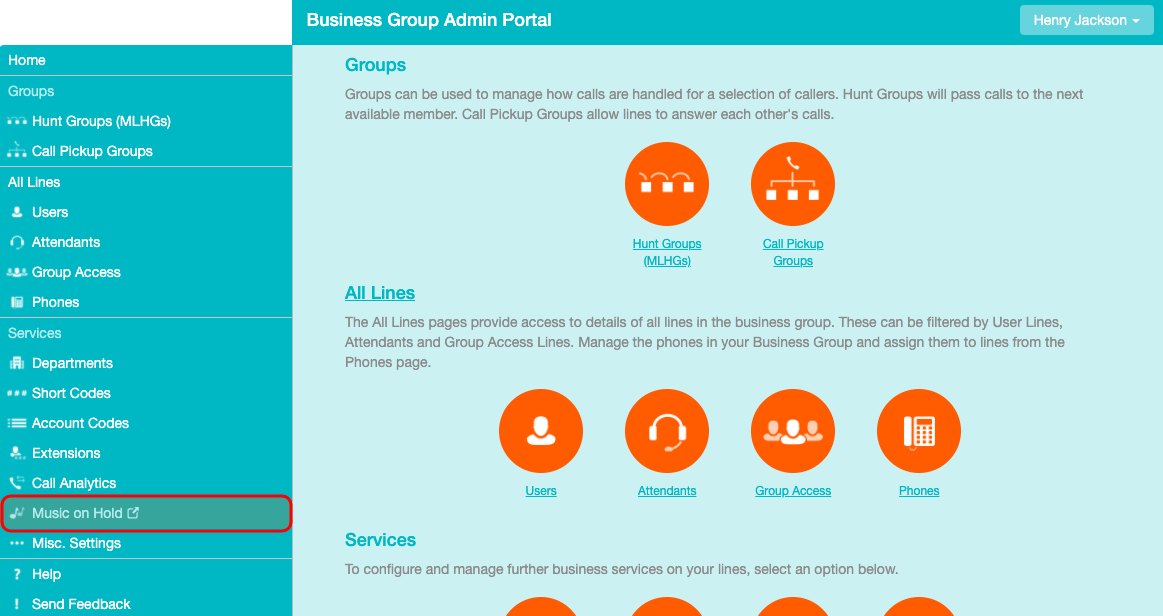
CommPortal BG Admin Overview
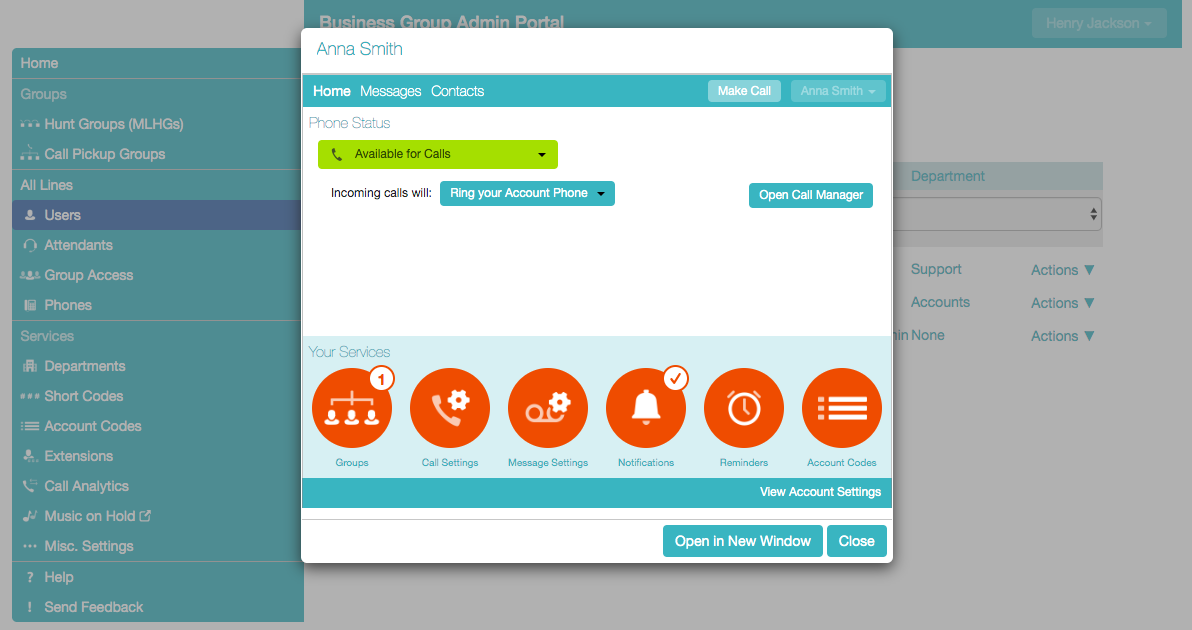
Once you are logged into CommPortal you will see the Business Group Administrator's homepage.
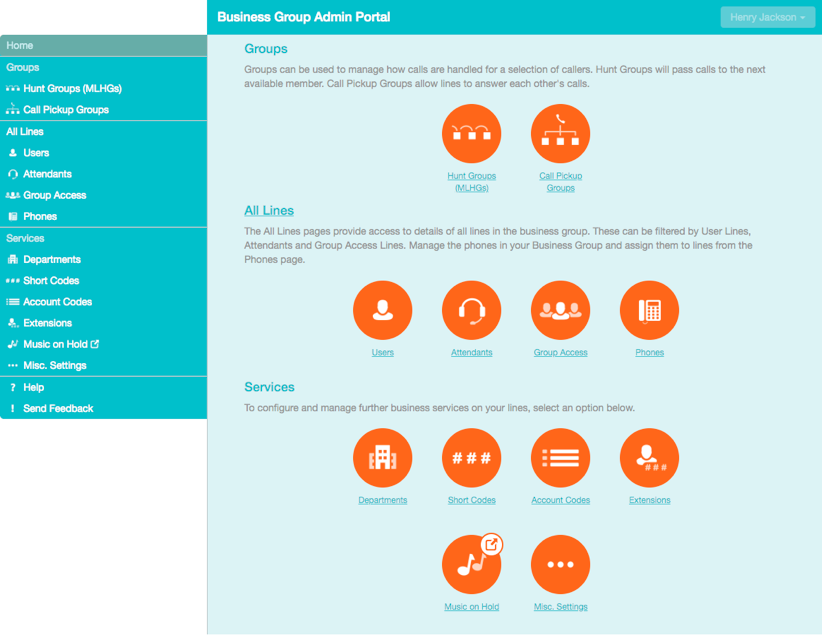
- Down the left hand side of this page are a series of links which take you to the different pages within CommPortal.
- Depending on the configuration of your system, you may not have access to all the services shown on this screenshot. You will only see links to features and services that you can view and manage.
- The main panel shows the same information as the left hand sidebar but as a series of clickable icons.
- The name of the user you are logged in as is shown at the top of the page. Use the drop-down to reveal a Logout
- At the bottom of the left-hand sidebar, you can follow links to
- access Help for the screen you are viewing
- Send Feedback, as described in the next section.
Send Feedback
If you encounter a problem when using the CommPortal BG Admin interface, or have a suggestion for an improvement, you can click on the Send Feedback link and submit a report to your service administrator.
Clicking on the Send Feedback link launches a pop-up.
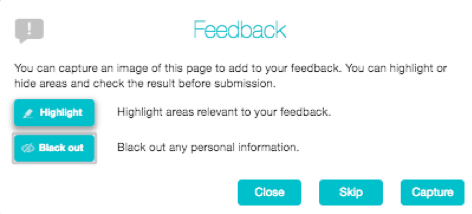
- If you want to include a screenshot of the BG interface: Highlight particular areas of the screen by selecting Highlight, positioning the cross-hatch and then dragging – the area that will be included in the screenshot will be highlighted.
- Use the Black out option to disguise any personal information
- Click Capture.
- If you do not want to include a screenshot, click Skip.
- This launches a second screen, with the screenshot on the right (if you have taken one) and a box where you can add a description of the problem you have encountered or enhancement you would like to see.
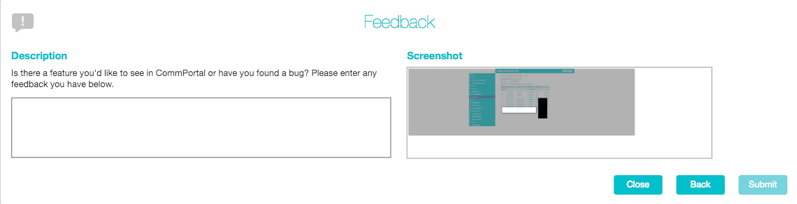
- Click Submit to send your feedback.
Managing Subscribers
This covers how to manage subscribers within your Business Group including logging on to their End User CommPortal to manage their settings.
Managing lines with BG Admin
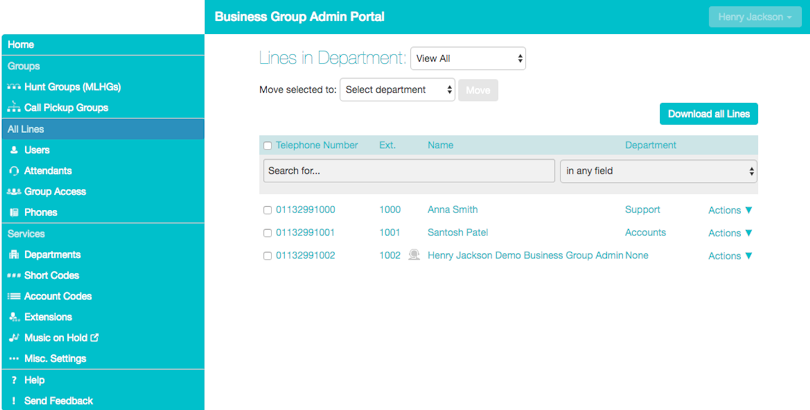
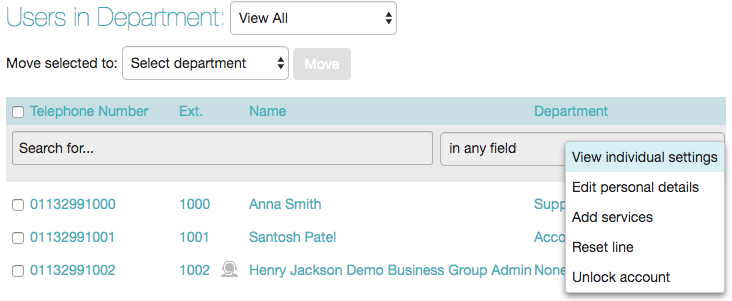
To manage the lines in your Department, click on the All Lines option on the left-hand sidebar.
Business Groups with more than 10,000 lines
Business Groups can support up to a maximum of 40,000 lines. Any Business Group that has more than 10,000 lines will be configured slightly differently as follows.
- If you are a BG Admin in a Business Group that is configured to support more than 10,000 lines, you should note the following:
- All lines must be in a specific Department. You will see a warning if there are any lines that are in the root Department, and will be prompted to move them to a sub-Department.
- If you are an administrator of the root Department for this Business Group, you will not see a list of all lines but will be prompted to select a Department (which could be the root Department).
- If you are an administrator for the entire Business Group, you will see all lines within the Business Group.
Working with your Business Group Lines
If you manage multiple departments or have any sub-departments in your department, you can select the department or sub-department using a drop-down list at the top of the page. This drop-down also includes a search box, which may be useful if you have a large number of departments in your Business Group. As you type a term in the search box, you will possible matches and you can then select the Department you want.
When View All is selected, the screen includes a Department column so that you can see where a particular line is located.
The Download all Lines button on the top right of the screen enables you to download a .csv file giving the name, DN and department of each line, ordered by the department to which the lines belong if you have more than one department.
The Actions drop-down on the far right of each line has some or all of the following options, depending on the type of line. Each option opens a pop-up where you can view or carry out configuration.
- View individual settings or view line settings to view configuration for the selected line
- View group settings for this line (if the Line is a member of a Group, for example a Hunt Group)
- Edit personal details, for example renaming the line
- Add services to the line
- Reset the line.
- Unlock the account.
Resetting a Business Group Line
You can use a reset line option on a Business Group line if you need to allocate this line to a different subscriber. Resetting the line removes all the current data associated with the line, including any call lists.
To reset the line:
- Expand the Actions drop-down alongside the line.
- Select Reset line

This will launch a pop-up where you should:
- enter the name of the new subscriber
- choose whether to use the account name as the local calling name (this is ticked by default)
- choose whether to remove the line from all the groups which the previous subscriber belonged to (this is ticked by default).
Click Apply.
You will then see a confirmation pop-up warning you that resetting the line will lose all the data for the line and cannot be undone.
Click Confirm to reset the line, or Cancel to leave the line unchanged.
If you click Confirm, you will then see a New User Details pop-up showing the new account name, directory number and all the PINs/passwords, which will have been set to randomly generated numeric or alphanumeric sequences.
You can copy and paste this information into an email to send to the new line user.
The new Pod account created for this new subscriber will not yet be initialised and the subscriber will be prompted to set a new CommPortal password and record an initial voicemail greeting the first time they log in.
Moving lines between departments
To move lines between departments, follow these steps:
-
- Select the line using the checkbox to the left of the line
- Select the department you wish to move the line to using the drop-down list at the top of the page.
- Click on the Move button
Logging into a user's account
To log on as a regular user, follow these steps:
- Expand the Actions drop-down to the right of the line, and select View individual settings.
- This will launch the regular CommPortal interface for that line in a new browser window.
For more details on modifying settings on behalf of an individual user see here
Managing Phones & Phone Profiles
This covers the basics for configuring compatible handsets with in the BG Admin CommPortal.
Managing Phones As Administrator
Overview
This will cover the basics in managing and configuring your Phones from the BG Admin Portal.
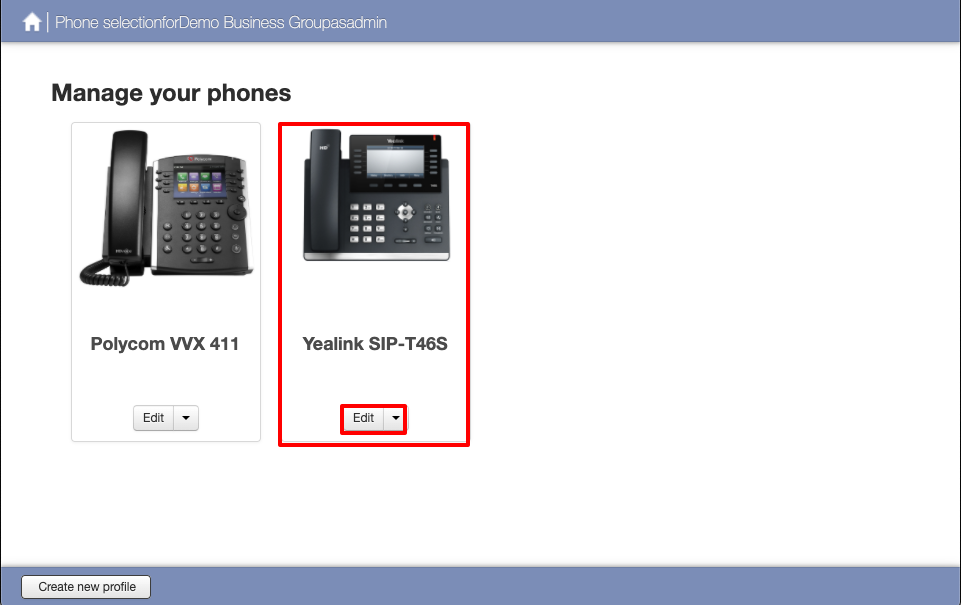
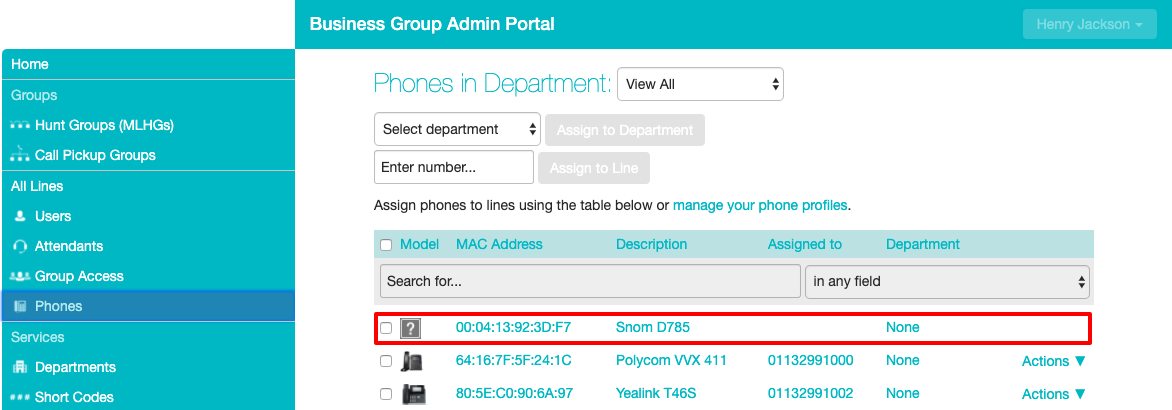
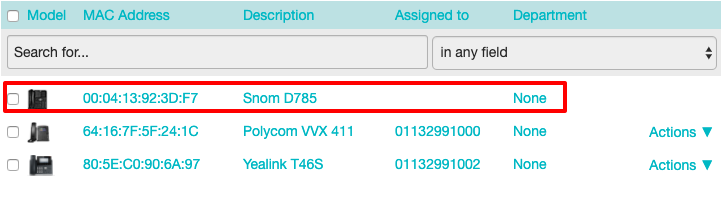
From the BG Admin Portal you can manage your Phones, click on Phones on the left hand side. From here you will see all your phones.
| INFO: You will need to contact your Service Provider to add phones or remove phones from this list. This is done using the MAC addresses of the devices. |
In this example this Business Group has 3 phones. The Polycom VVX 411 and Yealink T46S have been assigned to subscribers. The Snom D785 is not assigned to a subscriber. The portal allows you to provision any phone in this list to any of your subscribers without the need for contacting your Service Provider. To jump to the Provisioning section click here.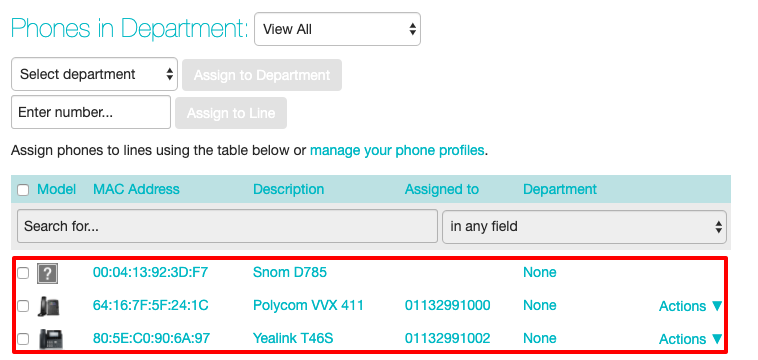
Phone configuration is managed by using Phone Profiles. You have two types of Phone Profiles:
- Business Group Profiles
- Subscriber Phone Profiles
Business Groups Profiles are optional, but are ideal to manage and make changes to devices across the entire Business Group without changing each individual phone profile. You would create one profile for each make and model of device. With Business Groups Profiles you can lock certain settings down to stop individuals making changes to their phone profile.
An example of using Business Group Profile would to enable Hot Desking. This would allow for all phone in your Business Group to use Hot Desking while only need to create one Business Group profile per a device model.
| INFO: Any change made to Business Groups Profiles will goto all phones that use that profile |
Subscriber Phone Profiles these are created per a subscriber when that subscriber first registers on a new device. These profiles will contain the the individual settings like speed dials, monitored extensions etc.
See the Business Group Profiles page and Subscriber Phone Profile for further information.
Business Group Profiles
Phone profiles are split into 2 sections Business Group Profiles and Subscriber Phone Profiles.
| INFO: Adding, modifying and removing of Business Group Profiles can only be done from the BG Admin Portal. |
Business Group Profiles
These are optional, but are ideal to manage and make changes to devices across the entire Business Group without changing each Subscriber phone profile. You would create one profile for each make and model of device.
An example of this would to enable Hot Desking. This would allow for all phones in your Business Group to use Hot Desking while only needing to create one Business Group Profile per a device model.
Lets say you have 15 phones in total 5 Polycom VVX 411, 5 Yealink T46S and 5 Snom D785 to enable Hot Desking this would only need 3 Business Group Profiles to be created.
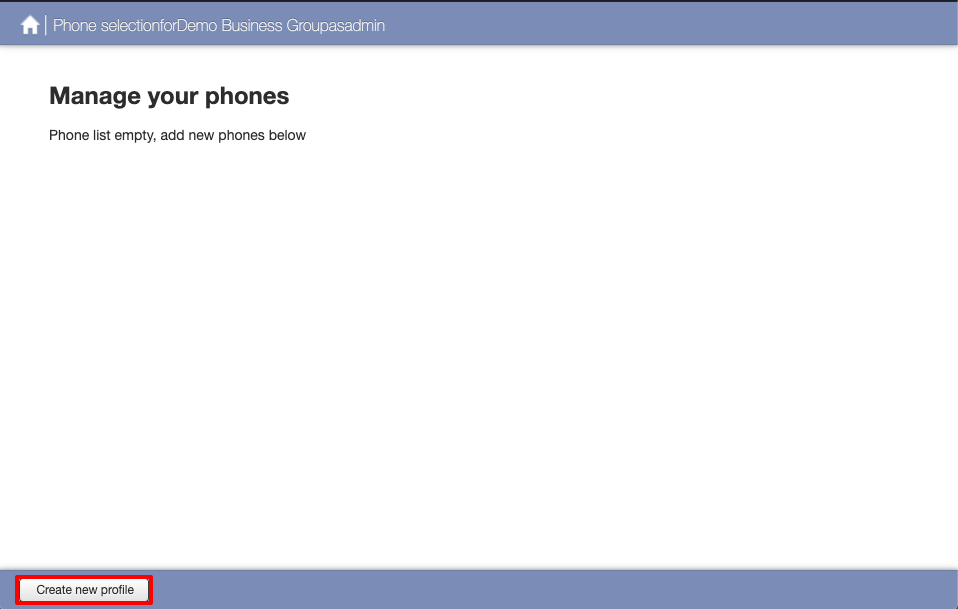
You can create and manage your Business Group Profiles by going to Phones within the BG Admin Portal and clicking on manage your phone profiles. If you have not already created a Business Groups Profile beforehand you will see the following screen. Click on Create new profile.
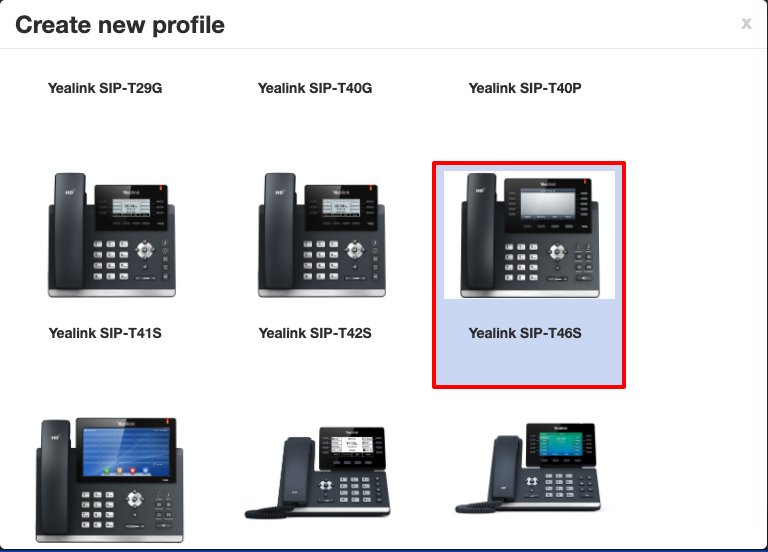
Select the make and model of the phone you would like to add.
|
INFO: You must always select the exact model of your phone. Selecting a Yealink T42S phone profile WILL NOT work with a Yealink T46S phone. |
This will now create the default profile, this is same as the subscriber phone profile as if a subscriber had just registered that device.
Now we can make the changes that will effect all Yealink T46S devices within your Business Group. Click on Edit
This will offer all the functionality and Soft Keys that are available for that device that you would see in the web interface of the phone. While this page does look overwhelming most settings you would not need to be changed. You will be able to search for various settings by using the Search in the right corner, depending on phone model you may be able to click on the soft keys on the phone picture, this will then take you directly to the Soft Key Settings.
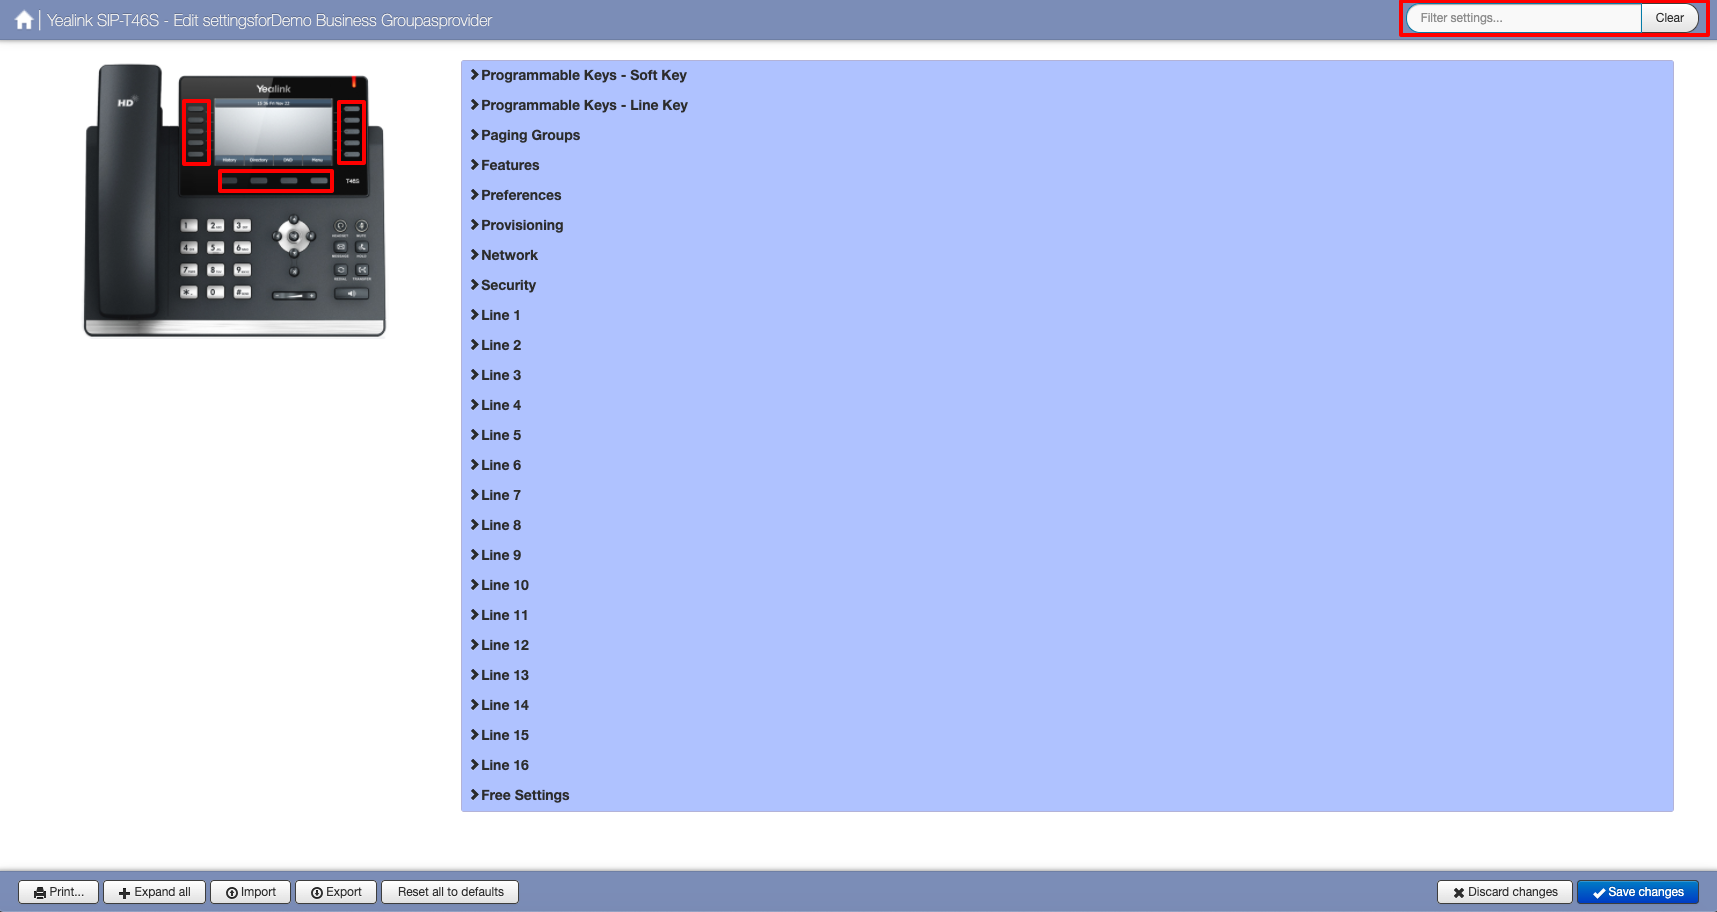
Depending on phone model the options will differ.
An example of using Business Group Profiles would be to set a Speed Dial for the Office Manager for a company, once this has been saved all users that are using the Yealink T46S would have this key set.
In this example we will use Soft Key 10 as the Speed Dial to the Office Manager

Once the changes have been saved, you must now reboot all the phones that are using this profile. Is this case it would all the Yealink T46S devices.
After the phone(s) have rebooted Soft Key 10 will be a Speed Dial with the label Office Manager.
|
INFO: If any of the subscriber have already has assigned Soft Key 10 to another function this will be overwritten when applying the Business Group Profile however they can change this back from the End Users CommPortal. Unless it has been locked. |
To lock a setting so the end user/subscriber cannot change it click on the Padlock icon and change Writable by to Admin and click Apply. Then click on Save changes in the lower right corner.
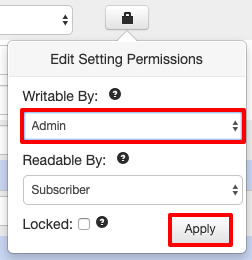
When the subscriber logs into their CommPortal to manage the device and they will see Soft Key 10 grey out and will be unable to change it.

You can also make a setting unreadable to a subscriber, by hiding it from their view, to do this click on the Pad lock icon and change Writable By to Admin and Readable By to Admin then click Apply. Then click on Save changes in the lower right corner.
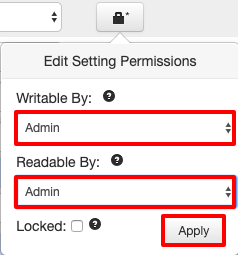
You can see from the screen shot below that Soft Key 10 is no longer visible.

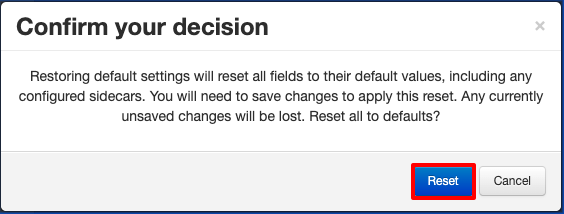
If you have made a mistake in configuring a profile and the phones are not working as expected after been rebooted, you revert all changes by using the Reset all to defaults option.
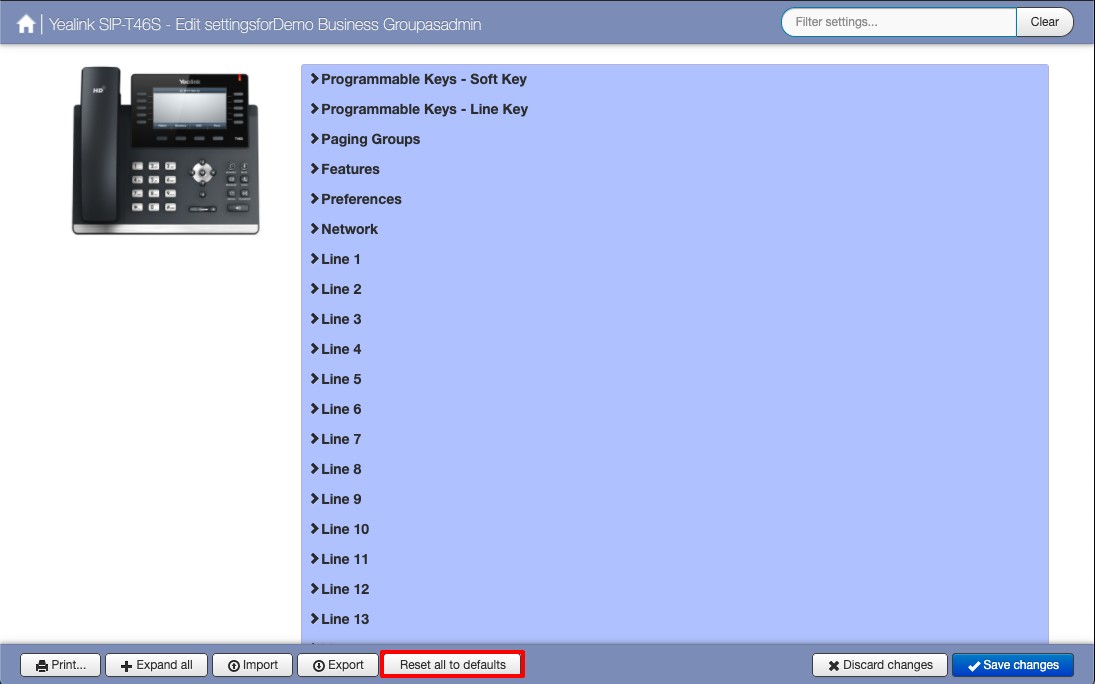
Click on Reset to Confirm. Then click on Save changes in the lower right corner. You must now reboot all devices using this profile.
|
INFO: This will NOT reset the configuration changes the subscriber has made to his subscriber phone profile for example if the subscriber has added several speed dials then these will still remain after rebooting the device as they have been set on the Subscriber Phone Profile unless they have been over written by the Business Group Profile |
Subscriber Phone Profiles
From the BG Admin Portal you can also make changes to Subscriber Phone Profiles directly.
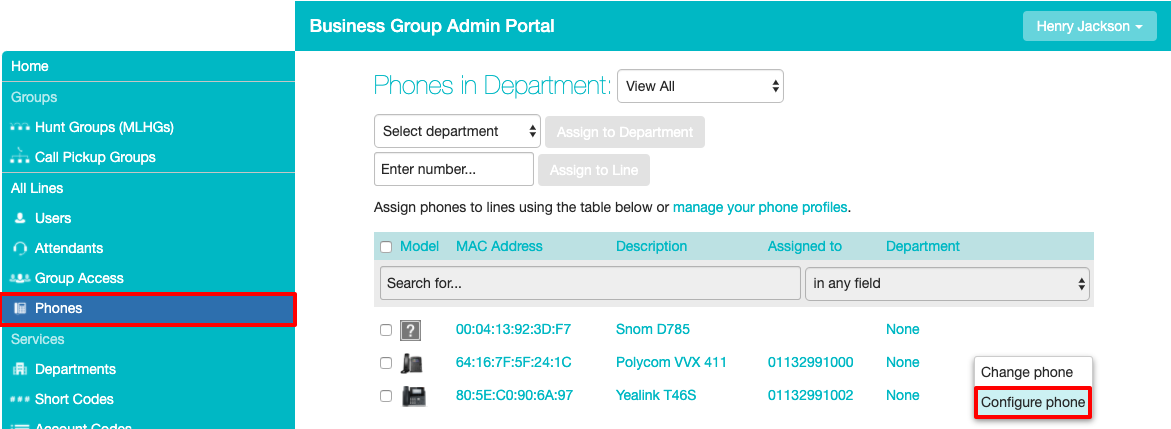
From the Bg Admin portal click on Phones on the subscribers phone you would like to modify click on Actions then Configure Phone.
Click on the Subscriber Phone Profile you would like to edit.
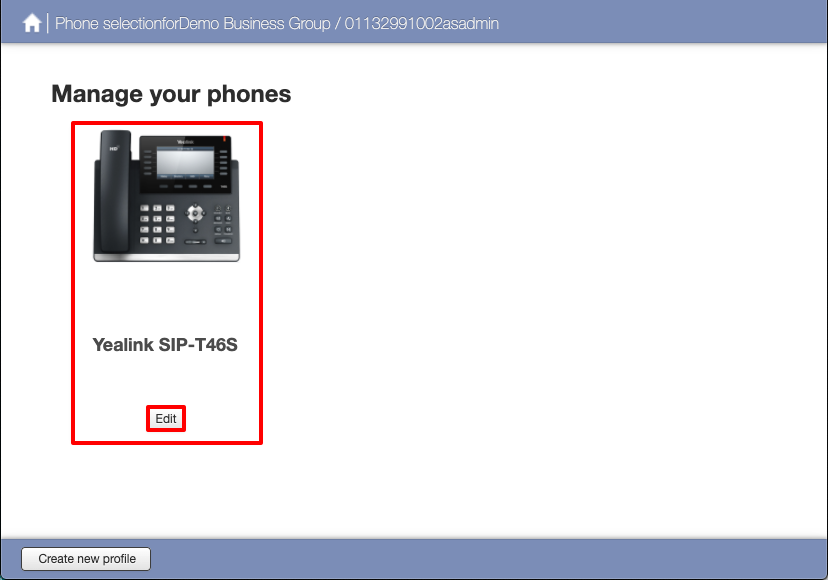
If you have created a Business Group Profile for this model of phone then you will see these changes on this subscribers phone profile. This page is exactly the same as editing the Business Group Profile however any changes made here will only effect this Subscribers Phone Profile after the changes have been saved and the phone has been rebooted.
You can also reset the Subscribers Phone Profile from here as well. Reseting the Subscriber Phone Profile from here will use the Business Group Profile as it defaults. This is useful if the subscriber is having issues after they have made changes to their Phone Profile.
| INFO: If no Business Group Profile is setup for this device than it will restore the original defaults as when it was first provisioned. |
Provisioning Phones
|
INFO: If you are missing phones from this list then you will need to contact your Service Provider with MAC addresses of the devices you would like to be added. You will also need to contact your Service Provider to remove a device from this list. |
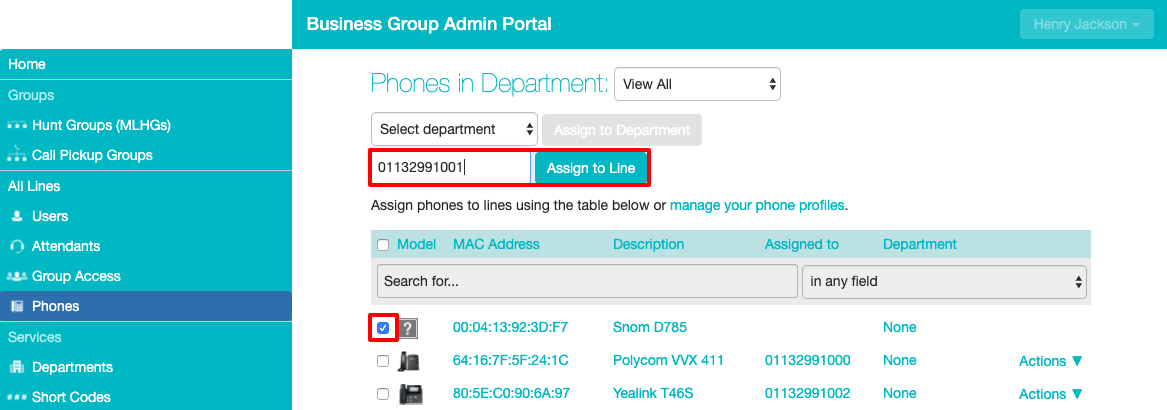
Depending on your order and configuration you may have already provisioned all your phones to subscribers you may also have requested phone to be added but not provisioned to a subscriber. You can see from this example that the Snom D785 has not been assigned to a subscriber.
In this example we are going to to assign the Snom D785 to the subscriber 01132991001. Tick the check box next to phone that you would like to assign, then enter the subscribers phone number and click on Assign to Line.
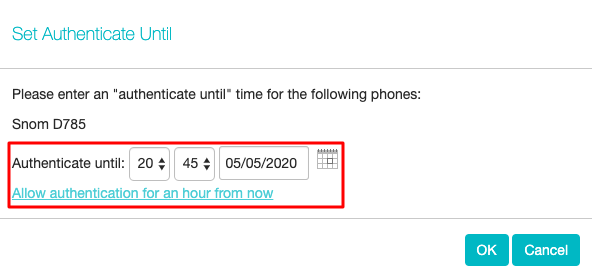
Now we need to set the authentication so the device in question can contact the provisioning server and download the correct configuration for that subscriber. You can either set an Authenticate until time or just click on Allow authentication for an hour from now. Then click OK
|
INFO: We strongly advise against leaving authentication open for more than a couple of hours as this could leave your phones open to attacks from the outside world. |
Next you need to reboot the device for the new configuration to be download. Depending on the firmware on your device is may reboot several times before the configuration has completed and the user is registered. Once the user is registered the phone is ready to be used.
When completed successfully the question mark box next the phone will also change to a picture of that phone.
|
INFO: If the phone fails to download the configuration you may need to speak to your Service Provider to discuss how the phone is been adopted. You may also have to manually configure the phone with the correct provisioning URL. |
Also from this page you remove a subscriber from a phone or change the description, click on Actions and then Change phone

On the Change Phone screen you will be to change the description or remove the phone from that subscriber.
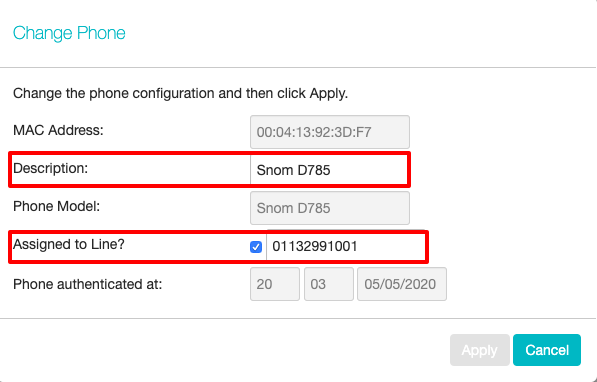
To remove a phone from a subscriber untick the Assigned to Line box and then click Apply.
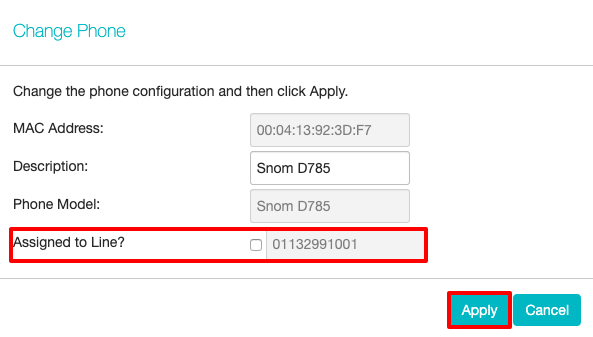
You will now need to reboot the phone to fully remove that subscriber. Once the phone has been removed it is ready to be assigned to another subscriber.
|
INFO: Any changes to the Subscriber Phone Profile for that device will be saved. If you assign the subscriber back to that device they automatically use their existing Subscriber Phone Profile. |
Managing Short Codes
Viewing Short Codes
The Short Codes page displays all of the Short Codes in your department.
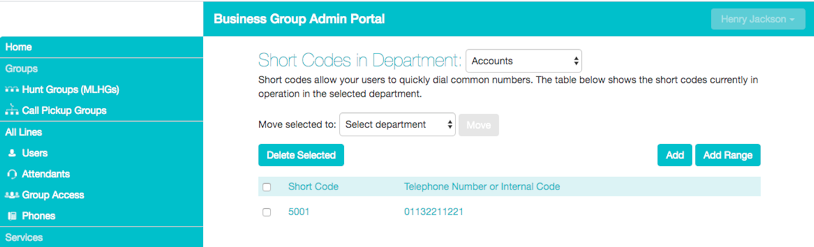
To view Short Codes in sub-departments, select the sub-department from the drop-down list at the top of the page.
To view all of the Short Codes for all departments, select View All from the department drop-down list.
You will only see the Import and Export All buttons if you are a root administrator for the Business Group. These options allow you to add large numbers of short codes and/or short code ranges, and are described in 8, Importing and Exporting short codes. A Business Group can have up to 10,000 short codes and/or short code ranges, of which 1,000 can have names.
Moving Short Codes to Another Department
To move Short Codes between departments, follow these steps:
-
- Select the Short Code or Short Code range using the checkbox to the left of the Short Code or Short Code range.
- Select the department you wish to move the Short Code or Short Code range to using the drop-down list at the top of the page.
- Click on the Move
Adding Short Codes
o create a new Short Code, follow these steps:
-
- Click on Add.
- Enter the number of the Short Code to add.
- Enter the telephone number or internal code the Short Code should dial. Note that if you are going to add a name, you can only have one short code that contains this telephone number.
- If the short code should be in a specific Department, use the drop-down to select it.
- Optionally add a name for this short code. If this short code is configured with a full national or international number, this name will be delivered as CNAM to the Business Group lines if the external DN matches the incoming caller ID.
- Named short codes will also be included in Business Group and CommPortal contact lists, including a Business Address book that can be accessed on the CommPortal interface and on supported SIP phones.
- You can have up to 1,000 named short codes or short code ranges in a Business Group.
- Click on Add.
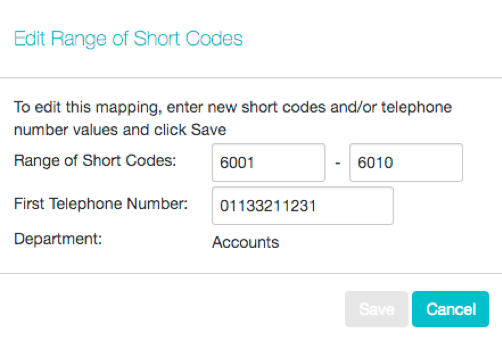
Modifying Short Codes
Short Codes
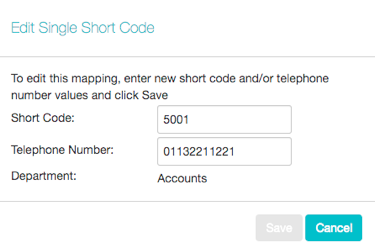
To modify an existing Short Code, follow these steps:
-
- Click on either the Short Code number or the number the Short Code dials.
- Modify the details.
- Click on Save.
Short Code Ranges
To modify an existing Short Code range, follow these steps:
-
- Click on either the Short Code range numbers or the numbers the Short Code range dials.
- Modify the details.
Deleting Short Codes and Short Code ranges
To delete Short Codes and Short Code ranges, follow these steps:
-
- Select the Short Code or Short Code range using the checkbox to the left of the Short Code or Short Code range.
- Click on the Remove Selected
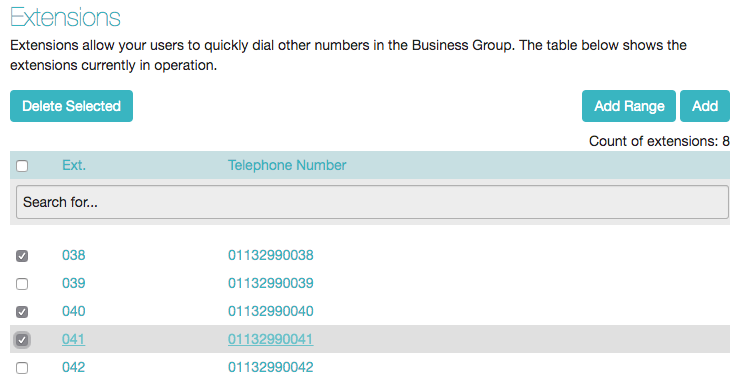
Managing Extensions
Viewing Extensions
The Extensions page displays all of the Extensions in your business.

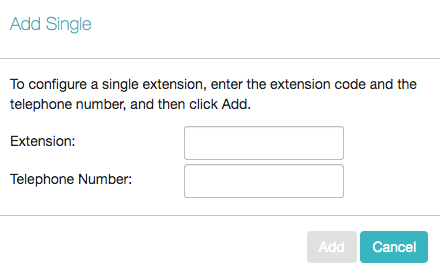
Adding Extensions
To create a single new Extension, follow these steps:
-
- Click on Add.
- Enter the number of the Extension to add.
- Enter the telephone number of the line in your business that this Extension should map to.
- Click on Add.
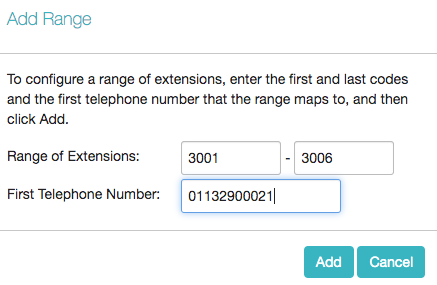
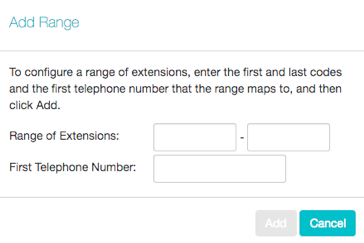
To create a new Extension range, follow these steps:
-
- Click on Add Range.
- Enter the first and last Extension numbers to add.
- Enter the telephone number of first line in your business that this Extension range should map to.
- Click on Add.
Modifying Extensions
To modify an existing Extension, follow these steps:
-
- Click on either the Extension number or the phone number of the Extension.
- Modify the details.
- Click on Save.
To modify an existing Extension range, follow these steps:
-
- Click on either the Extension range numbers or the phone numbers the Extension range dials.
- Modify the details.
- Click on Save.
To delete Extensions and Extension ranges, follow these steps:
-
- Select the Extension or Extension range using the checkbox to the left of the Extension or Extension range.
- Click on the Delete Selected
Managing Hunt Groups (Multi Line Hunt Groups (MLHGs))
Viewing Hunt Groups
The Hunt Groups page displays all of the Hunt Groups in the Business Group or department(s) that you have permission to administer.
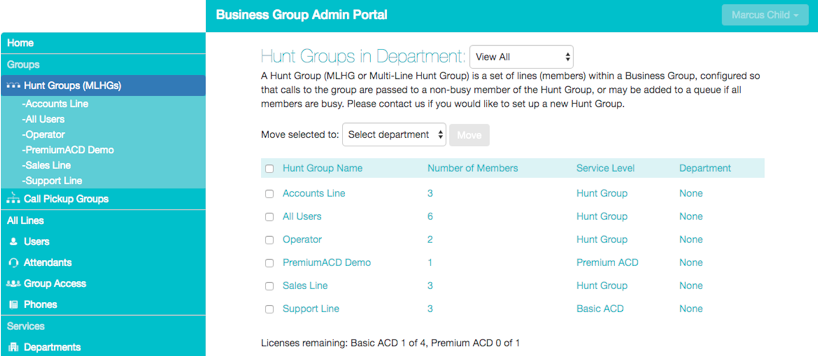
To view Hunt Groups in sub-departments, select the sub-department from the drop-down list at the top of the page.
Moving MLHGs to another department
To move an MLHG between departments, follow these steps:
- Select the MLHG using the checkbox to the left of the MLHG.
- Select the department you wish to move the MLHG to using the drop-down list at the bottom of the page.
- Click on the Move
Viewing and modifying Hunt Groups
To view the details of a Hunt Group and to modify its settings, select that MLHG by clicking anywhere on its entry on the Hunt Groups screen.
This takes you to a series of tabs for that MLHG.
Hunt Group Pilots
The Hunt Groups Pilots tab displays any pilot numbers for this Hunt Group. A pilot number is one which when called, enters this Hunt Group.
Click anywhere on a Pilot Line entry to access the CommPortal interface for this line. This allows you to carry out any configuration on the Pilot line, for example you can enable or disable the Unavailable Call Forwarding service for this line and configure the forwarding number that would be used if all your lines were unavailable, for example because there was a power outage at your site.
Hunt Group Members
This tab displays all of the lines which are members of this Hunt Group. There is an icon for each line which tells you whether each member is currently logged into this Hunt Group. Your deployment may be configured so that Hunt Groups can contain lines that are external to your Business Group.
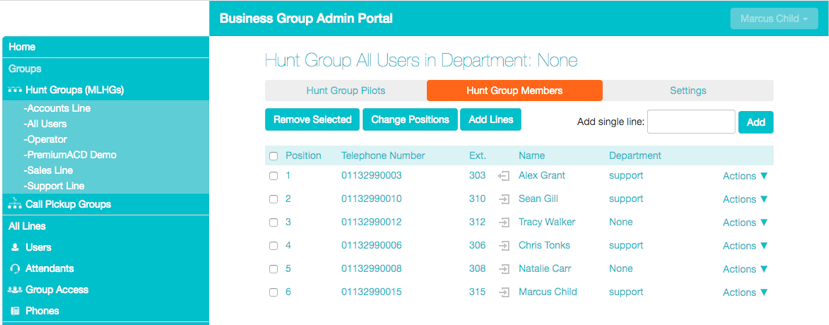
Adding lines
- To add lines to the Hunt Group, perform one of the following two steps:
- If you know the number, enter it in the text box on the top right and click Add.
- Note that if you want to add an external line to the Hunt Group, you must add it by specifying its full directory number in the text box. You cannot select from a list because this line is not a member of your Business Group.
- You cannot add external lines to an MLHG that uses the Integrated ACD service described in 4.
- If you know the number, enter it in the text box on the top right and click Add.
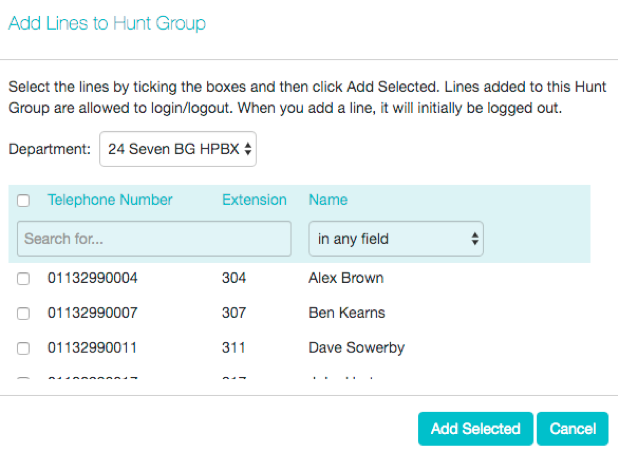
If you don't know the number, click on Add Lines. To select one or more lines to add, use the checkboxes to the left of the lines and click Add Selected
Removing Lines
- To remove a line from the Hunt Group, follow these steps:
- Select the line to remove by using the checkbox to the left of it.
- Click on the Remove Selected
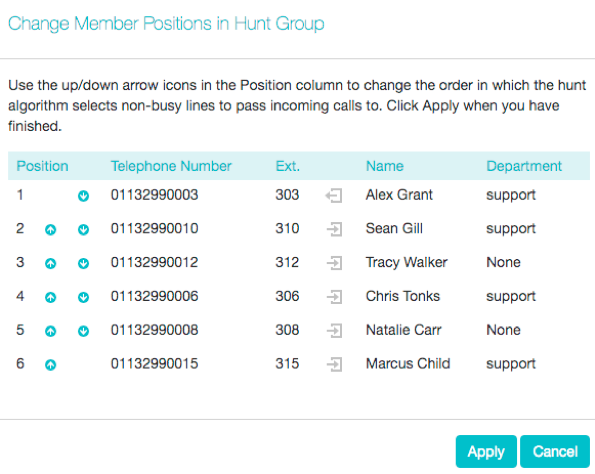
Changing Positions
- To change the positions of lines within the Hunt Group, follow these steps:
- Click on the Change Positions
- Move lines up and down using the icons.
- Click on Apply.
Settings
The Settings tab lets you view and change various settings for the Hunt Group.
Preferences
The Preferences page allows you to rename the MLHG. To rename the MLHG, follow these steps:
-
- Type the new name in the text box.
- Click on Apply.
Hunt settings
The Hunt Settings page allows you to see the call distribution algorithm that is currently in use for this MLHG and other detailed MLHG settings.
You can also use a setting on this page to determine whether the Pilot Line's information (DN and name) is delivered as the Caller ID
Music On Hold
Music On Hold (MoH)
Music on Hold is used for placing a call on hold/transfer or call queueing. This is turned on be default.
The default action for Music on Hold (MoH) is royalty free music. This will play whenever a call is placed on hold or when starting a transfer.
We recommend that you configure MoH to suit your needs - This can be music/announcements in any .wav/.mp3 file.
| INFO: Only the Business Group Administrator can configure MoH from the BG Admin portal. |
Logging In
Log In to the CommPortal BG Admin portal as normal. Click the Music On Hold link at the bottom of the left hand side of CommPortal. This opens up a new browser window with the Music On Hold administration system.
If you are the administrator for the top-level department of your business then you will see three links at the top of the page, each taking you to a different section of the Music On Hold administration system.
- Security – View and configure your security settings.
- Mappings – This section allows you to configure different recordings to be played when different lines within your business put callers on hold.
- Resources – This section allows you to upload and manage your recordings.
If you are not an administrator for the top-level department of your business you will not see Resources as only administrators for the top-level department can manage recordings.
Viewing and Changing Your Security Settings
To view your security settings, select the Security section.
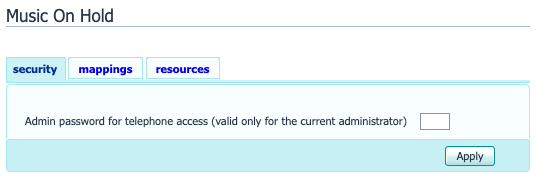
As well as accessing the Music On Hold system using CommPortal, you can also use your phone to access it. Using this page you can view and change the password you will need to enter to use the phone access. To change your password, follow these steps:
-
- Enter the new password in the text box.
- Click Apply.
Managing Recordings
To access the recordings section, click on the Resources
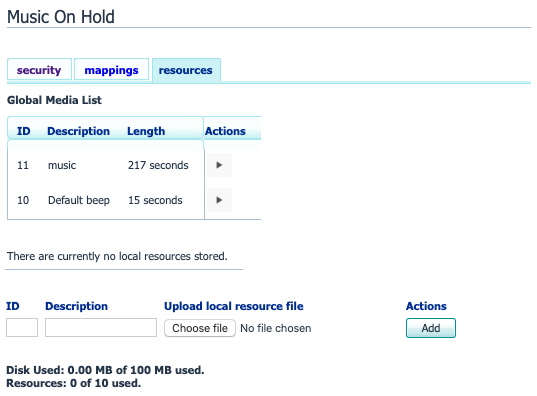
Global Media List
The Global Media List section specifies any recordings that we have made available for your use. Whether we make any recordings available to you depends on which service you have subscribed to. You cannot add or remove recordings from the Global Media List.
Your own recordings
The second section displays any recordings that you have uploaded to the system, either using this web interface or via the phone access.
Recording limits
At the bottom of this section you will see:
- How many MB of storage you have used
- How many MB of storage you are allowed
- How many recordings you have uploaded
- How many recordings you are allowed.
The system will not allow you to exceed either your storage limit or the maximum number of recordings you are allowed.
Recording formats
- You can upload recordings to the system in either WAV or MP3 format.
Adding a recording
To add your own recording, follow these steps:
-
- Enter an ID for this recording in the ID text box. This ID must be between 10 and 99.
- Enter a description for this recording in the Description text box.
- Click on Browse and select the recording you wish to upload. This must be either a .wav or .mp3 file.
- Click on Add.
Depending on the size of the recording you are uploading this process may take a few seconds.
Modifying a recording
To change the description of a recording, follow these steps:
-
- Click on the Edit button to the right of the recording.
- Edit the Description
- Click Save.
- To change the volume at which a recording will play, follow these steps:
- Click on the Edit button to the right of the recording.
- Select a new Gain value from the drop-down list.
- Select 0 to play the recording at its original volume,
- Select +1, +2 or +3 to play the recording louder, with +3 being the loudest.
- Select -1, -2 or -3 to play the recording quieter, with -3 being the quietest.
- Click Save.
Playing a recording
- You can play a recording that you have uploaded by clicking on the ID or Description link for that recording. Note that this will play the recording at its original volume – the Gain setting has no impact on playing a recording through this interface.
- If you want to check the effect of changing the volume of a recording you should log into the phone interface and play the recording from there. For more details on this, see Section 2.1.
Removing a recording
- To remove a recording click on Delete to the right of the recording you wish to delete.
Assigning Recordings To Lines
You can assign recordings either to all lines in your business, or different recordings per line. To do this you need to access the mappings section.
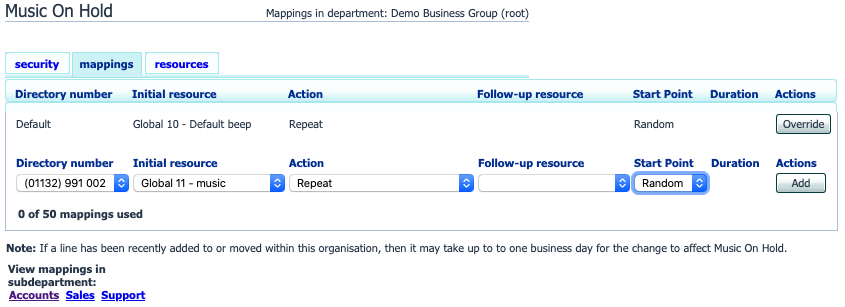
You will now see a list of mappings between the directory numbers of lines in your Business Group or department and the Music On Hold resources that each line uses.
- If the department you are an administrator of has one or more sub-departments, you will see links to these at the bottom of the screen.
- To manage resources for a line that is in a sub-department, click on the link for that sub-department.
- When you have followed the link to a sub-department, an additional link appears at the top of the screen, allowing you to move back up to the parent department
There is always a default mapping, which is used if you don't specify a mapping for a particular line. This is shown first in the list with Default instead of a Directory number and applies to all directory numbers except for those with their own individual mappings in the list. The mappings screen also shows how many individual mappings you are allowed to create.
Each mapping consists of a series of fields which you can set:
- An Initial resource, or recording, which is played when the call is put on hold.
- Optionally a Follow-up resource, or recording, which may be played depending on the Action.
- An Action, which can be one of:
- Repeat – The initial recording is played continually.
- Play Once – The initial recording is played once, and then the follow-up recording is playing continually.
- Repeat – Initial Interrupted – The initial recording should be interrupted at set intervals by the follow-up recording. This could be used to interrupt music with an announcement indicating that the user is in a queue.
- Repeat – Follow-up Interrupted – The initial recording is played first. Then the follow-up recording plays continually being interrupted by the first recording.
The Start point field indicates whether the recording will start at the beginning (the value Start indicates this) or whether it should start at a random point of the recording (the value Random indicates this).
The Duration field which is used by the Repeat – Initial Interrupted and Repeat – Follow-up Interrupted actions to indicate how often the repeated recording should be interrupted.
In general, your Service Provider will configure a Default resource to be played as a single, repeating resource.
If you are an administrator for the whole Business Group, you can override this mapping for the whole group and all its departments, to use a different resource or a combination of resources.
If you are an administrator for a department within the group, you can override the default mapping for your department and any sub-departments.
If you have not changed the default, it appears with an Override button to the right (instead of the Edit button shown for other mappings).
Adding a mapping
To add a mapping for a particular line, follow these steps:
- Use the Directory number, Initial resource, Action, Follow-up resource, Start Point, and Duration drop-downs to set these fields (located to the left of the Add button).
- Click on Add.
Modifying a mapping
To modify either the default mapping, or the mapping for a line, follow these steps:
- To change the default mapping that was supplied by your Service Provider or inherited from a higher-level department, click the Override button to the right of the mapping.
- If you were overriding the default mapping, the Override button is now replaced by Edit and Use Default
To change any other existing mapping, including the default mapping if you have already overridden it, click Edit to the right of the mapping.
- Modify the fields.
To revert to the existing default mapping that was supplied by your Service Provider for the whole Business Group, or the default mapping for your department if you are a department administrator, click the Use Default
- Click on Save.
You cannot modify the telephone number that a mapping applies to. If you need to do this, remove the mapping and add a new one.
Removing a mapping
To remove a mapping click on the Delete button to the right of the mapping. You cannot delete the default mapping but you can override it, edit it, or revert to the original default that was inherited from Service Provider settings or from a higher-level department.
Managing Call Pickup Groups
Viewing Call Pickup Groups
The Call Pickup Groups page displays all of the Call Pickup Groups in your department.
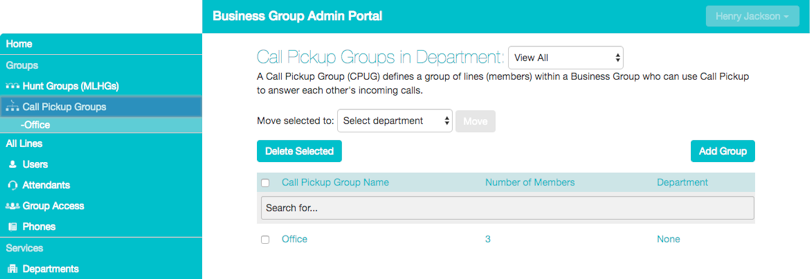
To view Call Pickup Groups in sub-departments, select the sub-department from the drop-down list at the top of the page.
Moving Call Pickup Groups to Another Department
To move Call Pickup Groups between departments, follow these steps:
-
- Select the Call Pickup Group using the checkbox to the left of the Call Pickup Group.
- Select the department you wish to move the Call Pickup group to using the drop-down list at the top of the page.
- Click on the Move
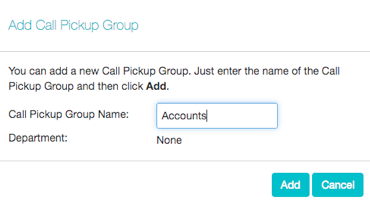
Adding Call Pickup Groups
To create a new Call Pickup Group, follow these steps:
- Select the Department to which you want to add the Call Pickup Group.
- Click on Add Group.
- Enter the name of the new Call Pickup Group in the text box.
- Click on Add.
Deleting Call Pickup Groups
To delete a Call Pickup Group, follow these steps:
- Select the Call Pickup Group using the checkbox to the left of the Call Pickup Group.
- Click on the Remove Selected
Viewing and Modifying Call Pickup Groups
To view the details of a Call Pickup Group and to modify its settings, follow these steps:
-
- Select that Call Pickup Group by clicking on its entry.
- This takes you to the page for that Call Pickup Group.
Managing Call Pick Up Group Members
The Members tab displays all the lines in this Call Pickup Group.
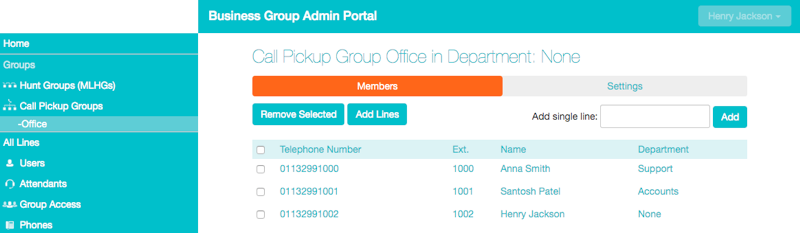
Adding lines
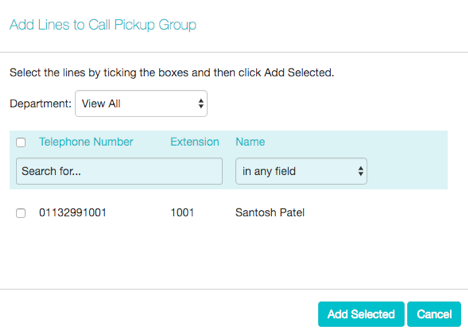
To add lines to the Call Pickup Group perform one of the following two operations:
- If you know the number, enter it in the text box on the top right and click Add.
- If you don't know the number, click on Add Lines. To select one or more lines to add, use the checkboxes to the left of the lines and click Add Selected.
Removing Lines
To remove a line from the Call Pickup Group, follow these steps:
-
- Select the line to remove by using the checkbox to the left of it.
- Click on the Remove Selected
Settings
The Settings tab lets you view and change the name of the Call Pickup Group. To change the name, follow these steps:
- Enter the new name in the text box.
- Click Apply.
Viewing Business Group Call Reports
Business Group Call Logs
You will be able to export raw call logs in CSV format containing details of all calls made (up to a month at a time) to and from the lines within your Business Group. This includes calls to MLHGs within the Business Group or department. The reports can be filtered by date and department.
- You can then import these call logs into other programs, for example Microsoft Excel, for analysis and further processing. When using Microsoft Excel, you should use the Import Data menu option and change the data format of all telephone number columns to text to ensure that the telephone numbers in the call logs are displayed correctly.
To download call logs:
- From the BG Admin page select the Call Analytics link from the left of the page. You will see the following screen.

- Enter the start and end dates in the boxes provided. You can download Call Logs for a time frame of up to 30 days.
- Use the dropdown to select the department for the call logs that you would like to see.
- Click the Download The report will be downloaded on to your computer.
Account Codes
Viewing and Modifying Account Code Setting
Account Codes are not enabled by default. Please contact your Administrator for further information. Viewing and modifying account code settings.
Modifying call types requiring account codes
Use the checkboxes on the Account Codes page to specify which types of calls will require account codes:
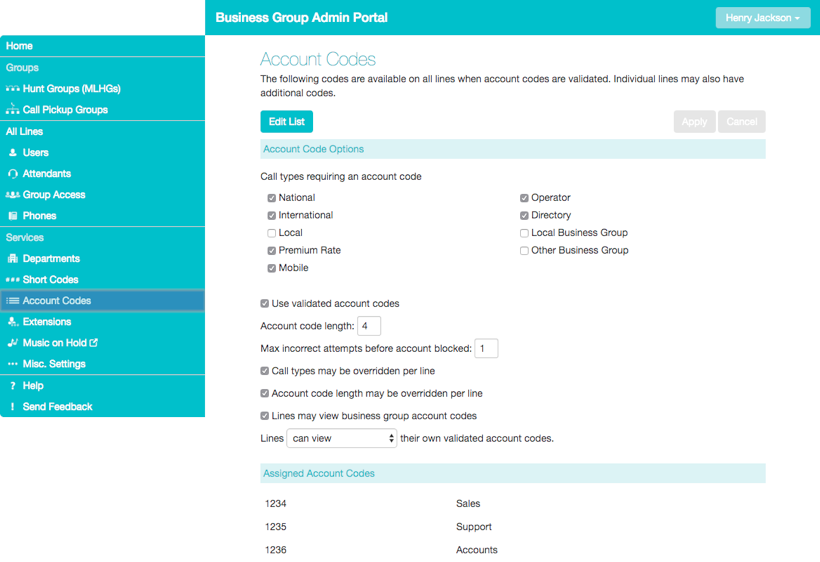
- National – Whether account codes are required for long distance calls.
- International – Whether account codes are required for calling international numbers.
- Local – Whether account codes are required for local calls.
- Premium Rate –Whether account codes are required for premium rate (1-900 number) calls.
- Mobile - Whether account codes are required for mobile calls.
- Operator – Whether account codes are required for operator calls.
- Directory – Whether account codes are required for directory (411) calls.
- Local Business Group – Whether account codes are required for local calls to other numbers within your business. Normally calls within your business will be local calls, but if you have multiple sites calls between numbers may be regional or national calls. In this case you need to use the Other Business Group setting.
- Other Business Group – Whether account codes are required for non-local calls to other numbers within your business
Note: You cannot require an account code for emergency calls, toll-free calls, or calls to service access codes.
Once you have selected the call types, click Apply to save your changes.
Choosing Validated or Non-validated Account Codes
To use Validated Account Codes, follow these steps:
-
- Check Yes after User validated account codes.
- Click Apply.
To use Non-validated Account Codes, follow these steps:
-
- Check No after User validated account codes.
- Click Apply.
Setting Account Code Length
To specify the length that should be used by your account codes, follow these steps:
- Enter the length in the text box after Account code length:
- Click Apply.
Blocking Access After Incorrect Account Codes
If you are using Validated Account Codes, a user's phone line will be blocked after an incorrect account code is entered too many times in succession. To change the number of incorrect entries the user is allowed, follow these steps:
-
- Enter the value in the text box after Max incorrect attempts before account is blocked:
- Click Apply.
Setting Individual Line Properties
To specify whether various settings can also be specified for each line in your business, perform one of the following operations.
- To allow which types of calls require account codes to be changed for each line, check Call types may be overridden per line.
- To allow the length of account codes to be changed for each line, check Account code length may be overridden per line.
- To allow lines to view the account codes that you have defined for the whole business, check Lines may view business group account codes.
- Set whether each line should be able to view, or both view and change, or not view their own account codes by selecting the relevant setting from the dropdown list at the bottom of the Account Code Options section.
- If you want to have per line account codes, but don't want the user to be able to configure these, configure these by logging on to CommPortal as that user.
- Once you have made your changes, click Apply to save them.
Configuring Account Codes
To modify the account codes, click on Edit List at the top of the Accounts code page.
The following screen appears
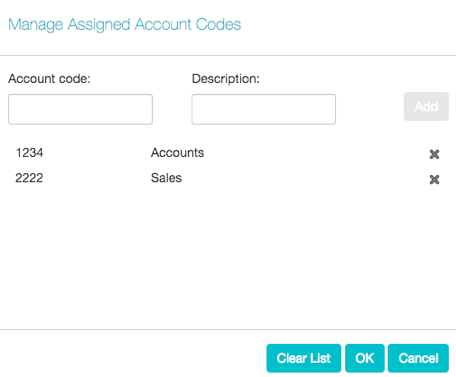
To add an account code, follow these steps:
- Enter the code in the Account code text box.
- Enter the description in the Description text box.
- Click on Add.
- To remove an account code, click the delete icon to the right of the account code.
- To change the description of an account code, remove it and then re-add it with the new description.
- Once you have finished making changes, click on OK.
- To save your changes you must now click Apply.
Viewing and Modifying Account Code Settings For a Line
If you want to view or change a particular line's account code settings, follow these steps:
- Change the settings to allow you to do this as described in here
- Go to the Lines page in CommPortal and log in as the line whose settings you wish to change. Information can be found here.
Once you have logged in as this user, follow the instructions for modifying account codes in CommPortal End User Guide.
Unblocking Account Codes
If a subscriber has entered an incorrect account code too many times they will become blocked. To unblock a subscriber please follow these instructions:
- Login into the CommPortal as the Administrator
- Click on Users from the menu on the left.
- On the user that has been blocked click on Actions then View individual settings
- This will open a new window where you can view the settings for that subscriber.
- Click on Account Codes. You can also click on Open in New Window this will open a full sized window that may be easier to work with.
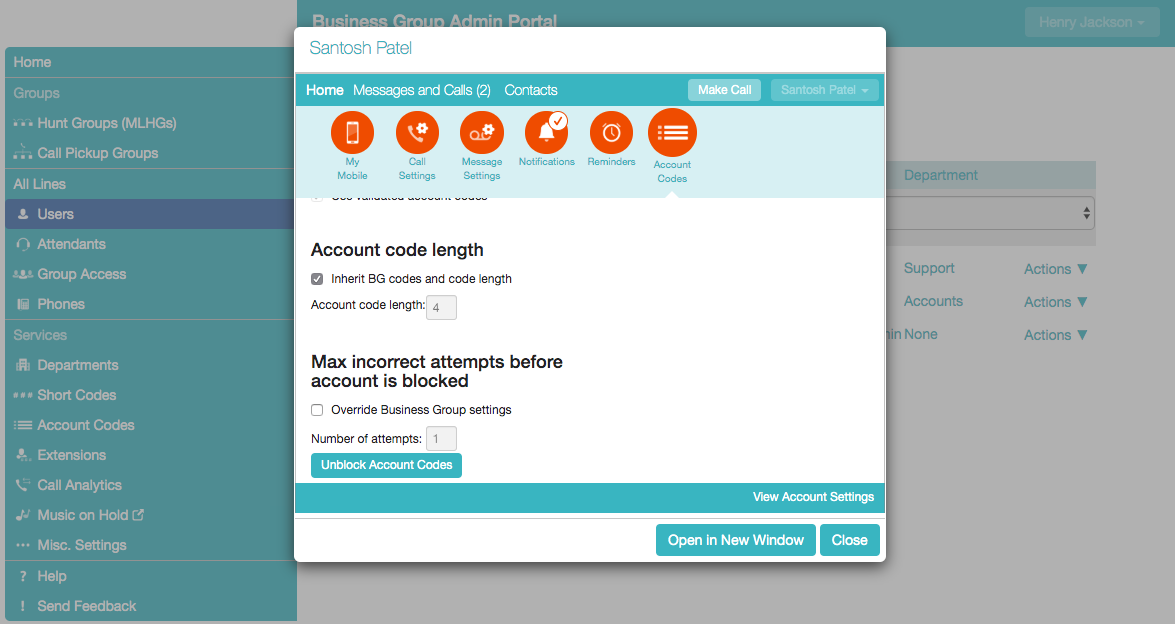
- Scroll down and click on Unblock Account Codes. The pop window will refresh, then click on Close the subscriber is now unblocked.
- Please request the subscriber to retest his line.
Cloud Contact Centre
Cloud Contact Centre
If you have the Cloud Contact Centre (ServicePlus or PeoplePlus) feature in your deployment, the Supervisor Dashboard link on the left-hand menu in CommPortal allows you to access detailed current and historical information about the call queues and agents in the MLHG(s) that you administer and generate reports.
In this interface, the term 'queue' refers to an MLHG and 'agent' to its members.
Clicking the Supervisor Dashboard button launches the Summary screen in a new browser window.
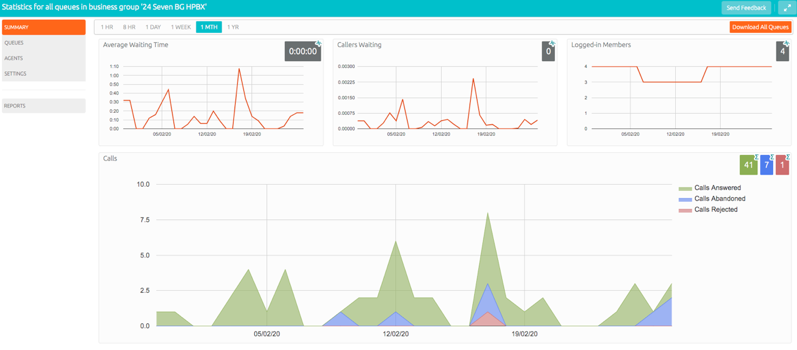
You should refer to your Cloud Contact Centre (ServicePlus or PeoplePlus) documentation for detailed information on the features provided by Cloud Contact Centre (ServicePlus or PeoplePlus), including the configuration options that you can change using the Settings tab on the Supervisor Dashboard.
Departments
Managing Departments
You will see the following screen when you click on the Departments link in the menu on the left of any page in the CommPortal BG Admin interface.
This displays all the departments in your Business Group, along with any configured restrictions on the number of incoming, outgoing or incoming/outgoing calls.
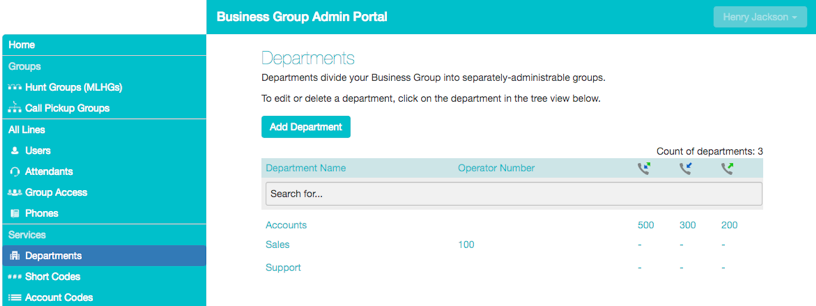
If you have a very large number of departments, you can use the Search for box to find a department. As you type, matching departments are shown, with the matching text highlighted in yellow
Adding Departments
The BG Admin may be able to create departments within the business group. Each Business Group can have up to 1,000 departments or, if it is configured as a Business Group that supports more than 10,000 lines up to 4,000 departments.
To create a department within a business group follow these steps:
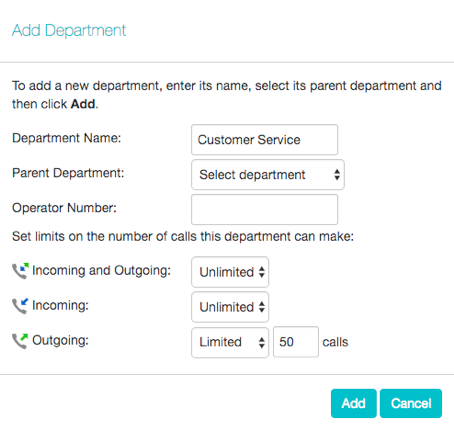
- From the BG Admin Page select the Departments link on the left of the page. Click the Add Department button at the top of the page and the dialog shown above will appear.
- Enter the following information.
- Department Name
- Parent Directory – If this is a top level department, you will use the Business Group Name. If this is a sub department, this will be the upper level department
- Operator Number – Enter the number of the line that will act as operator for this department
- If you plan to limit the number of calls allowed for this department, enter the following information
- Incoming & Outgoing – Enter the total number of combined concurrent calls that this department will be permitted to have active at any given time.
- Incoming – Enter the total number of concurrent incoming calls that this department will be permitted to have active at any given time.
- Outgoing – Enter the number of concurrent outgoing calls that this department will be permitted to have active at any given time.
NOTE: To allow any mix of incoming & outgoing enter the same value in all three fields, or set both the Incoming and the Outgoing fields to Unlimited.
Viewing Miscellaneous Settings
Miscellaneous Settings
The Misc. Settings page allows you to view and change a number of settings associated with your Business Group.

It includes the following tabs.
- Number Blocks
- External Calls
- Call Notifications
- Other Settings
Viewing Number Block settings
The Number Blocks tab displays all of the telephone numbers which we have assigned to your business.
Viewing External Call settings
The External Calls tab lets you view the settings that are in place for calls that are external to your business.
- External Calls – This can take one of the following values:
- Not Permitted – Calls outside of your business are not permitted.
- Unlimited – There is no explicit limit to the number of concurrent external calls you can have, but there may be a limit to either the number of Incoming or Outgoing Calls you can make.
- Limited – There is a limit to the number of concurrent calls you can have to numbers outside of your business.
- Maximum number of external calls – If the value of External Calls is Limited, the value of this setting specifies how many concurrent external calls there may be at any time.
- Incoming Calls – This can take one of the following values:
- Not Permitted – Inbound calls from outside of your business are not permitted.
- Unlimited – There is no limit to the number of concurrent incoming external calls you can have, although you are still subject to any Maximum number of external calls.
- Limited – There is a limit to the number of concurrent calls you can have from outside of your business.
- Maximum number of simultaneous incoming calls – If the value of Incoming Calls is Limited, the value of this setting specifies how many concurrent incoming external calls there may be at any time.
- Outgoing Calls – This can take one of the following values:
- Not Permitted – Outgoing calls to outside your business are not permitted.
- Unlimited – There is no limit to the number of concurrent outgoing external calls you can have, although you are still subject to any Maximum number of external calls.
- Limited – There is a limit to the number of concurrent calls you can have to numbers outside of your business.
- Maximum number of simultaneous outgoing calls – If the value of Outgoing Calls is Limited, the value of this setting specifies how many concurrent incoming external calls there may be at any time.
- Local carrier code – This is a code that identifies which carrier will be used for any local calls your business makes. It is sometimes called PIC2.
- Long distance carrier code – This is a code that identifies which carrier will be used for any long distance calls your business makes. It is sometimes called PIC1.
- International carrier code – This is a code that identifies which carrier will be used for any international calls your business makes. It is sometimes called PIC3.
Viewing Other Settings
- The Other Settings tab lets you view settings for Restricted Subscriber Messaging, the Internal Operator Number, and internal extensions.
- Restricted Subscriber Messaging – This determines whether members of this Business Group can send messages only to other members of the same Business Group.
- Use Internal extensions – This determines whether or not CommPortal displays the Business Group extension number associated with a directory number where possible.
- Internal operator number – This determines the number used to access this Business Group's operator.