Start Up Guide (Readme First)
Here you will find a start up guide designed to give you the best experience with your Unified Communication System.
- Overview
- Logging Into The CommPortal
- Changing the CommPortal Password (Optional)
- Downloading Pod Connect for Desktop/Android/iOS
- Recommended Settings for Pod Connect for Desktop
- Desk Phones
- Voicemail Configuration (Optional)
- Voicemail Configuration Overview
- Using The Voicemail System
- Voicemail Main Menu
- Message Playback Options
- Forwarding a Message
- Replaying to a Message - Dialling the Originator
- Changing Your Voicemail Pin
- Recording Your Personal Greeting
- Music On Hold (Optional)
- Music On Hold Overview
- Logging In
- Viewing and Changing Your Security Settings
- Managing Recordings
- Assigning Recordings To Lines
- Testing Your System
Overview
| INFO: Before starting we strongly advice that you read the IP Requirements page here. Firewall configuration is likely to be required to use Pod on a corporate or VPN network. This information may also be helpful for subscribers having problems connecting to use Pod. |
Welcome to your Pod Unified Communications System.
Your Service Provider may have given you information on setting up, if so you should follow any instructions given by your Service Provider first.
We recommend that you first take the time to read through this Start Up Guide before making any changes. Depending on your package(s) some configuration options may not apply to some or all subscribers (users).
Before you continue, you must have an understanding of what your package consists of and how you would like calls to be managed/routed.
This guide assumes that you have a working internet connection to use with your package, Administrator access to any PC/Laptops that require Pod Connect to be installed and any mobile devices to hand that require Pod Connect.
| TIP: If your package includes Desk Phones you can unpack and connect these phones to your network and power them on before starting. They may need to have a firmware update and require several reboots before they can be used. |
This Start Up Guide will walk you through the following:
- Logging Into The CommPortal
- Changing the CommPortal Password (optional)
- Downloading Pod Connect for Desktop/Android/iOS
- Recommended Settings for Pod Connect for Desktop
- Desk Phones
- Voicemail Configuration (optional)
- Music On Hold (optional)
- Testing Your System
Logging Into The CommPortal
Your Service Provider will have given you all the login details for your subscribers (users). If you have not received any login details please contact your Service Provider before continuing.
This will consist of:
- Phone Number
- Password
|
TIP: If you have multiple users and you are managing the account passwords and security e-mails for your users then you complete the process from one machine for all users. Just log out after completing the steps below for one user, then log in with the next user and repeat. |
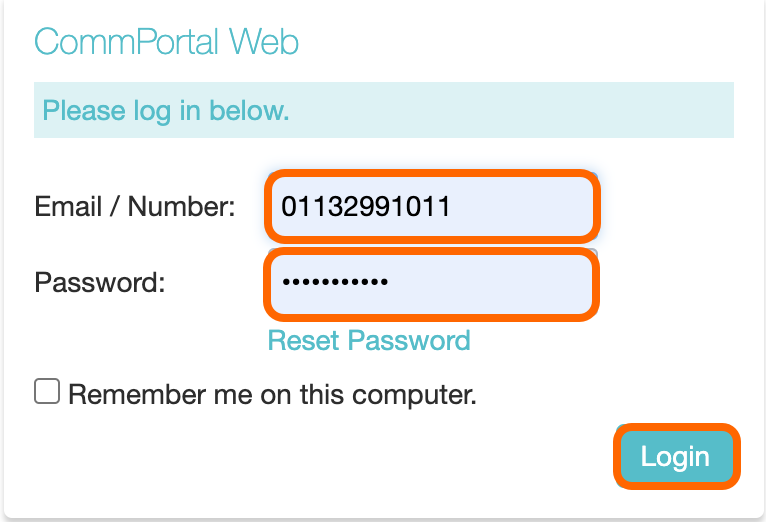
- On a PC/Laptop or compatible mobile device, open a web browser to the following https://commportal.connectbetter.net
- At the login screen enter the Phone Number and Password of the first user. Then click on Login
Next you will required to enter an account e-mail address, this will also be used for security to reset the password.
Enter a valid e-mail address and the password for that subscriber (user). Optionally you can tick the Allow email login enabling this will allow the subscriber to user the e-mail address or phone number to login to the CommPortal.
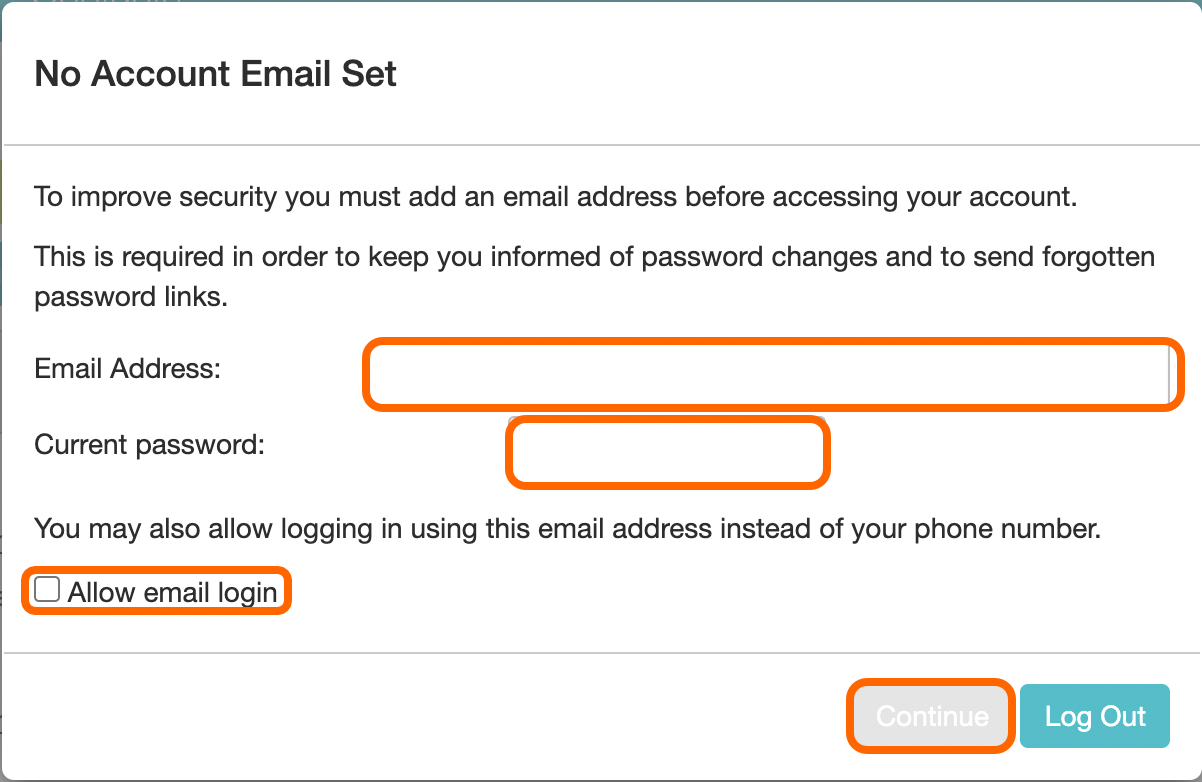
| INFO: It is important that the e-mail address entered is valid and the user has access to this. This will save time if a password reset is required. If Allow email login is enabled then each subscriber will need a unique e-mail address you will not be able to use the same e-mail address on multiple subscribers. |
Click on Continue to save the changes.
|
TIP: More detailed information on the CommPortal can be found here. |
The next stage is optional Changing the CommPortal Password
Changing the CommPortal Password (Optional)
| INFO: Please keep your passwords in a safe place. This password is required to access the CommPortal and is required for both mobile and desktop Pod Connect applications. |
Once logged in the CommPortal scroll down to the bottom of the page and under Security click on Change Password

Next, in the change password box enter your current password then enter a new password, type the new password again in the Confirm new password field.
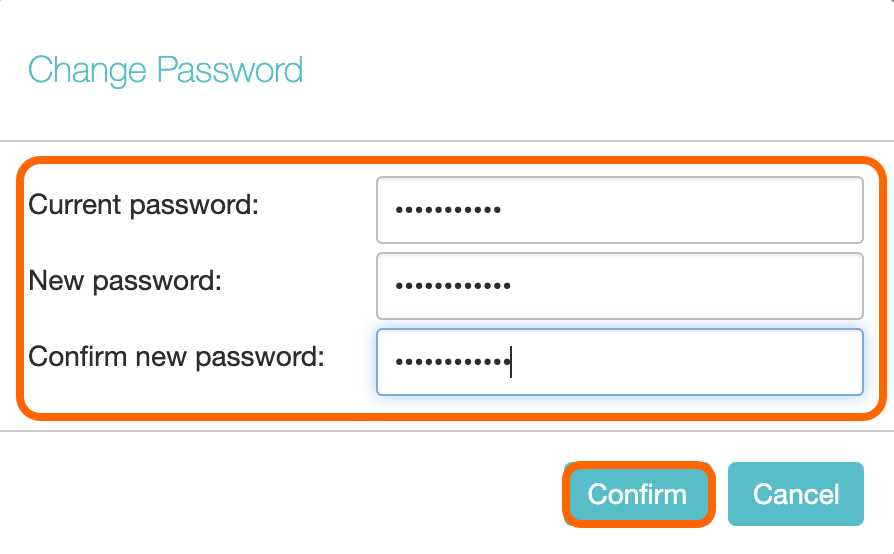
Click on Confirm once completed. You will receive and e-mail to account e-mail address advising tat the password has been changed.
Next continue to Downloading Pod Connect for Desktop/Android/iOS if this is included in your package, if not continue to Desk Phones
Downloading Pod Connect for Desktop/Android/iOS
| INFO: If Pod Connect for Desktop/Android/iOS is not included in you package please skip to the Desk Phones section of this guide. If you would like to know more about Pod Connect for Desktop/Android/iOS please contact your Service Provider. Information on how use Pod Connect for Desktop/Android/iOS can be found here. |
To download Pod Connect for Desktop see this guide for detailed instructions: How Do I Download Pod Connect For Desktop?
- Login to the CommPortal with your new password created previously.
- Click on Downloads
- Click on View Apps
- Click on pod connect
- Download and install the the file following the onscreen instructions for your computer operating system
|
INFO: If you are logging on to the CommPortal from a Windows machine you will only be able to download the Windows version and vice versa if you are logging in on Mac OS. |
|
TIP: If you have multiple machines that require Pod Connect to be installed on you can copy the downloaded file to a USB thumb drive or other media and install from there. This would save time logging into the CommPortal and downloading each time. |
To download Pod Connect for Android/iOS see this guide for detailed instructions: How Do I Download Pod Connect For Android/iOS?
The easiest way to download Pod Connect for Android and iOS device is scan the below QR Code:


- Or the mobile device go to either the Google Play Store or App Store
- In search option, search for Pod Connect
- Tap on Install or Get
Once the Pod Connect Applications are installed you will be able to log in with your phone number and password.
Please continue to the Recommended Settings for Pod Connect for Desktop
Recommended Settings for Pod Connect for Desktop
Whist these settings are optional we do recommend that these are enable and other set to your personal preference.
To access the Pod Connect for Desktop Options:
For MAC - Click on pod connect > Preferences
For Windows - Click on Tools > Options
The Options are are slightly different on both MAC and Windows versions.
The Options will open by default on the General tab.
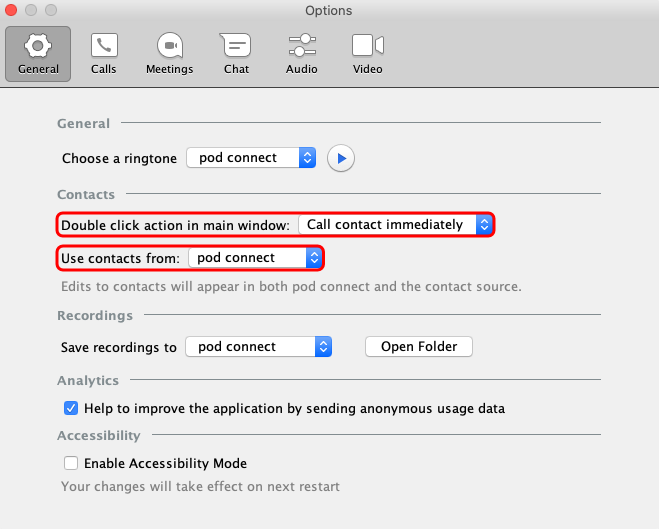
For MAC: General
Double click action in main window: You can choose what happens when you double click on a contact - This is personal preference.
- Call contact immediately (Default)
- Open a chat window
- View contact details
- Invite to meeting
Use contacts from: You can choose which contact you would like to use.
- pod connect - (Default) This will allow you to see any members within you Business Group and any contacts you have added to the CommPortal.
- Apple Contacts - You will see Business Group contacts and any Apple Contact that you have saved.
For Windows: General
Launch pod connect on startup: If ticked this will launch Pod Connect when your Windows PC?Laptop starts up.
Double click action in main window: You can choose what happens when you double click on a contact - This is personal preference.
- Call contact immediately (Default)
- Open a chat window
- View contact details
- Invite to meeting
Use contacts from: You can choose which contact you would like to use.
- pod connect - (Default) This will allow you to see any members within you Business Group and any contacts you have added to the CommPortal.
- Outlook - You will see Business Group contacts and any Outlook Contacts that you have saved.

For MAC & Windows: Calls
Enable call park: If you have Call Park enabled you will need to enable this option to be able to use it from Pod Connect for Desktop. If you do not see this option then Call Park has not been enabled.

| INFO: The Calls options are the same on both MAC and Windows. |
For MAC & Windows: Chat
By default Open the chat window when new messages are received and Display a popup when new messages are received are enabled by default. These should be left on otherwise you may miss a message.
| TIP: If you are hosting a meeting or in a meeting and using screen sharing or remote control you you may wish to disable these options. Otherwise the notifications would be displayed during your meeting. Just don't forget to enable these options again! |
Load messages when opening a new chat window: The default for this is only 10 messages, we recommend that you increase this. The maximum is 140.

For MAC & Windows: Audio
We recommend that you throughly test you microphone and speakers and/or headset. When you connect an external headset you will see pop notification on screen and it may have been auto selected.
Microphone: Select the microphone you wish to use from the drop down list. Now click Test Mic - Speak into the microphone when finished it will be played back to you.
In-call Audio: Select the In-call audio device you wish to use from the drop down list. Now click play button. This will play the default ring tone back to you.
Notifications: This is the device that will play notifications , for example an inbound call. Choose the audio device and click play.
| INFO: If you remove your headset or change it, you may need to come back to the audio options to confirm your settings. |
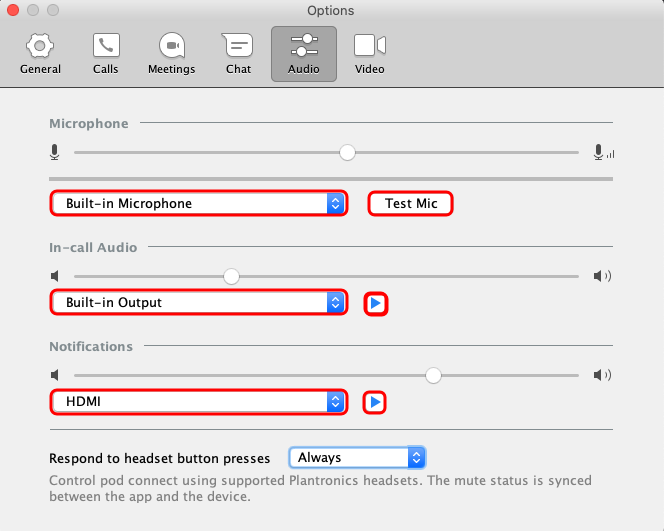
| INFO: The Audio options are the same on both MAC and Windows. |
For MAC & Windows: Video
This will allow view and test you web cam
For MAC & Windows: Meetings
| INFO: If you do not have the Meeting options, please contact your Service Provider to have this enabled. |
Two options worth taking note of are Mute my microphone when joining this is turned off by default. When you join a meeting your microphone will be active. Turn off my video when joining this is enabled by default. When you join a meeting the video is not displayed to other users, you must enable this manually within the meeting.
Email invitation: This allows you to modify the content of the email invite.
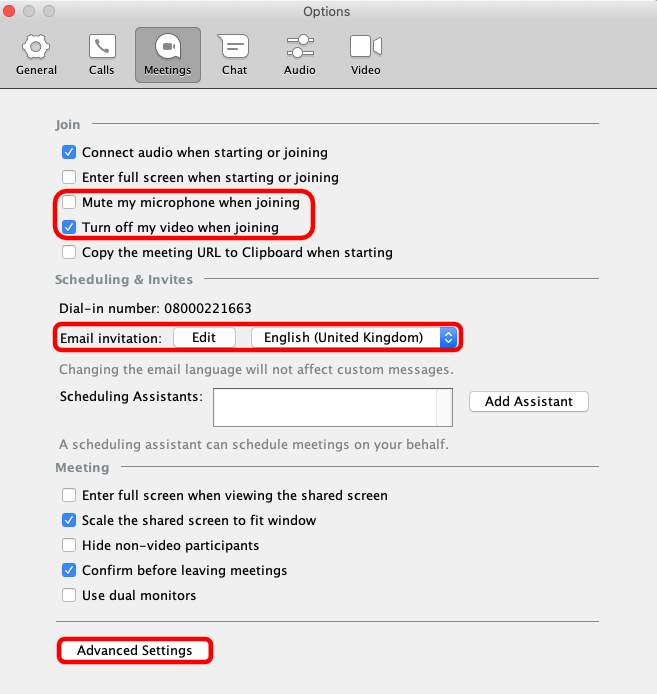
| INFO: On Windows versions you will see an option to download and install the Outlook plugin. This is optional but will give overall better integration with Outlook. |
Advanced Settings: Click on Advanced Settings this will open a new web page. The following settings are enabled by default - Some settings will be locked and cannot be change for additional security:
| INFO: The Attention Tracking option has been has been set to off and cannot be enabled. This feature has been permanently disabled and will be removed from the Options page in a future release. |
-
Require a password for Personal Meetings if attendees can join before the host
- ALWAYS ON - If the meeting organiser selects the "Enable join before host" option for a Personal Meeting, the "Require meeting password" option is also enabled. This prevents unauthorised participants from fraudulently using the meeting ID
-
Generate and require password for participants joining by phone
- ALWAYS ON - Will generate and send new passwords for newly scheduled or edited meetings.
-
End-to-end encryption
- Require that all meetings are encrypted using AES
-
Chat
- Allow meeting participants to send a message visible to all participants
-
Private chat
- Allow meeting participants to send a private 1:1 message to another participant.
-
Annotation
- Allow participants to use annotation tools to add information to shared screens
-
Remote control
- During screen sharing, the person who is sharing can allow others to control the shared content
-
Breakout room
-
Allow host to split meeting participants into separate, smaller rooms
-
-
Screen sharing
- Allow host and participants to share their screen or content during meetings
-
Waiting room
- Attendees cannot join a meeting until a host admits them individually from the waiting room. If Waiting room is enabled, the option for attendees to join the meeting before the host arrives is automatically disabled. Please see the How Do I Use Waiting Rooms document for further information.
-
Show a "Join from your browser" link
- Allow participants to bypass the Meeting application download process, and join a meeting directly from their browser. This is a workaround for participants who are unable to download, install, or run applications. Note that the meeting experience from the browser is limited.
-
Personal Link:
- We recommend that you take the time to choose a Personal Link, This can be changed at anytime. Further information can be found in How Do I Create A Personal Meeting Link (URL)?
We recommend that the you leave the above settings enabled. Feel free to enable other options to see which suits your needs best, all changes will take effect immediately.
|
INFO: With Waiting Rooms enabled as the Host you will need to manually allow participants into the meeting. See the following document How Do I Use Waiting Rooms on how to do this. If you are hosting a large Meeting you may wish to turn this feature off.
Please note that when using joining from a web browser the following web browsers are supported :
*Screen sharing on Microsoft Edge requires Windows 10 Pro or Enterprise. It is not supported on Windows 10 Home. If you are running Windows 10 Home and need to share your screen, we recommend using Chrome or Firefox. |
| INFO: To use all the listed features above you MUST install the AccessionMeetingLauncher for MAC or Windows. Note that the meeting experience from the join from browser is limited. |
Please continue to Desk Phones or if you do not use Desk Phones continue on to Voicemail Configuration.
Desk Phones
If you are not using Desk Phone please skip this section.
You will first need to confirm with your Service Provider as to how your phones will be provisioned. If they are been auto-provisioned and are already powered on and connected to the network they should ready to use, once the updates have completed.
You can check which phones are been auto provisioned from the BG Admin portal. Please take a look at the Provisioning Phones section in the CommPortal: Administrator Guide for information on provisioning phones.
Once the phones have an allocated time to authenticate with the Provisioning Server power them on and connect them to your network. Depending on make and model they may require several updates and restart several times. This is normal behaviour.
If the phones are powered and not reregistered with the correct DDIs (the phone number) please contact your Service Provider. Please make a note of the MAC addresses for each device as they will need to be checked against the Provisioning Server.
|
INFO: If your phone had been used with a previous supplier you will need to factory reset the phone and enter the new provisioning URL exactly as shown below within the phone configuration via the web interface.
Provisioning URLs can vary for each manufacturer :
Polycom: https://commportal.connectbetter.net/sip-ps/ Yealink: https://commportal.connectbetter.net/sip-ps/ Snom: https://commportal.connectbetter.net/sip-ps/{mac}.xml
You will need to know IP address and the admin login username and password for your phone in order to factory reset them. If you do not know this you will not be able reset the device and add the provisioning URL. Please contact your Service Provider as they may be able to assist. |
Additional configuration of the Soft Keys can be found in the CommPortal under devices.
Please continue to the Voicemail section.
Voicemail Configuration (Optional)
Voicemail Configuration Overview
| INFO: Voicemail is enabled on all phone numbers (DDIs) by default is set at 36 seconds. Please also note if you are using the Pod Connect for iOS and Android devices you will receive a persistent notification on that device until you have completed Voicemail setup wizard. |
When you first call Voicemail from your phone you will be required to follow the initial setup wizard, this will take around 2 minute to complete.
Setting up Voicemail for your DDI
From either your Desk Phone or Pod Connect Application dial *318
- Select the language you wish to use - press 1 to confirm - The first choice is British English
- Record your name.
- Setup a greeting - Select the type of greeting you wish to use or record you own
- Confirm greeting press #
- Your initial voicemail setup has been completed.
Optional Settings
You can log into the CommPortal to manage most of your Message Settings these include:
- Forward messages as emails
- Upload or record a greeting
- Or choose a System greeting
Further information can be found in the Message Settings documentation here.
Please continue to Music on Hold. If you would like to leave it as default then continue to Testing Your System.
Using The Voicemail System
The voicemail system is menu driven. Listen to the voice prompts and then press the keys on your phone to select which option you would like.
Accessing Voicemail
The first time you access your voicemail box you will be asked to set up your mailbox, and record your name, greeting to be played by callers and setup a PIN.
When you have one or more unheard voice messages waiting, your phone will display a solid red light on the top of the phone and/or you will receive a notification on your Pod client.
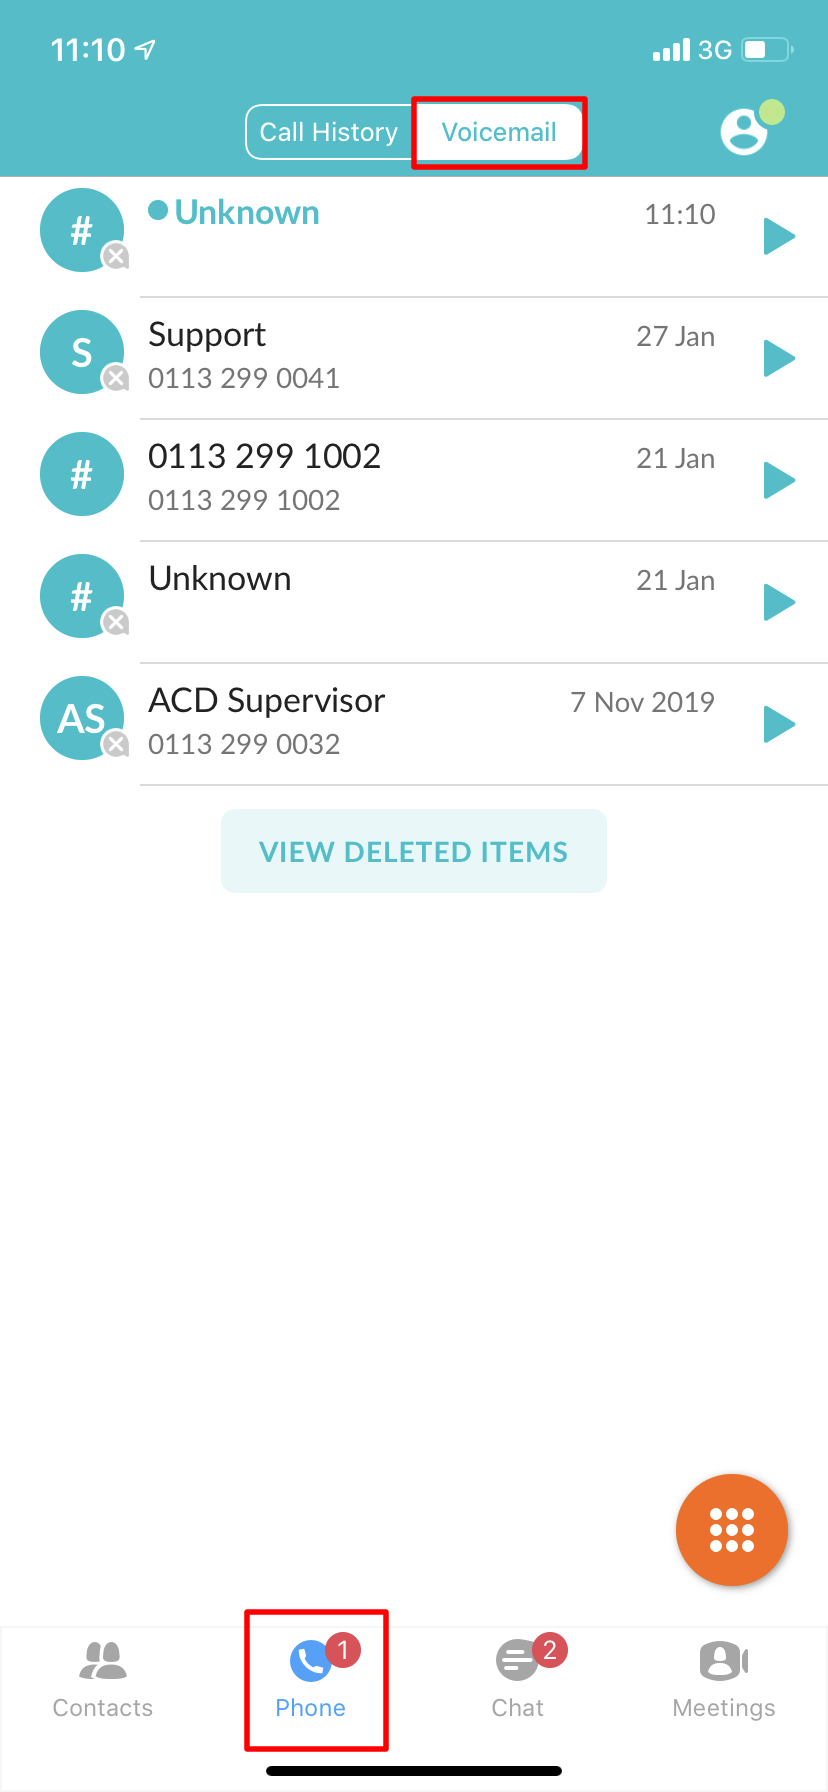
From Pod Mobile Client:
On the Pod mobile client you will receive a notification on your mobile device similar to the below image:

You can either tap on this to open the Pod client or open the Pod client normally from your apps. Voicemail messages are located under the Phone section and Voicemail tab as per below.
From Pod Desktop Client:
On the Pod desktop client, you can access your voicemail from the keypad by clicking on the blue voicemail icon as below.
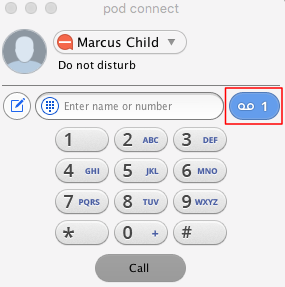
This will open the CommPortal and take you to your messages, from here you can listen/delete messages. Further information on this can be found here.

From a Desk Phone:
-
Press the Messages button or dial *318.
-
Enter your voicemail password.
-
If you have new messages, the messages will be identified.
-
After hearing any new messages, you will be presented with the Voicemail Main Menu.
From a External Phone:
- Dial the voicemail access number 01132990034
- Dial your DDI main telephone number and press #
- When prompted, enter your voicemail PIN followed by #.
- If you have new messages, the messages will be identified.
- After hearing any new messages, you will be presented with the Voicemail Main Menu.
Voicemail Main Menu
The Pod Voicemail main menu is as follows:
|
Option |
Key |
|
Play Inbox Messages |
1 |
|
Send Messages |
2 |
|
Work with Greetings |
3 |
|
Mail Box Settings |
4 |
|
Work with Reminders |
5 |
|
Access Deleted Messages |
6 |
|
Log on as a different user |
7 |
|
Help |
0 |
|
Exit Voicemail System |
* |
Message Playback Options
While listening to your voicemail messages, the following options are available:
|
Option |
Before Message |
During Message |
After Message |
|
Skip Message |
# |
# (skip to next message) |
N/A |
|
Reply to Message |
n/a |
4 |
4 |
|
Save Message and go to next |
n/a |
2 |
2 |
|
Delete |
n/a |
3 |
3 |
|
Play Inbox Messages |
1 |
n/a |
1 |
|
Send Messages |
n/a |
5 |
5 |
|
Help |
0 |
0 |
0 |
|
Return to Main Menu, Exit Voicemail System |
* (repeatedly, depending on how deep you are in the menu) |
* |
* |
Forwarding a Message
While listening to messages, you can send a copy of the message to another recipient.
-
To Forward the current message, press 5.
-
Enter an extension number or Distribution Group Number. Repeat this step until you’ve entered all the desired destinations.
-
Press # when finished entering destinations.
-
You will be prompted to record an introduction.
-
After the tone, record your introductory message and press # when finished.
-
Press # to send or press 1 for delivery options, followed by # to send. Delivery options include the following.
DELIVERY OPTIONS MENU
|
Option |
Before Message |
|
Review the message |
1 |
|
Mark message as urgent |
2 |
|
Mark message as private |
3 |
|
Re-record your message |
4 |
|
Request a delivery report |
5 |
|
Request a read report |
6 |
|
Add or remove recipients |
7 |
|
Schedule the message to be delivered in the future |
9 |
|
Send the message as is |
# |
|
Exit or cancel press |
* |
Replaying to a Message - Dialling the Originator
While listening to a message, you can call the person back by pressing 4 and selecting option 1.
This capability will not work if the voicemail system was not able to identify the Caller ID information when the original voicemail was received or if your phone is configured with call restrictions which prevent you from calling the originator’s number.
Changing Your Voicemail Pin
Access your voicemail box.
From the Main Menu, press 4 to change your settings.
Press 3 for security options.
Press 1 to change the PIN.
You can also change your Voicemail PIN from the CommPortal. Login and click on Change Voicemail PIN in the Security section at the bottom of the page.

Recording Your Personal Greeting
Access your voicemail box.
From the Main Menu, press 3.
To set up a personal greeting press 1.
To set up a system generated greeting or to change the recording of your name press 3.
To change the greeting that callers hear when you’re busy press 5.
If you don’t record a personal greeting, a generic greeting will be played.
Music On Hold (Optional)
Music On Hold Overview
Music on Hold is used for placing a call on hold/transfer or call queueing. This is turned on be default.
The default action for Music on Hold (MoH) is royalty free music. This will play whenever a call is placed on hold or when starting a transfer.
We recommend that you configure MoH - This can be music/announcements in any .wav/.mp3 file.
| INFO: Only the Business Group Administrator can configure MoH from the BG Admin portal. |
Please take a look at Pod Connect: Music On Hold for configuring your MoH service.
Once Music on Hold is configured continue to Testing Your System.
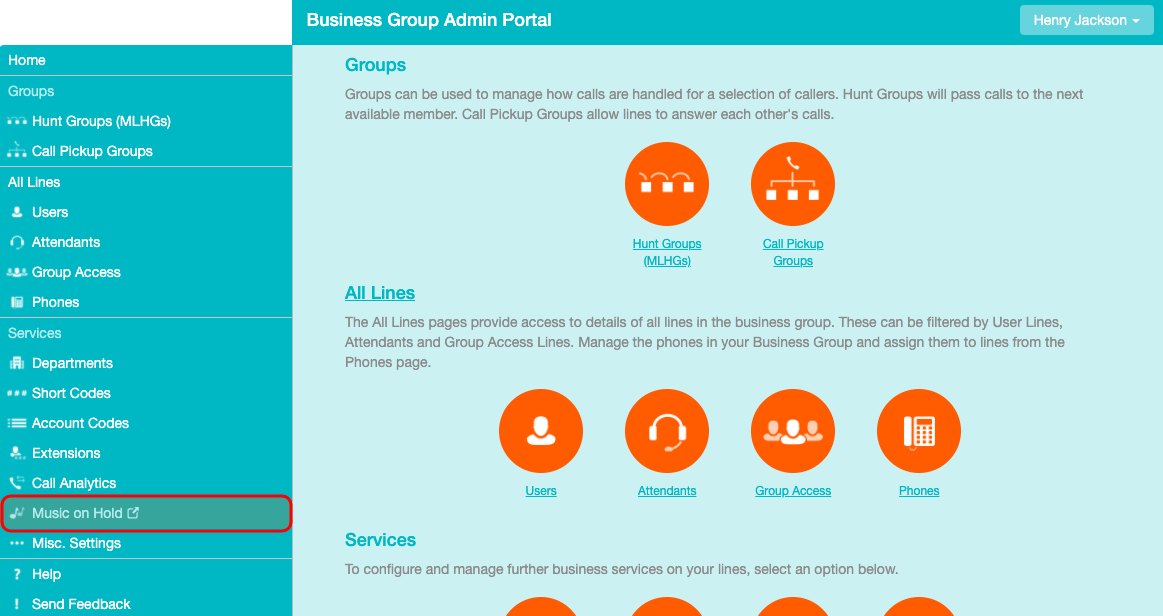
Logging In
Log In to the BG Admin CommPortal portal as normal. Click the Music On Hold link at the bottom of the left hand side of CommPortal. This opens up a new browser window with the Music On Hold administration system.
|
TIP: More detailed information on the BG Admin CommPortal can be found here. |
If you are the administrator for the top-level department of your business then you will see three links at the top of the page, each taking you to a different section of the Music On Hold administration system.
- Security – View and configure your security settings.
- Mappings – This section allows you to configure different recordings to be played when different lines within your business put callers on hold.
- Resources – This section allows you to upload and manage your recordings.
If you are not an administrator for the top-level department of your business you will not see Resources as only administrators for the top-level department can manage recordings.
Viewing and Changing Your Security Settings
To view your security settings, select the Security section.
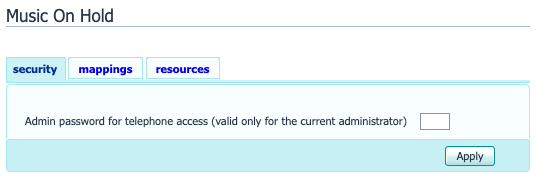
As well as accessing the Music On Hold system using CommPortal, you can also use your phone to access it. Using this page you can view and change the password you will need to enter to use the phone access. To change your password, follow these steps:
-
- Enter the new password in the text box.
- Click Apply.
Managing Recordings
To access the recordings section, click on the Resources
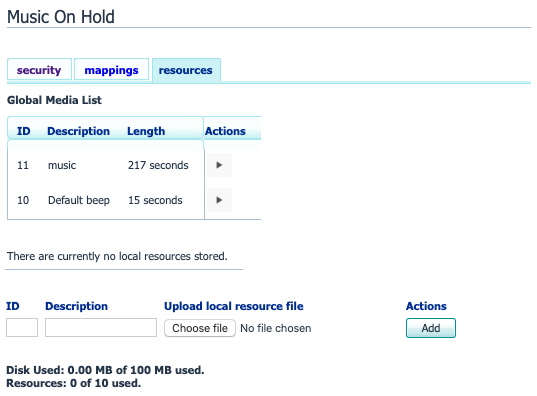
Global Media List
The Global Media List section specifies any recordings that we have made available for your use. Whether we make any recordings available to you depends on which service you have subscribed to. You cannot add or remove recordings from the Global Media List.
Your own recordings
The second section displays any recordings that you have uploaded to the system, either using this web interface or via the phone access.
Recording limits
At the bottom of this section you will see:
- How many MB of storage you have used
- How many MB of storage you are allowed
- How many recordings you have uploaded
- How many recordings you are allowed.
The system will not allow you to exceed either your storage limit or the maximum number of recordings you are allowed.
Recording formats
- You can upload recordings to the system in either WAV or MP3 format.
Adding a recording
To add your own recording, follow these steps:
-
- Enter an ID for this recording in the ID text box. This ID must be between 10 and 99.
- Enter a description for this recording in the Description text box.
- Click on Browse and select the recording you wish to upload. This must be either a .wav or .mp3 file.
- Click on Add.
Depending on the size of the recording you are uploading this process may take a few seconds.
Modifying a recording
To change the description of a recording, follow these steps:
-
- Click on the Edit button to the right of the recording.
- Edit the Description
- Click Save.
- To change the volume at which a recording will play, follow these steps:
- Click on the Edit button to the right of the recording.
- Select a new Gain value from the drop-down list.
- Select 0 to play the recording at its original volume,
- Select +1, +2 or +3 to play the recording louder, with +3 being the loudest.
- Select -1, -2 or -3 to play the recording quieter, with -3 being the quietest.
- Click Save.
Playing a recording
- You can play a recording that you have uploaded by clicking on the ID or Description link for that recording. Note that this will play the recording at its original volume – the Gain setting has no impact on playing a recording through this interface.
- If you want to check the effect of changing the volume of a recording you should log into the phone interface and play the recording from there. For more details on this, see Section 2.1.
Removing a recording
- To remove a recording click on Delete to the right of the recording you wish to delete.
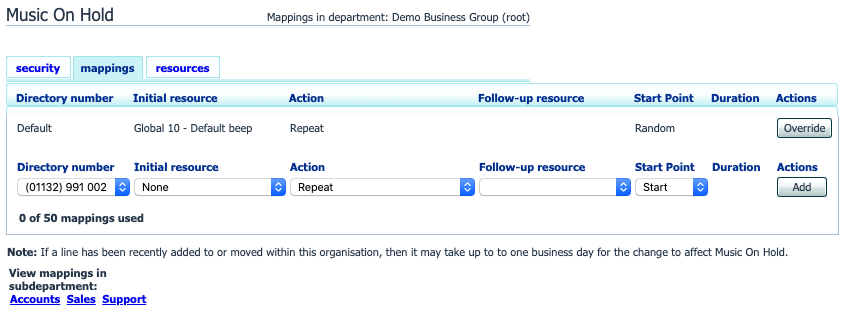
Assigning Recordings To Lines
You can assign recordings either to all lines in your business, or different recordings per line. To do this you need to access the mappings section.
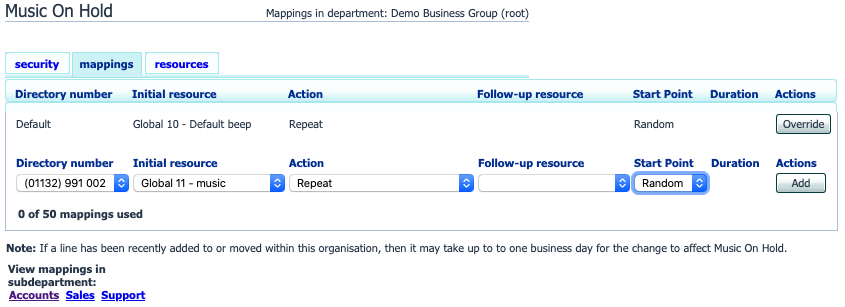
You will now see a list of mappings between the directory numbers of lines in your Business Group or department and the Music On Hold resources that each line uses.
- If the department you are an administrator of has one or more sub-departments, you will see links to these at the bottom of the screen.
- To manage resources for a line that is in a sub-department, click on the link for that sub-department.
- When you have followed the link to a sub-department, an additional link appears at the top of the screen, allowing you to move back up to the parent department
There is always a default mapping, which is used if you don't specify a mapping for a particular line. This is shown first in the list with Default instead of a Directory number and applies to all directory numbers except for those with their own individual mappings in the list. The mappings screen also shows how many individual mappings you are allowed to create.
Each mapping consists of a series of fields which you can set:
- An Initial resource, or recording, which is played when the call is put on hold.
- Optionally a Follow-up resource, or recording, which may be played depending on the Action.
- An Action, which can be one of:
- Repeat – The initial recording is played continually.
- Play Once – The initial recording is played once, and then the follow-up recording is playing continually.
- Repeat – Initial Interrupted – The initial recording should be interrupted at set intervals by the follow-up recording. This could be used to interrupt music with an announcement indicating that the user is in a queue.
- Repeat – Follow-up Interrupted – The initial recording is played first. Then the follow-up recording plays continually being interrupted by the first recording.
The Start point field indicates whether the recording will start at the beginning (the value Start indicates this) or whether it should start at a random point of the recording (the value Random indicates this).
The Duration field which is used by the Repeat – Initial Interrupted and Repeat – Follow-up Interrupted actions to indicate how often the repeated recording should be interrupted.
In general, your Service Provider will configure a Default resource to be played as a single, repeating resource.
If you are an administrator for the whole Business Group, you can override this mapping for the whole group and all its departments, to use a different resource or a combination of resources.
If you are an administrator for a department within the group, you can override the default mapping for your department and any sub-departments.
If you have not changed the default, it appears with an Override button to the right (instead of the Edit button shown for other mappings).
Adding a mapping
To add a mapping for a particular line, follow these steps:
- Use the Directory number, Initial resource, Action, Follow-up resource, Start Point, and Duration drop-downs to set these fields (located to the left of the Add button).
- Click on Add.
Modifying a mapping
To modify either the default mapping, or the mapping for a line, follow these steps:
- To change the default mapping that was supplied by your Service Provider or inherited from a higher-level department, click the Override button to the right of the mapping.
- If you were overriding the default mapping, the Override button is now replaced by Edit and Use Default
To change any other existing mapping, including the default mapping if you have already overridden it, click Edit to the right of the mapping.
- Modify the fields.
To revert to the existing default mapping that was supplied by your Service Provider for the whole Business Group, or the default mapping for your department if you are a department administrator, click the Use Default
- Click on Save.
You cannot modify the telephone number that a mapping applies to. If you need to do this, remove the mapping and add a new one.
Removing a mapping
To remove a mapping click on the Delete button to the right of the mapping. You cannot delete the default mapping but you can override it, edit it, or revert to the original default that was inherited from Service Provider settings or from a higher-level department.
Testing Your System
You should now be ready to complete the basic testing, this is has been designed to to ensure that all basic functionally is working correctly.
You may also have the following services in your package:
- Multi Line Hunt Groups (MLHG)
- Standard Auto Attendant
- Advanced Auto Attendant
If you are using either Easy Attendant or Premium Attendant you will need to make sure these have been configured first. In most cases your Service Provider will have discussed this with you and will already be configured.
If you have agreed with your Service Provider that you are managing and setting up the Easy or Premium Attendants this should be completed now. Please see the following documentation for help with this.
Please contact your Service Provider for further assistance if required.
Before continuing with testing you will need access to an external test phone, a mobile would be fine. You may also need to speak to your Service Provider if you are unsure about how are your incoming calls handled, what happens, greetings and options if required.
| INFO: Please do not use another Pod phone for testing. Any testing must be carried out with an external phone. Pod to Pod calls are routed as internal calls therefore may not show any faults or configuration issues with the service provided. These tests are based on the assumption that you have not made any changes within the CommPortal Phone Status section on how calls are handled. |
Outbound Calls
- Make an outbound call from a subscriber to your external test phone. This should be completed on all devices for this subscriber. (Desk Phone/Pod Connect Mobile & Desktop) - make a note of the following:
- Did the external test phone ring? If yes continue
- Is the Caller ID displayed? This can be either the subscribers DDI or a Calling Party Number that has been setup. If yes continue
- Answer the call and confirm that you have 2 way audio. If yes continue
- If required: Do you need access to International calls and Premium rate numbers - These maybe blocked by default. From your subscriber test an international and premium call.
| INFO: Premium Numbers include the following number ranges - 09, 084, 087. Please contact your Service Provider if you require this. |
Inbound Calls To Your DDI
- Make an inbound call to your DDI subscriber your external test phone - Make a note of the following
- Did your DDI ring, if you multiple devices (Desk Phone/Pod Connect Mobile & Desktop) registered for this subscriber then all devices should ring at the same.
- Answer the call and confirm that you have 2 way audio. If yes continue
- Make another inbound call to your DDI subscriber but this time leave the phone to ring. By default voicemail should start after 36 seconds. If yes continue.
- Leave a voicemail message then end the call.
- Check your devices to make you have a voicemail notification and/or email has been received if you have enabled Forward messages as emails. If yes continue.
- From your subscriber call the voicemail number 121 to access your voicemail and listen to the message. You can now delete the message and continue.
Inbound Calls To Your MLHG and/or Easy/Premium Attendant
|
INFO: Before proceeding with this test it is advisable to have a written out call flow on how calls should be handled. For MLHGs:
For Easy/Premium Attendants
|
- Make an inbound call to your Easy/Premium Attendant phone number from your external test phone. For MLHGs check the above information.
-
- As the call is been made follow your call flow
- Did you hear the announcement?
- Did you hear the menu options?
- Did the menu option goto to correct subscriber/MLHG/or other action correctly?
- If yes to all please repeat this process until all menu options have been tested.
- As the call is been made follow your call flow
Music On Hold
- Make an inbound call to your DDI and/or Standard/Advanced Auto Attendant phone number from your external test phone
- Answer the call
- Place the call on hold
- Check on your external test phone that Music On Hold is playing the correct file. If it has not been configured this will play the default music.
- Check the Music On hold documentation for help configuring.
|
INFO: If any of the above tests are failing please check the configuration within the CommPortal and relevant documentation. If you are still having issues please contact your Service Provider. Remember to make a note of which tests are failing and any error messages that maybe presented. You will also need the subscribers phone number and the external test phone number that you have been using. |