Managing Phones & Phone Profiles
This covers the basics for configuring compatible handsets with in the BG Admin CommPortal.
Managing Phones As Administrator
Overview
This will cover the basics in managing and configuring your Phones from the BG Admin Portal.
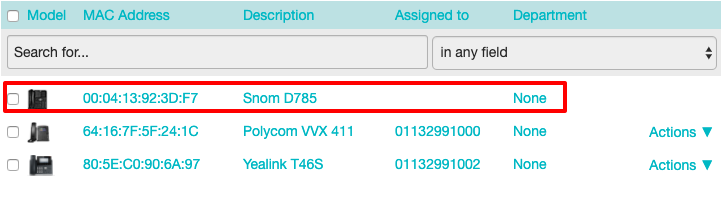
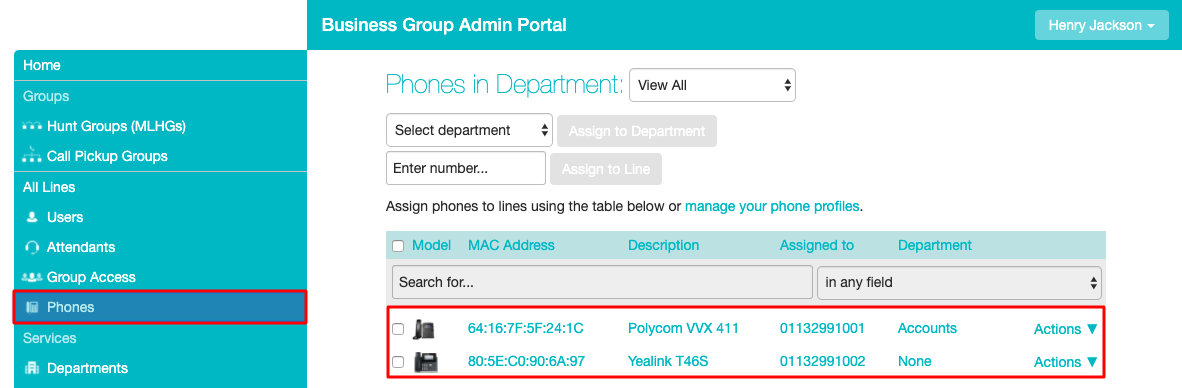
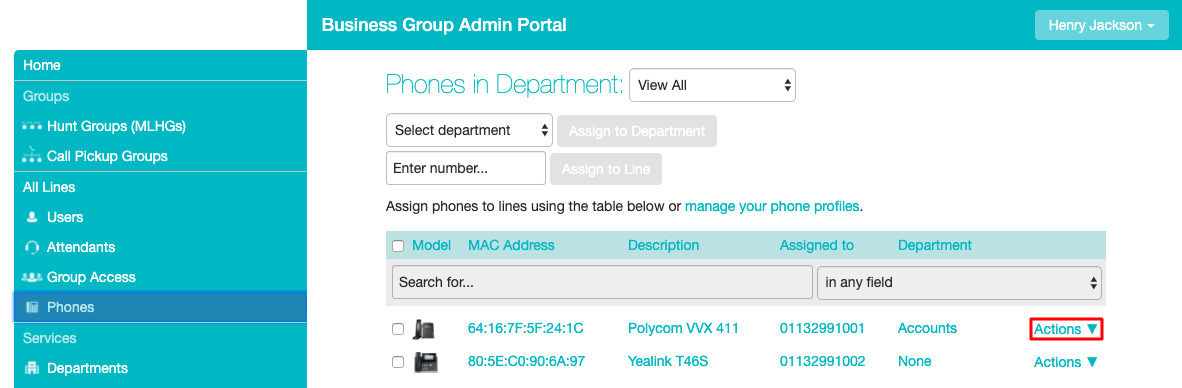
From the BG Admin Portal you can manage your Phones, click on Phones on the left hand side. From here you will see all your phones.
| INFO: You will need to contact your Service Provider to add phones or remove phones from this list. This is done using the MAC addresses of the devices. |
In this example this Business Group has 3 phones. The Polycom VVX 411 and Yealink T46S have been assigned to subscribers. The Snom D785 is not assigned to a subscriber. The portal allows you to provision any phone in this list to any of your subscribers without the need for contacting your Service Provider. To jump to the Provisioning section click here.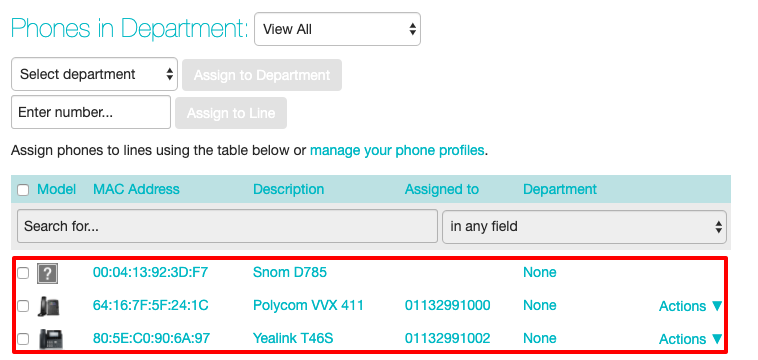
Phone configuration is managed by using Phone Profiles. You have two types of Phone Profiles:
- Business Group Profiles
- Subscriber Phone Profiles
Business Groups Profiles are optional, but are ideal to manage and make changes to devices across the entire Business Group without changing each individual phone profile. You would create one profile for each make and model of device. With Business Groups Profiles you can lock certain settings down to stop individuals making changes to their phone profile.
An example of using Business Group Profile would to enable Hot Desking. This would allow for all phone in your Business Group to use Hot Desking while only need to create one Business Group profile per a device model.
| INFO: Any change made to Business Groups Profiles will goto all phones that use that profile |
Subscriber Phone Profiles these are created per a subscriber when that subscriber first registers on a new device. These profiles will contain the the individual settings like speed dials, monitored extensions etc.
See the Business Group Profiles page and Subscriber Phone Profile for further information.
Business Group Profiles
Phone profiles are split into 2 sections Business Group Profiles and Subscriber Phone Profiles.
| INFO: Adding, modifying and removing of Business Group Profiles can only be done from the BG Admin Portal. |
Business Group Profiles
These are optional, but are ideal to manage and make changes to devices across the entire Business Group without changing each Subscriber phone profile. You would create one profile for each make and model of device.
An example of this would to enable Hot Desking. This would allow for all phones in your Business Group to use Hot Desking while only needing to create one Business Group Profile per a device model.
Lets say you have 15 phones in total 5 Polycom VVX 411, 5 Yealink T46S and 5 Snom D785 to enable Hot Desking this would only need 3 Business Group Profiles to be created.
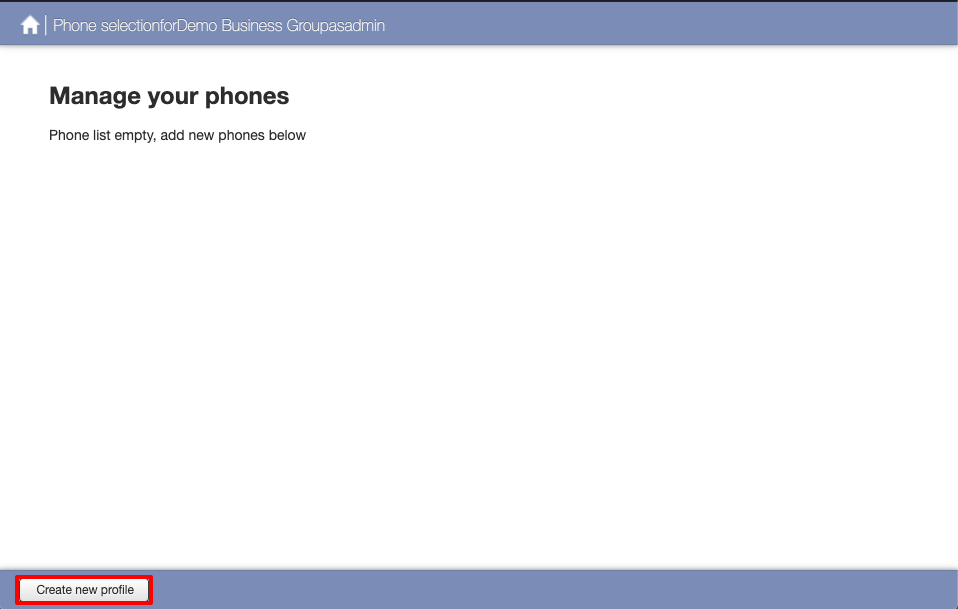
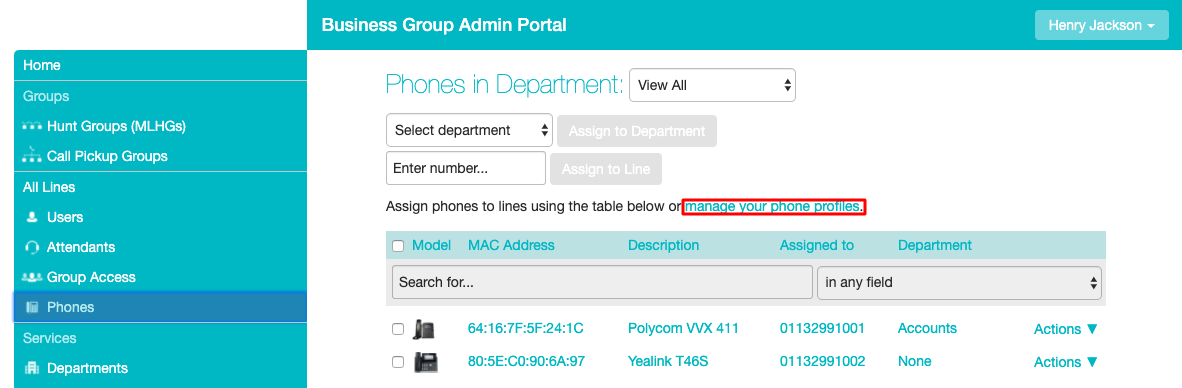
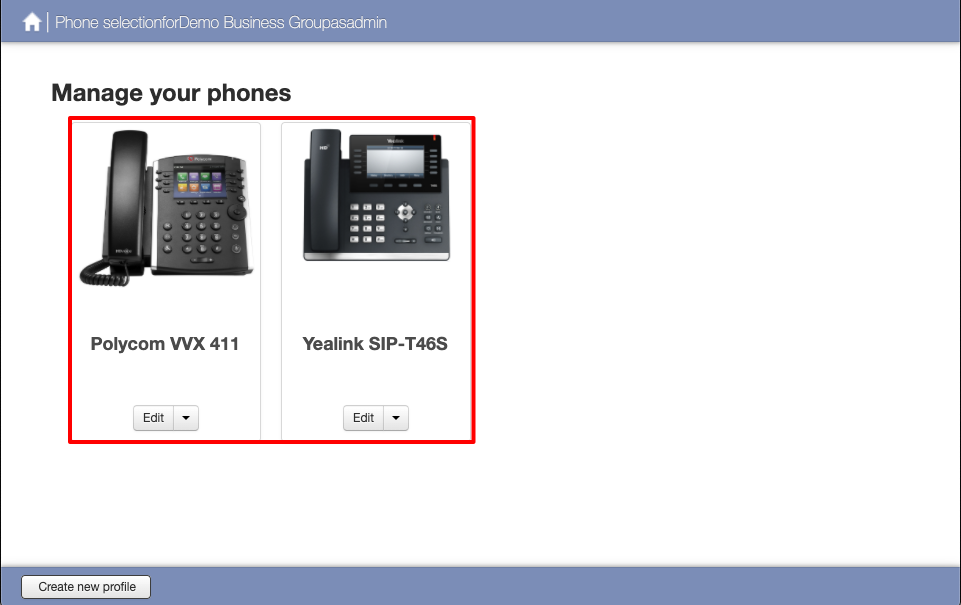
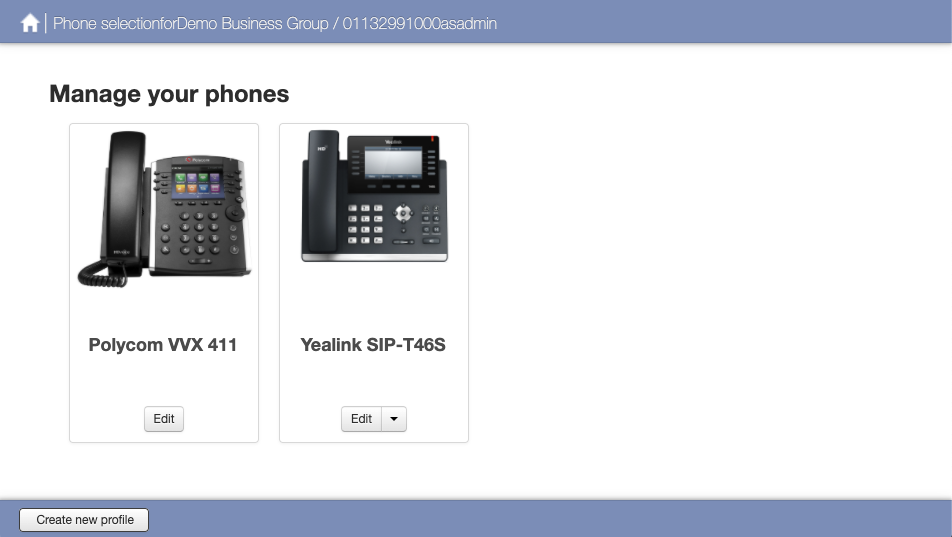
You can create and manage your Business Group Profiles by going to Phones within the BG Admin Portal and clicking on manage your phone profiles. If you have not already created a Business Groups Profile beforehand you will see the following screen. Click on Create new profile.
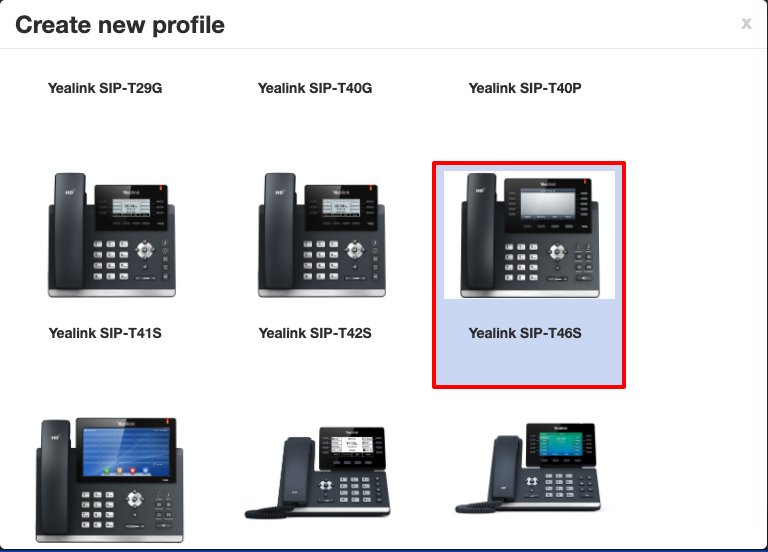
Select the make and model of the phone you would like to add.
|
INFO: You must always select the exact model of your phone. Selecting a Yealink T42S phone profile WILL NOT work with a Yealink T46S phone. |
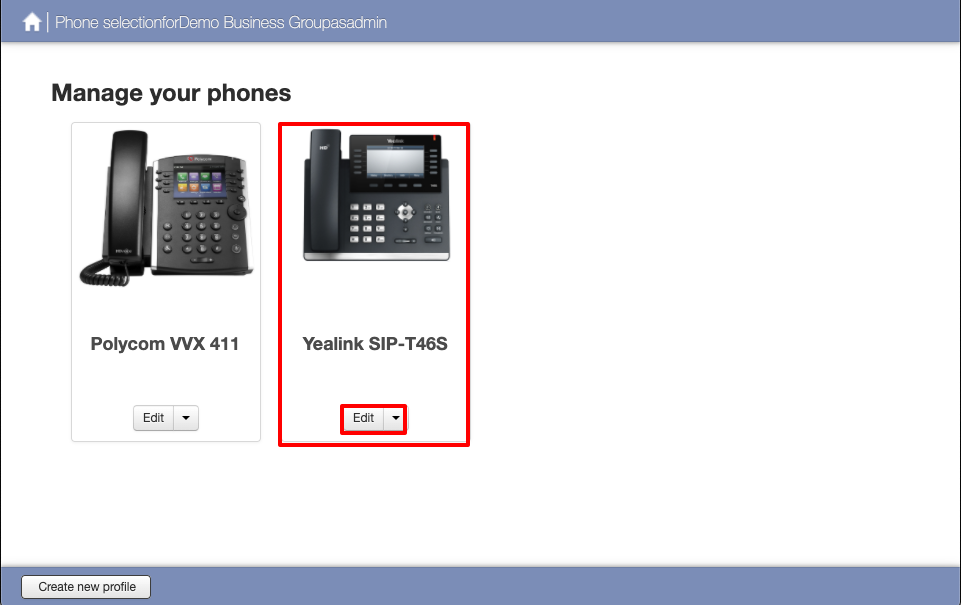
This will now create the default profile, this is same as the subscriber phone profile as if a subscriber had just registered that device.
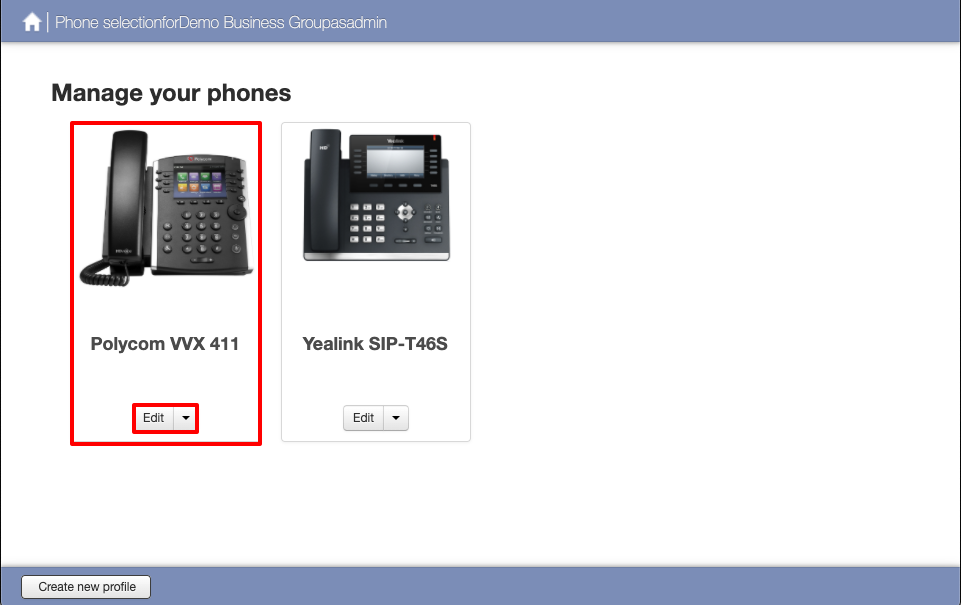
Now we can make the changes that will effect all Yealink T46S devices within your Business Group. Click on Edit
This will offer all the functionality and Soft Keys that are available for that device that you would see in the web interface of the phone. While this page does look overwhelming most settings you would not need to be changed. You will be able to search for various settings by using the Search in the right corner, depending on phone model you may be able to click on the soft keys on the phone picture, this will then take you directly to the Soft Key Settings.
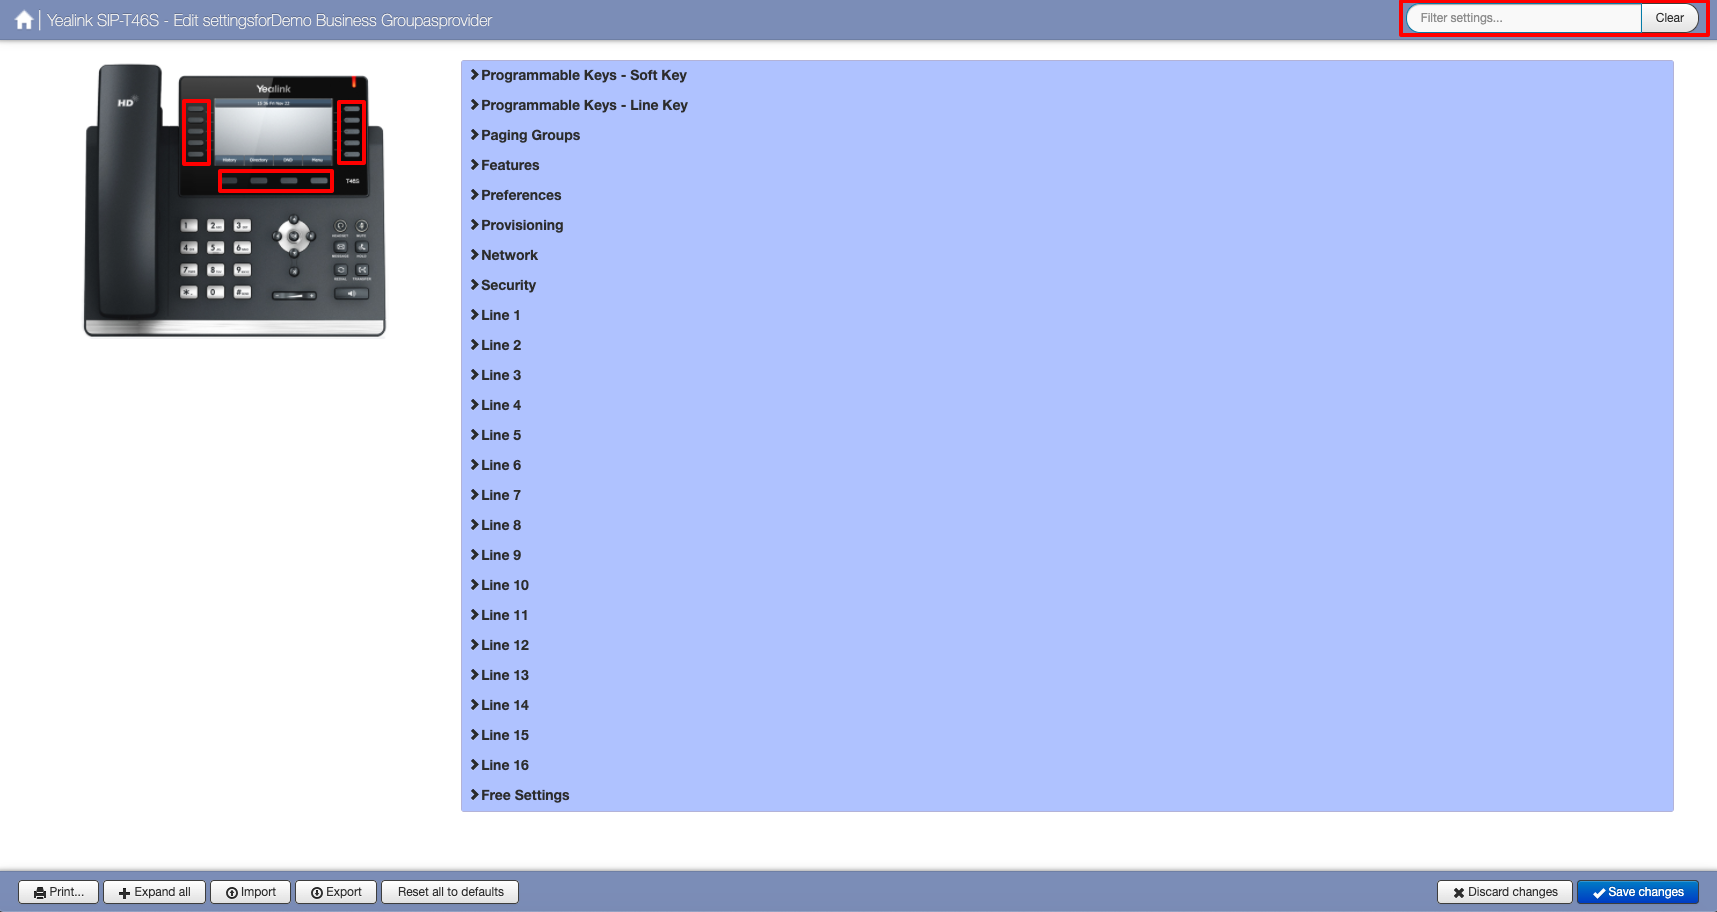
Depending on phone model the options will differ.
An example of using Business Group Profiles would be to set a Speed Dial for the Office Manager for a company, once this has been saved all users that are using the Yealink T46S would have this key set.
In this example we will use Soft Key 10 as the Speed Dial to the Office Manager

Once the changes have been saved, you must now reboot all the phones that are using this profile. Is this case it would all the Yealink T46S devices.
After the phone(s) have rebooted Soft Key 10 will be a Speed Dial with the label Office Manager.
|
INFO: If any of the subscriber have already has assigned Soft Key 10 to another function this will be overwritten when applying the Business Group Profile however they can change this back from the End Users CommPortal. Unless it has been locked. |
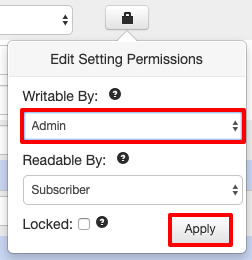
To lock a setting so the end user/subscriber cannot change it click on the Padlock icon and change Writable by to Admin and click Apply. Then click on Save changes in the lower right corner.
When the subscriber logs into their CommPortal to manage the device and they will see Soft Key 10 grey out and will be unable to change it.

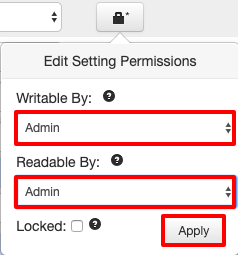
You can also make a setting unreadable to a subscriber, by hiding it from their view, to do this click on the Pad lock icon and change Writable By to Admin and Readable By to Admin then click Apply. Then click on Save changes in the lower right corner.
You can see from the screen shot below that Soft Key 10 is no longer visible.

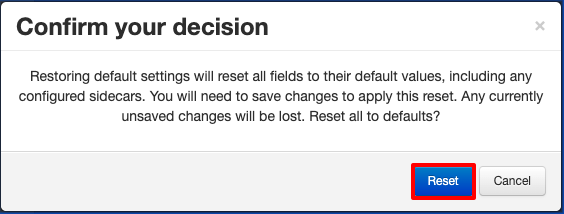
If you have made a mistake in configuring a profile and the phones are not working as expected after been rebooted, you revert all changes by using the Reset all to defaults option.
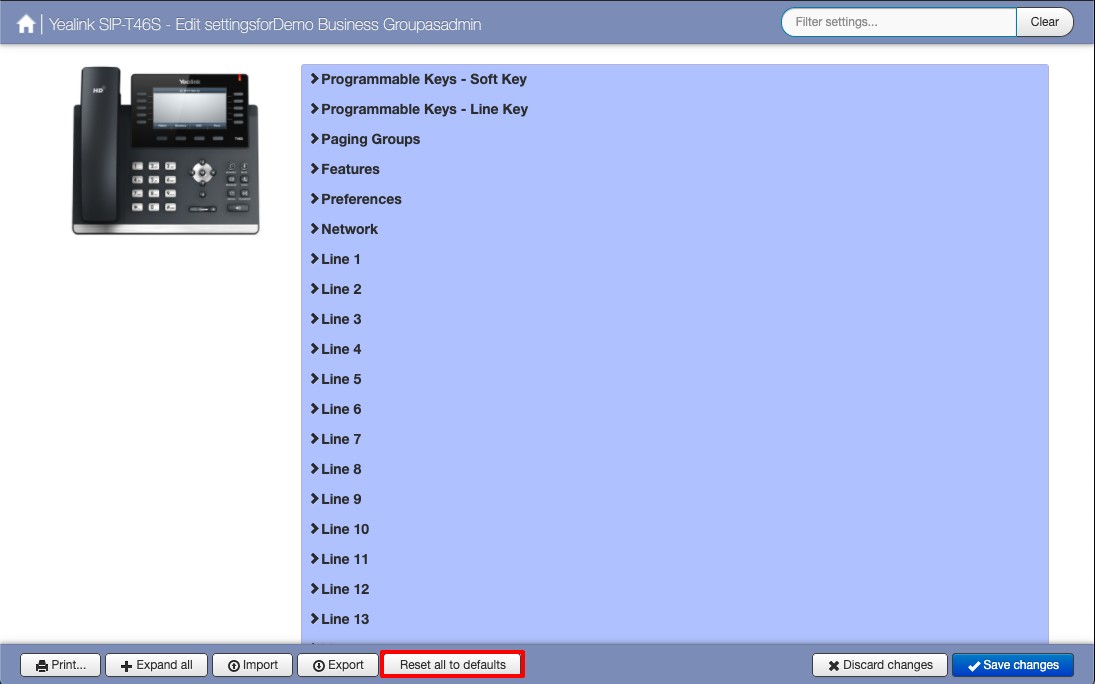
Click on Reset to Confirm. Then click on Save changes in the lower right corner. You must now reboot all devices using this profile.
|
INFO: This will NOT reset the configuration changes the subscriber has made to his subscriber phone profile for example if the subscriber has added several speed dials then these will still remain after rebooting the device as they have been set on the Subscriber Phone Profile unless they have been over written by the Business Group Profile |
Subscriber Phone Profiles
From the BG Admin Portal you can also make changes to Subscriber Phone Profiles directly.
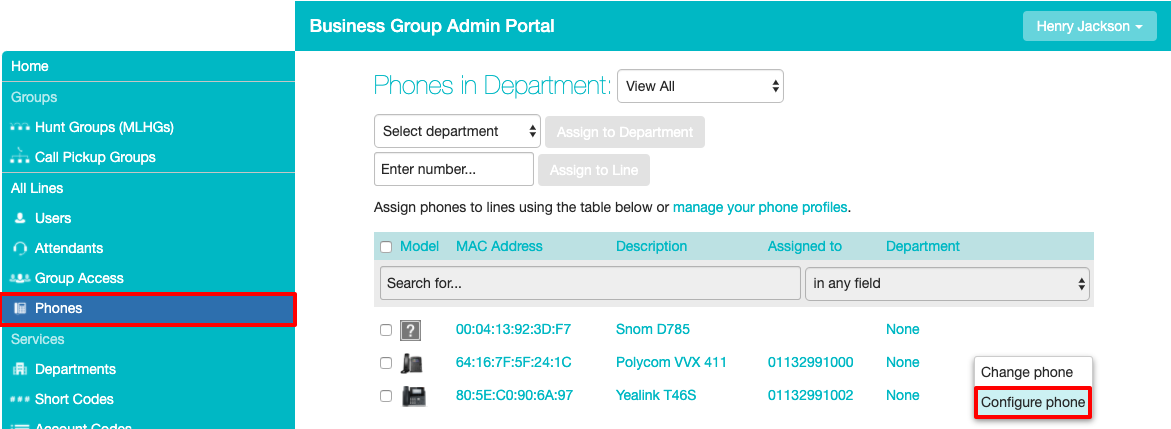
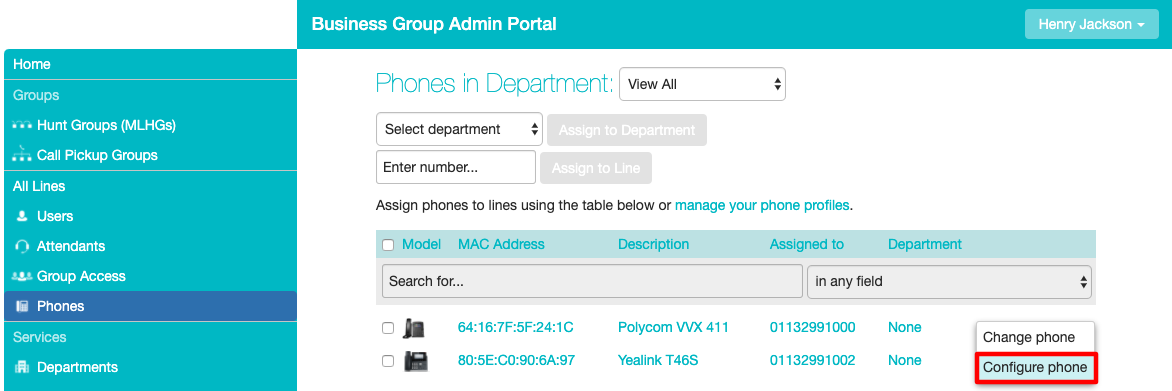
From the Bg Admin portal click on Phones on the subscribers phone you would like to modify click on Actions then Configure Phone.
Click on the Subscriber Phone Profile you would like to edit.
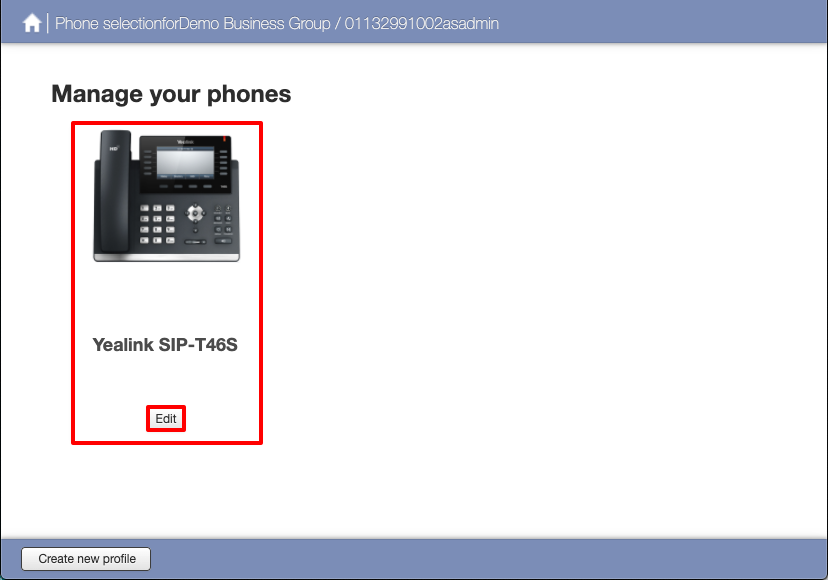
If you have created a Business Group Profile for this model of phone then you will see these changes on this subscribers phone profile. This page is exactly the same as editing the Business Group Profile however any changes made here will only effect this Subscribers Phone Profile after the changes have been saved and the phone has been rebooted.
You can also reset the Subscribers Phone Profile from here as well. Reseting the Subscriber Phone Profile from here will use the Business Group Profile as it defaults. This is useful if the subscriber is having issues after they have made changes to their Phone Profile.
| INFO: If no Business Group Profile is setup for this device than it will restore the original defaults as when it was first provisioned. |
Provisioning Phones
|
INFO: If you are missing phones from this list then you will need to contact your Service Provider with MAC addresses of the devices you would like to be added. You will also need to contact your Service Provider to remove a device from this list. |
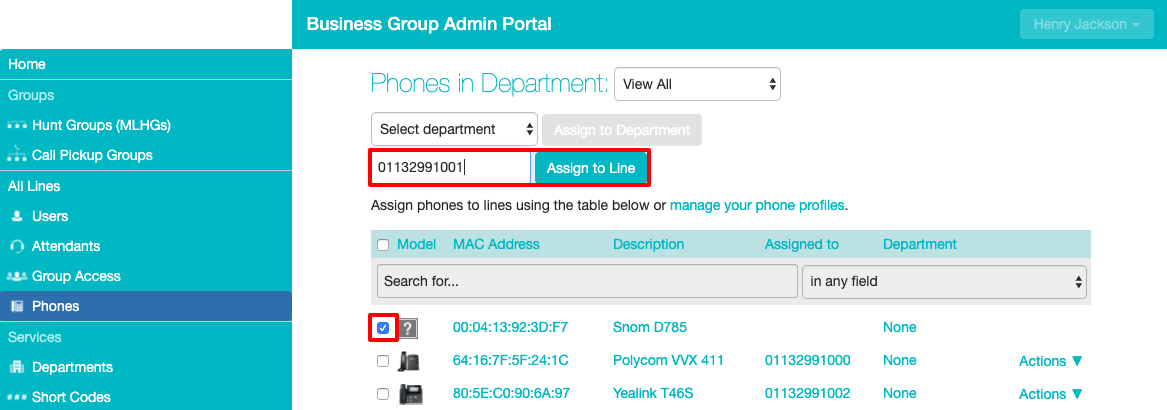
Depending on your order and configuration you may have already provisioned all your phones to subscribers you may also have requested phone to be added but not provisioned to a subscriber. You can see from this example that the Snom D785 has not been assigned to a subscriber.
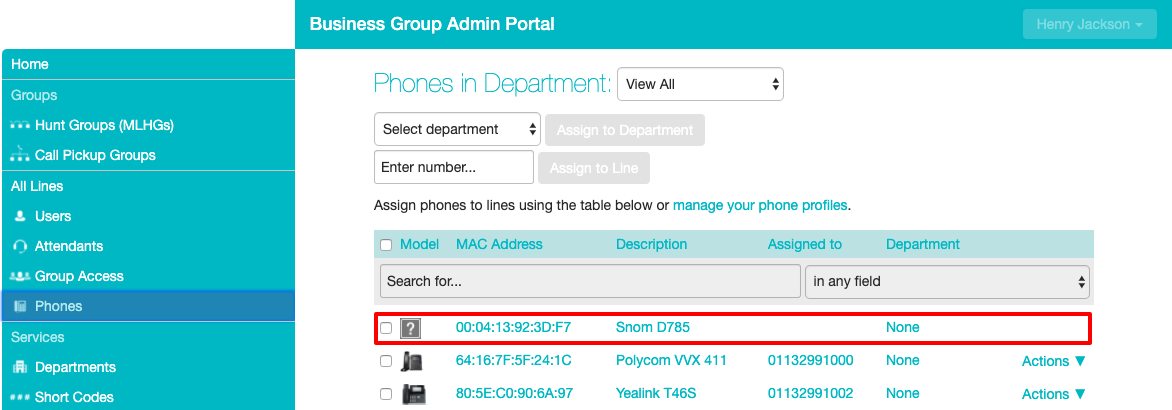
In this example we are going to to assign the Snom D785 to the subscriber 01132991001. Tick the check box next to phone that you would like to assign, then enter the subscribers phone number and click on Assign to Line.
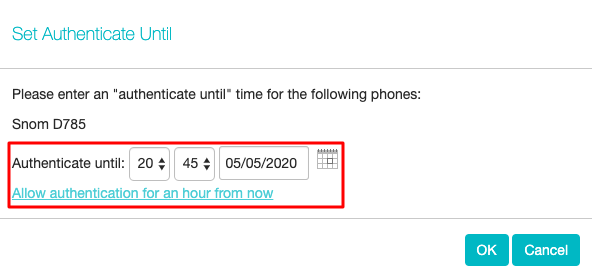
Now we need to set the authentication so the device in question can contact the provisioning server and download the correct configuration for that subscriber. You can either set an Authenticate until time or just click on Allow authentication for an hour from now. Then click OK
|
INFO: We strongly advise against leaving authentication open for more than a couple of hours as this could leave your phones open to attacks from the outside world. |
Next you need to reboot the device for the new configuration to be download. Depending on the firmware on your device is may reboot several times before the configuration has completed and the user is registered. Once the user is registered the phone is ready to be used.
When completed successfully the question mark box next the phone will also change to a picture of that phone.
|
INFO: If the phone fails to download the configuration you may need to speak to your Service Provider to discuss how the phone is been adopted. You may also have to manually configure the phone with the correct provisioning URL. |
Also from this page you remove a subscriber from a phone or change the description, click on Actions and then Change phone

On the Change Phone screen you will be to change the description or remove the phone from that subscriber.
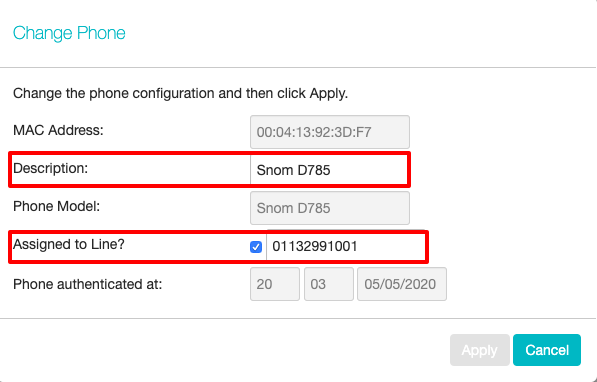
To remove a phone from a subscriber untick the Assigned to Line box and then click Apply.
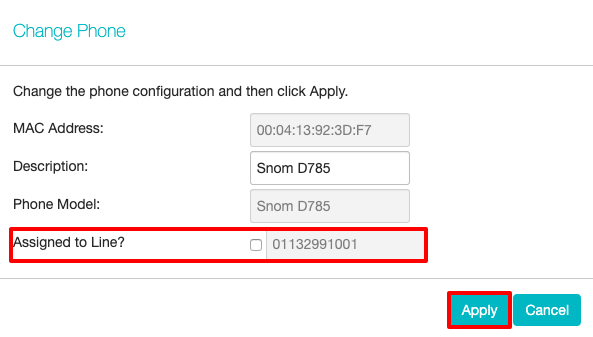
You will now need to reboot the phone to fully remove that subscriber. Once the phone has been removed it is ready to be assigned to another subscriber.
|
INFO: Any changes to the Subscriber Phone Profile for that device will be saved. If you assign the subscriber back to that device they automatically use their existing Subscriber Phone Profile. |
How To Configure Hot Desking?
Hot Desking Overview
Hot Desking allows a phone user to log out of the phone and allow another user to login or allow that user to log in to any other phone that is configured for Hot Desking. In the example shown here this Business Group has 3 users but only 2 phones.
In this Hot Desking example Henry and James work full time at the office and Jane is only used to cover in Henry or James absence. To make this clear we will be using the subscriber names throughout this example :
- Henry: (01132991002) Phone Yealink T46S
- James: (01132991001) Phone Polycom VVX 411
- Jane: (01132991000) No phone
Before continuing you must make sure that your phones have been provisioned correctly by the provisioning server. You can check which phone have been provisioned from the BG Admin Portal. Once logged in click on Phones on the left hand side. Here you will see a list of all your phones that have been provisioned.
|
INFO: If you are missing phones from this list then they will not have been provisioned and this process will not work. Please contact you Service Provider for assistance. |
There are 2 ways in which Hot Desking can be enabled:
- The easiest way is by creating a Business Group Phone Profile, in this example we have 2 different phones Yealink T46S and Polycom VVX 411. By using the manage your phone profiles option you can create a Business Group profile for the Polycom VVX 411 and another for Yealink T46S. All settings configured in this profile will be passed down to all devices of the same make and model that the profile was created for.
- Enabling Hot Desking on Subscriber Phone Profiles (not recommended) this would take longer to configure as each phone profile would need to be configured. As with this example Jane does not have a phone therefore if Henry or James logout of the phone when Jane logs in Jane would not see a logout button, this is because Jane does not have a phone profile with Hot Desking enabled for the device that she has logged into. You would now need to edit Janes phone profile to enable Hot Desking.
Creating a Business Group Phone Profile
From the the BG Admin portal click on Phones then manage your phone profiles.
Next we now need to create a phone profile for the make and model of the phones that you are using, in this example it will be for the Yealink T46S and Polycom VVX 411. Click on Create new Profile.

From the list of phones select the exact make and model of your device, in this example we will have selected the Yealink T46S

When a phone is selected it will add the phone to the Manage Your Phones page, here you can see we have also added the the Polycom VVX 411
You will need to repeat this each phone model you wish to use.
|
INFO: You must always select the exact model of your phone. Selecting a Polycom VVX 311 phone profile WILL NOT work with a Polycom VVX 411 phone. |
Now we can configure the profiles, click on one of manufactures below to get started.
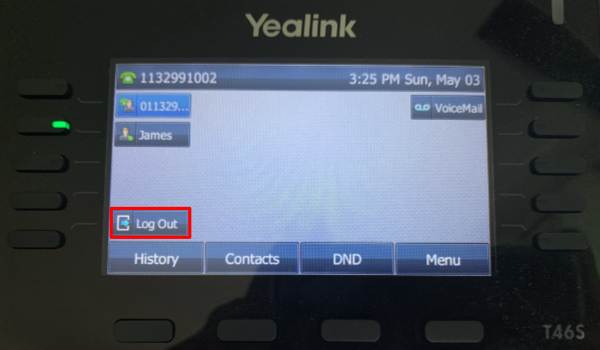
Once the profiles have been saved and your phones have restarted you should now see the the Log Out option on the soft key that you specified.
Here we have the Yealink T46S Henrys phone
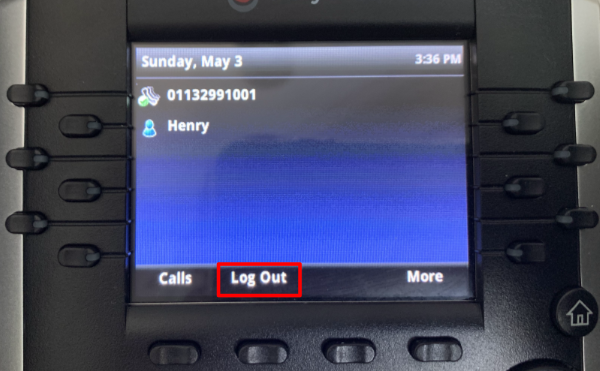
Polycom VVX 411 James phone
|
INFO: With the Polycom phones you can ONLY use the bottom row of soft keys to configure the Log Out button. Depending on you configuration you may need to press the More button first in order to view the Log Out button. |
In this example James is going to Log Out of the Polycom VVX 411 and Jane will Login. When pressing the Log Out button you will be asked to confirm that want to log out. Press OK/YES you will then be logged out and the phone will reboot.
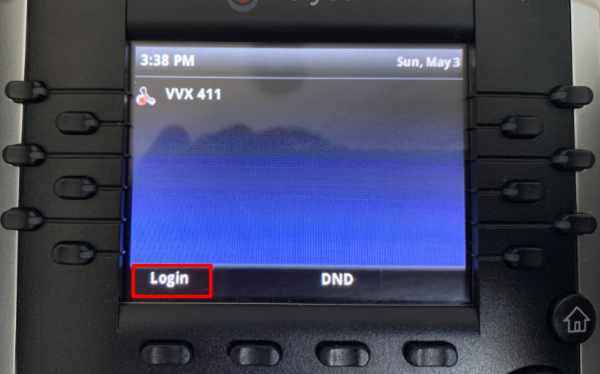
Once the phone has rebooted you will see the following screen this will allow another user to login, or in this case Jane. Press Login
On the next screen enter the Username (subscriber phone number) and the Password (CommPortal password) then press Submit
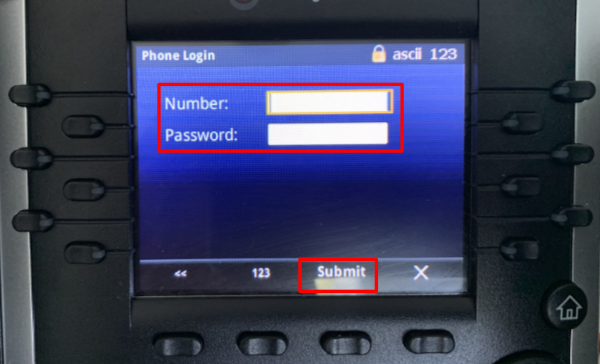
If the Username and Password are correct the configuration will update and the phone will reboot. When the phone comes back on the user will be logged in.
| \ |
INFO: If you had enable Hot Desking from Subscriber Phone Profiles when a new user logs in they will NOT see a Log Out option in this case Jane. This is because Jane only has a default phone profile which was created the first time she logged in. |
As the user Jane has never logged into a phone before this user has no Subscriber Phone Profiles set, it will automatically create a default profile for that make and model for that user when they first log in.
You can change Subscriber Phone Profiles from the Phones list click on Actions
No click on Configure phone
You will now be able to edit the phone profile for this user and make and model of phone the user is using. The picture below shows 2 Subscriber phone profiles Polycom VVX 411 and Yealink T46S this is because this user has already logged into the Yealink T46S at another time.
| \ |
INFO: Every time user logs into a new phone a default profile is created. Configuring settings from Subscriber Phone Profiles will only affect this user when they are logged into that make and model of phone. This phone will stay with user even after they log out. When they log back into the same make and model of phone it will continue using that phone profile. |
Hot Desking Polycom
| INFO: This guide is showing the configuration of a Polycom VVX 411. Depending on your model of Polycom your options may differ slightly but the process should be the same. |
Continuing from the Hot Desking Overview page from the Phones page click on Manage Your Phones then click on Edit on the phone model you would like to configure, in this case it is the Polycom VVX 411
| INFO: With the Polycom VVX phones you can only configure Hot Desking on the bottom row of soft keys |
Click on the bottom row of keys to expand the key options
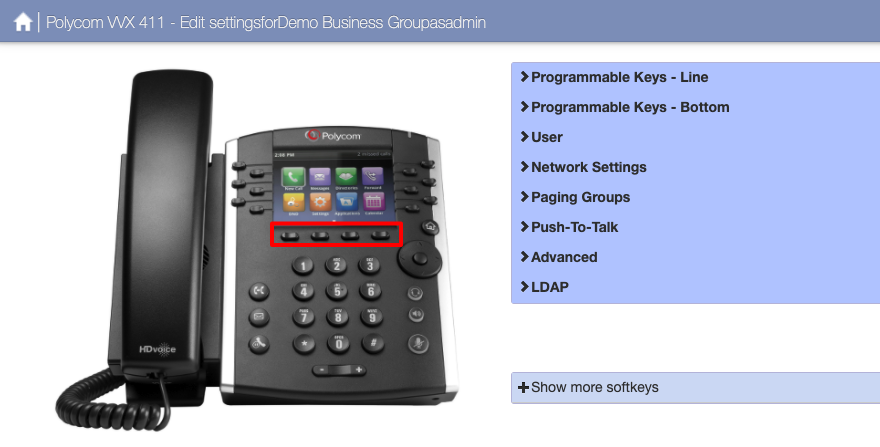
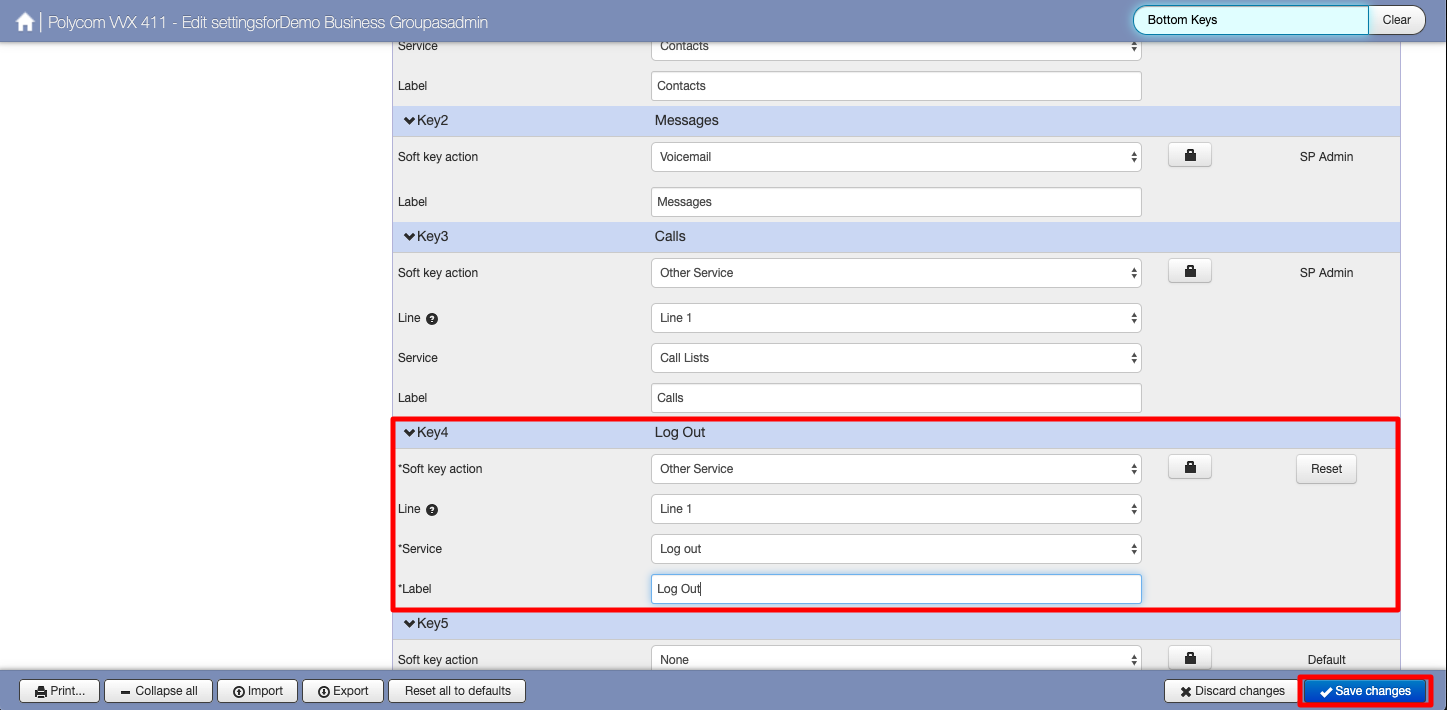
You should leave the Key Capabilities as default unless you know what you are doing. Scroll down until you get to the Keys, in this example we are going to be using Key 4 for Hot Desking which is currently set to None

From the Soft key action drop down menu select Other Service. Unless less you have multiple lines on this phone leave Line 1 as it is.

From the Service drop down menu select Log out, You can now add a Label for this soft key. We have used Log Out

Next click on Save changes in the lower right corner.
Once saved you will now need to reboot your phone for the changes to take effect. Once rebooted you should see the Log Out key that you created. View the Hot Desking Overview page more information.
|
INFO: Depending how the Polycom is configured you may see Key 4 as More this normal. When you press More you will see more key options depending on configuration. One of these will show as Log Out.
Please note it can take up to 15 minutes for Hot Desking to be configured. If you press Log Out and after the phone reboots the user is automatically logged back in please wait until 15 minutes has passed before trying again. |
Hot Desking Yealink
| INFO: This guide is showing the configuration of a Yealink T46S. Depending on your model of Yealink your options may differ slightly but the process should be the same. |
Continuing from the Hot Desking Overview page from the Phones page click on Manage Your Phones then click on Edit on the phone model you would like to configure, in this case it is the Yealink T46S
With Yealink phones we have 2 sections to configure
- The Log Out Key - This can be any soft key
- Enable Hot Desking
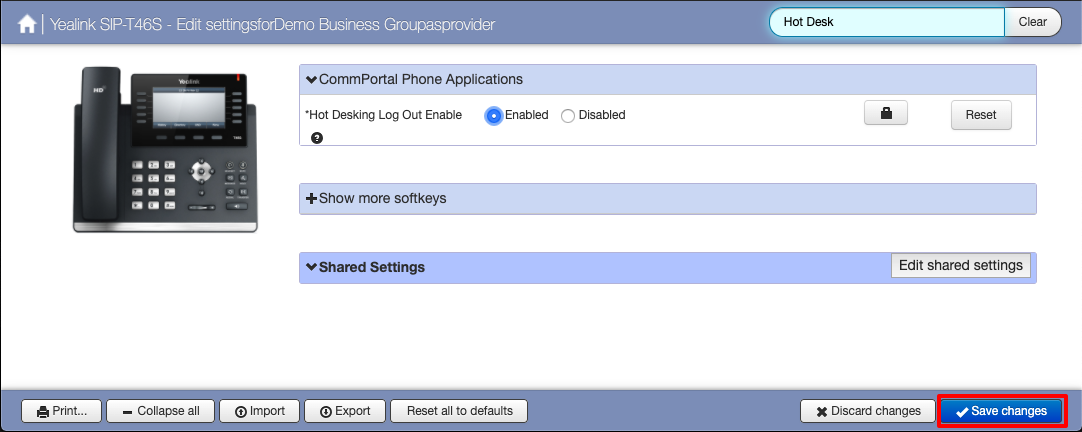
First we will select the soft key we want to use for the Log Out button, in this example we will use Soft Key 5 by clicking on the left hand side buttons on the phone picture.
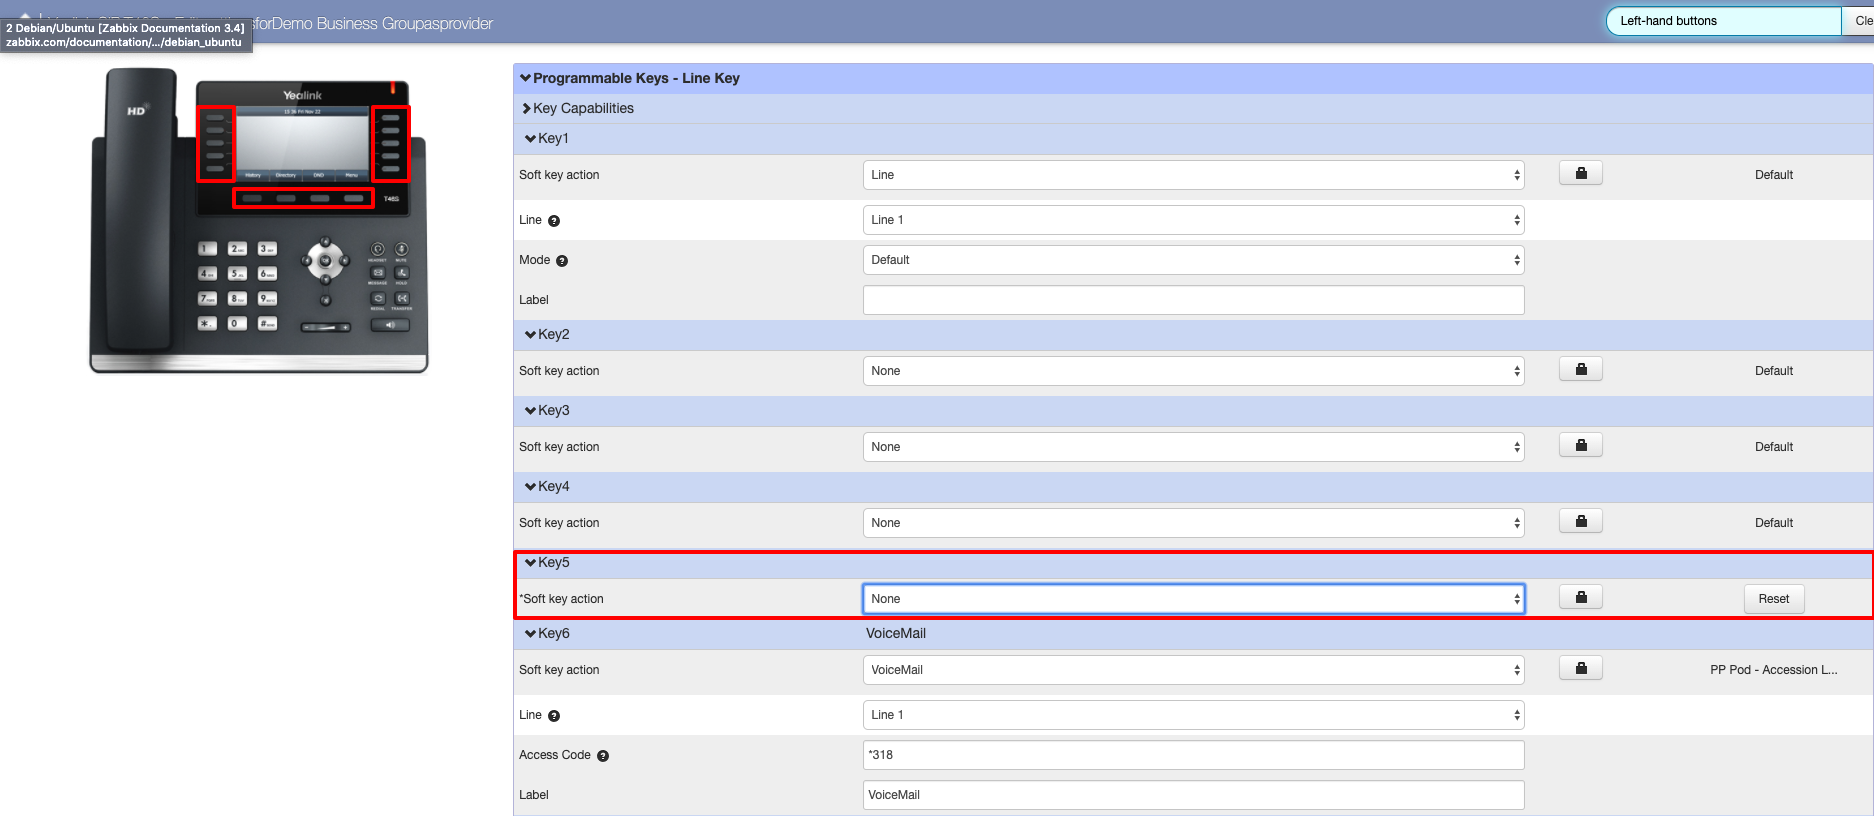
On the Soft key action drop down menu select Log Out. Then enter a Label for this soft Key we have used Log Out in this case.

Now we need to Enable Hot Desking
In the Search box in the top right this will probably say Left-hand buttons (if you have been following this guide). In the search type hot desk and select Hot Desking Log Out Enable
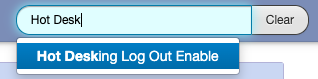
Select the Enabled button.

You should now have set the Log Out soft key and enabled Hot Desking. Now we need to save the changes. Click on Save changes in the lower right corner.
Once saved you will now need to reboot your phone for the changes to take effect. Once rebooted you should see the Log Out key that you created. View the Hot Desking Overview page more information.
|
INFO: Please note it can take up to 15 minutes for Hot Desking to be configured. If you press Log Out and after the phone reboots the user is automatically logged back in please wait until 15 minutes has passed before trying again. |
Hot Desking Snom
| INFO: This guide is showing the configuration of a Snom D785. Depending on your model of Snom your options may differ slightly but the process should be the same. |
Continuing from the Hot Desking Overview page from the Phones page click on Manage Your Phones then click on Edit on the phone model you would like to configure, in this case it is the Snom D785

| INFO: With the Snom DXXX phones you can only configure Hot Desking on the Lower right soft keys. |
With Snom phones we have 2 sections to configure
- The Log Out Key
- Enable Hot Desking
Click on the lower right keys to expand the key options, in this example we are going to configure Key 6 for the Log Out key.
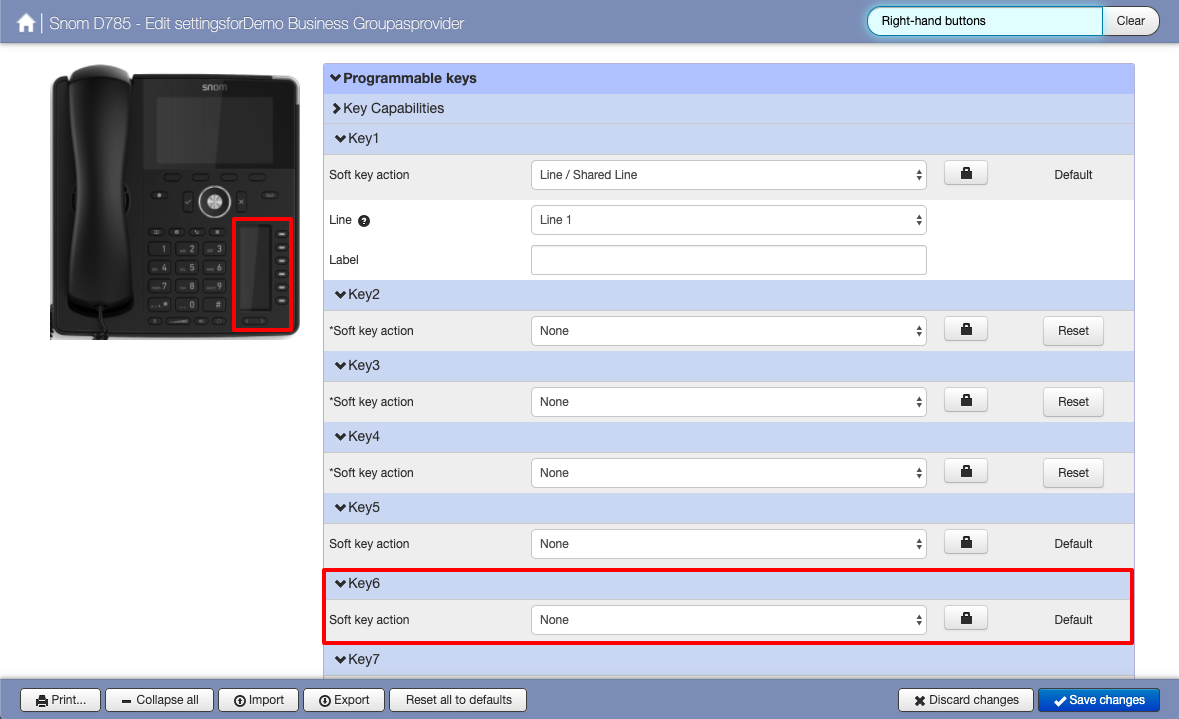
On the Soft key action drop down menu select Log Out. Then enter a Label for this soft Key we have used Log Out in this case.

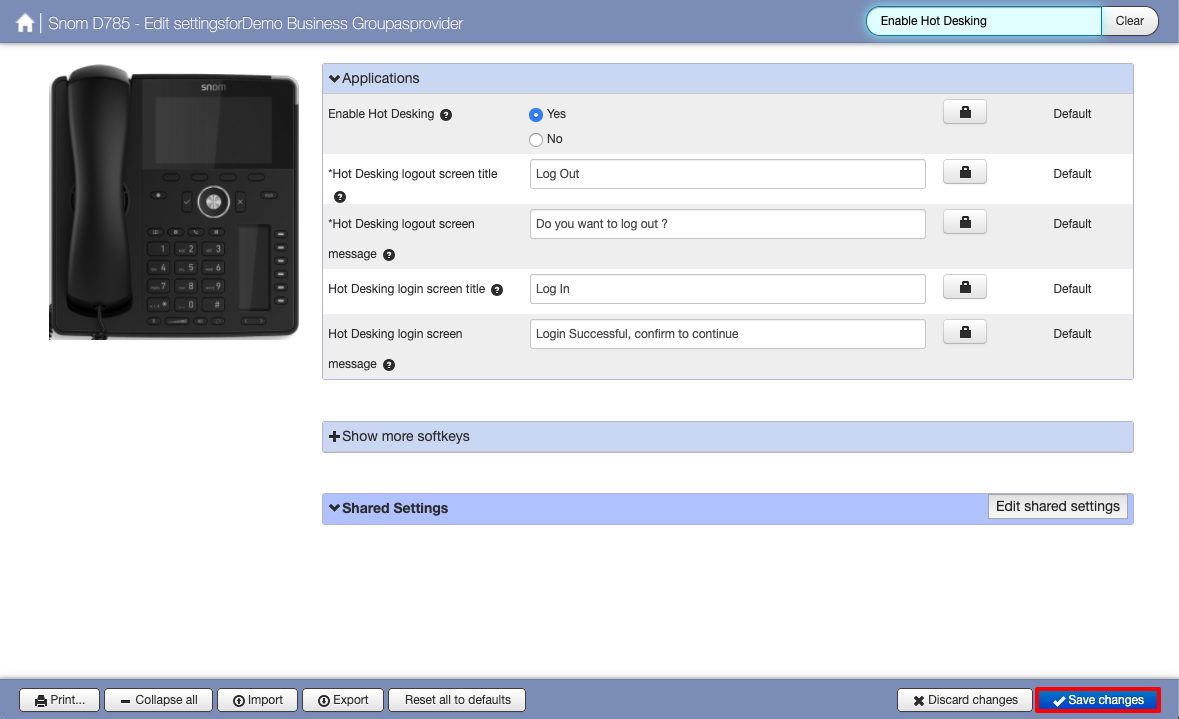
Now we need to Enable Hot Desking
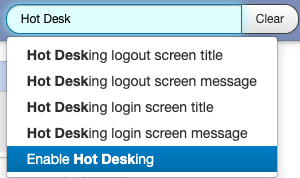
In the Search box in the top right this will probably say Left-hand buttons (if you have been following this guide). In the search type hot desk and select Enable Hot Desking
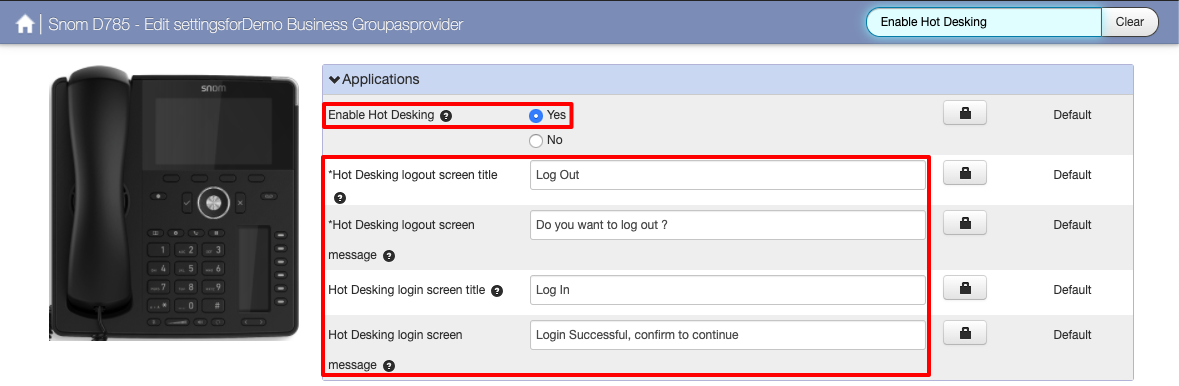
Select Yes on Enable Hot Desking
The other settings are optional:
- Hot Desking logout screen title
- Hot Desking logout screen message
- Hot Desking login screen title
- Hot Desking login screen message
You should now have set the Log Out soft key and enabled Hot Desking. Now we need to save the changes. Click on Save changes in the lower right corner.
Once saved you will now need to reboot your phone for the changes to take effect. Once rebooted you should see the Log Out key that you created. View the Hot Desking Overview page more information.
|
INFO: Please note it can take up to 15 minutes for Hot Desking to be configured. If you press Log Out and after the phone reboots the user is automatically logged back in please wait until 15 minutes has passed before trying again. |