Recommended Settings for Pod Connect for Desktop
Whist these settings are optional we do recommend that these are enable and other set to your personal preference.
To access the Pod Connect for Desktop Options:
For MAC - Click on pod connect > Preferences
For Windows - Click on Tools > Options
The Options are are slightly different on both MAC and Windows versions.
The Options will open by default on the General tab.
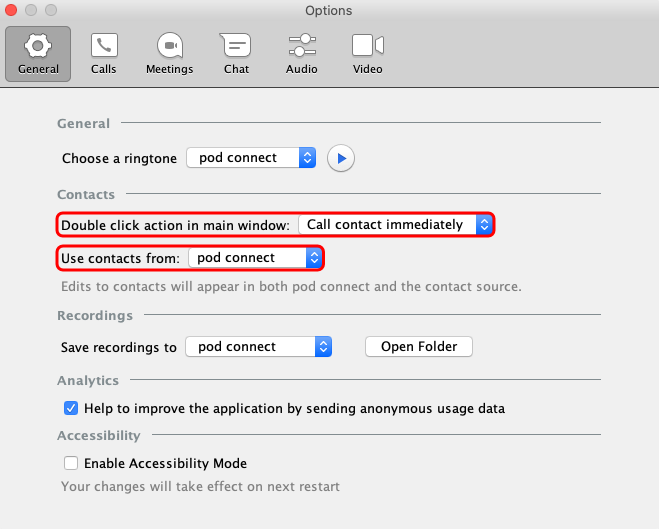
For MAC: General
Double click action in main window: You can choose what happens when you double click on a contact - This is personal preference.
- Call contact immediately (Default)
- Open a chat window
- View contact details
- Invite to meeting
Use contacts from: You can choose which contact you would like to use.
- pod connect - (Default) This will allow you to see any members within you Business Group and any contacts you have added to the CommPortal.
- Apple Contacts - You will see Business Group contacts and any Apple Contact that you have saved.
For Windows: General
Launch pod connect on startup: If ticked this will launch Pod Connect when your Windows PC?Laptop starts up.
Double click action in main window: You can choose what happens when you double click on a contact - This is personal preference.
- Call contact immediately (Default)
- Open a chat window
- View contact details
- Invite to meeting
Use contacts from: You can choose which contact you would like to use.
- pod connect - (Default) This will allow you to see any members within you Business Group and any contacts you have added to the CommPortal.
- Outlook - You will see Business Group contacts and any Outlook Contacts that you have saved.

For MAC & Windows: Calls
Enable call park: If you have Call Park enabled you will need to enable this option to be able to use it from Pod Connect for Desktop. If you do not see this option then Call Park has not been enabled.

| INFO: The Calls options are the same on both MAC and Windows. |
For MAC & Windows: Chat
By default Open the chat window when new messages are received and Display a popup when new messages are received are enabled by default. These should be left on otherwise you may miss a message.
| TIP: If you are hosting a meeting or in a meeting and using screen sharing or remote control you you may wish to disable these options. Otherwise the notifications would be displayed during your meeting. Just don't forget to enable these options again! |
Load messages when opening a new chat window: The default for this is only 10 messages, we recommend that you increase this. The maximum is 140.

For MAC & Windows: Audio
We recommend that you throughly test you microphone and speakers and/or headset. When you connect an external headset you will see pop notification on screen and it may have been auto selected.
Microphone: Select the microphone you wish to use from the drop down list. Now click Test Mic - Speak into the microphone when finished it will be played back to you.
In-call Audio: Select the In-call audio device you wish to use from the drop down list. Now click play button. This will play the default ring tone back to you.
Notifications: This is the device that will play notifications , for example an inbound call. Choose the audio device and click play.
| INFO: If you remove your headset or change it, you may need to come back to the audio options to confirm your settings. |
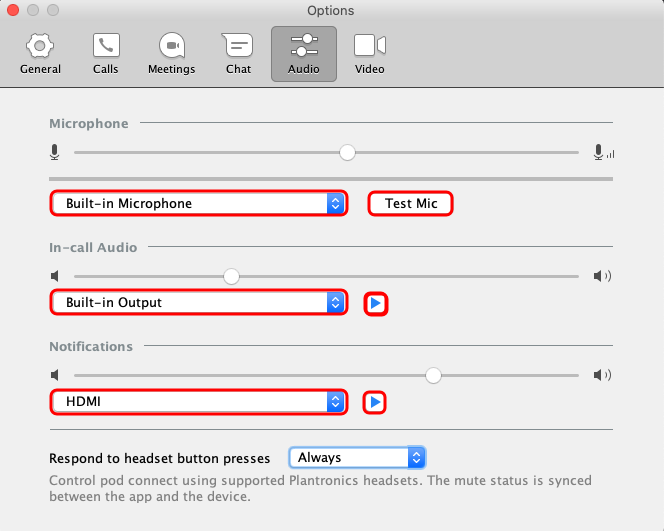
| INFO: The Audio options are the same on both MAC and Windows. |
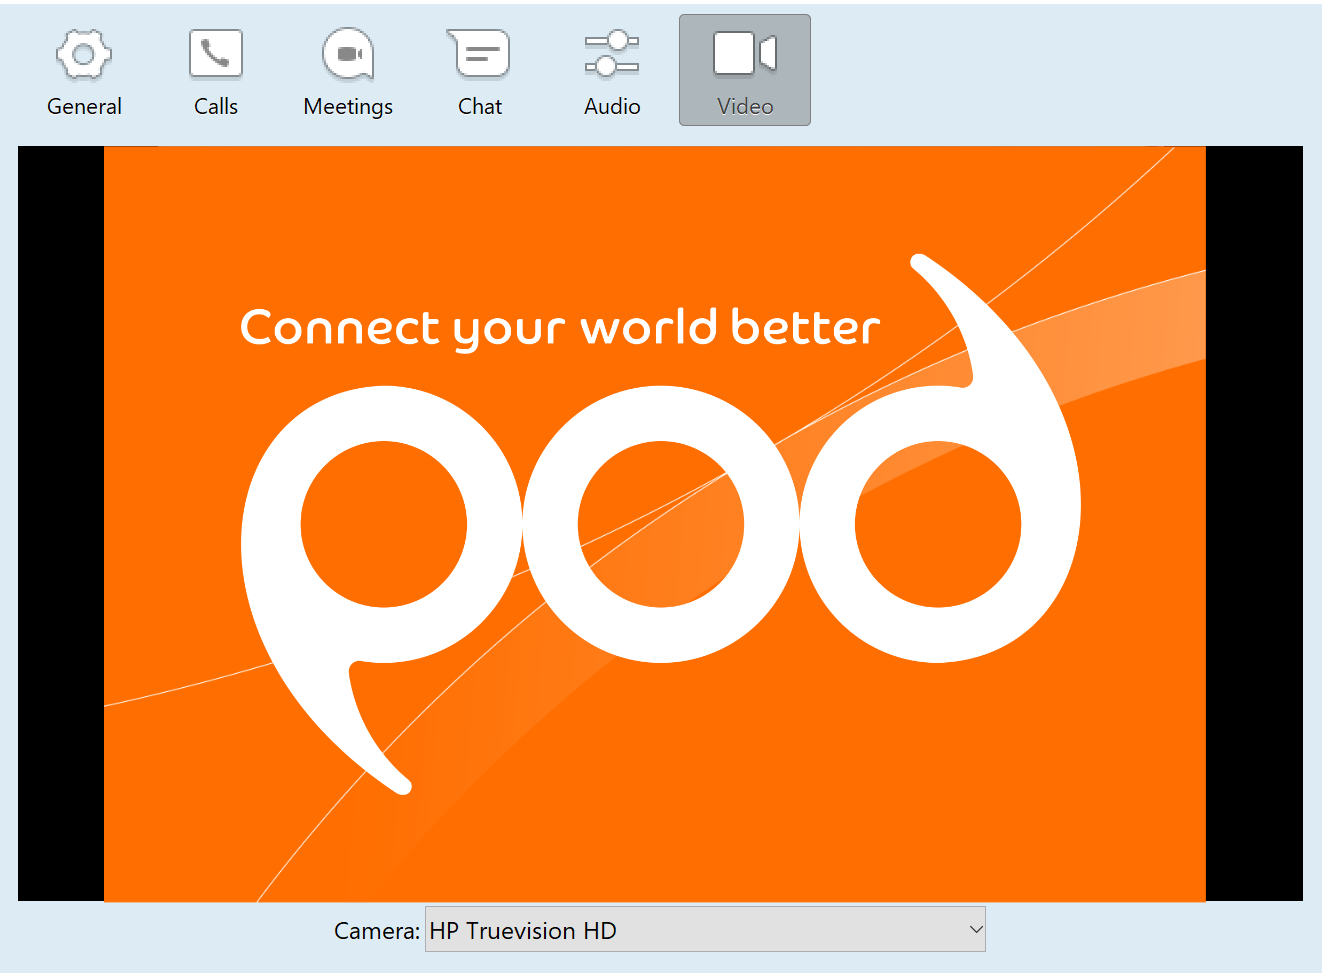
For MAC & Windows: Video
This will allow view and test you web cam
For MAC & Windows: Meetings
| INFO: If you do not have the Meeting options, please contact your Service Provider to have this enabled. |
Two options worth taking note of are Mute my microphone when joining this is turned off by default. When you join a meeting your microphone will be active. Turn off my video when joining this is enabled by default. When you join a meeting the video is not displayed to other users, you must enable this manually within the meeting.
Email invitation: This allows you to modify the content of the email invite.
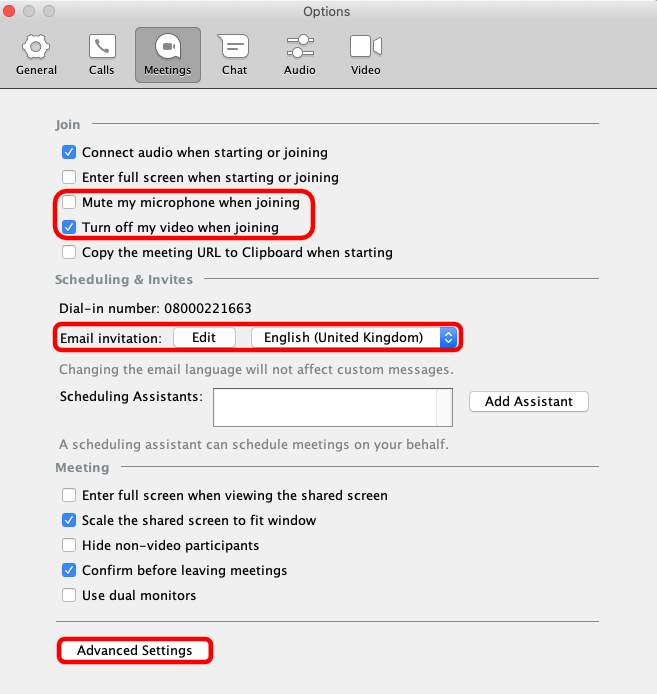
| INFO: On Windows versions you will see an option to download and install the Outlook plugin. This is optional but will give overall better integration with Outlook. |
Advanced Settings: Click on Advanced Settings this will open a new web page. The following settings are enabled by default - Some settings will be locked and cannot be change for additional security:
| INFO: The Attention Tracking option has been has been set to off and cannot be enabled. This feature has been permanently disabled and will be removed from the Options page in a future release. |
-
Require a password for Personal Meetings if attendees can join before the host
- ALWAYS ON - If the meeting organiser selects the "Enable join before host" option for a Personal Meeting, the "Require meeting password" option is also enabled. This prevents unauthorised participants from fraudulently using the meeting ID
-
Generate and require password for participants joining by phone
- ALWAYS ON - Will generate and send new passwords for newly scheduled or edited meetings.
-
End-to-end encryption
- Require that all meetings are encrypted using AES
-
Chat
- Allow meeting participants to send a message visible to all participants
-
Private chat
- Allow meeting participants to send a private 1:1 message to another participant.
-
Annotation
- Allow participants to use annotation tools to add information to shared screens
-
Remote control
- During screen sharing, the person who is sharing can allow others to control the shared content
-
Breakout room
-
Allow host to split meeting participants into separate, smaller rooms
-
-
Screen sharing
- Allow host and participants to share their screen or content during meetings
-
Waiting room
- Attendees cannot join a meeting until a host admits them individually from the waiting room. If Waiting room is enabled, the option for attendees to join the meeting before the host arrives is automatically disabled. Please see the How Do I Use Waiting Rooms document for further information.
-
Show a "Join from your browser" link
- Allow participants to bypass the Meeting application download process, and join a meeting directly from their browser. This is a workaround for participants who are unable to download, install, or run applications. Note that the meeting experience from the browser is limited.
-
Personal Link:
- We recommend that you take the time to choose a Personal Link, This can be changed at anytime. Further information can be found in How Do I Create A Personal Meeting Link (URL)?
We recommend that the you leave the above settings enabled. Feel free to enable other options to see which suits your needs best, all changes will take effect immediately.
|
INFO: With Waiting Rooms enabled as the Host you will need to manually allow participants into the meeting. See the following document How Do I Use Waiting Rooms on how to do this. If you are hosting a large Meeting you may wish to turn this feature off.
Please note that when using joining from a web browser the following web browsers are supported :
*Screen sharing on Microsoft Edge requires Windows 10 Pro or Enterprise. It is not supported on Windows 10 Home. If you are running Windows 10 Home and need to share your screen, we recommend using Chrome or Firefox. |
| INFO: To use all the listed features above you MUST install the AccessionMeetingLauncher for MAC or Windows. Note that the meeting experience from the join from browser is limited. |
Please continue to Desk Phones or if you do not use Desk Phones continue on to Voicemail Configuration.